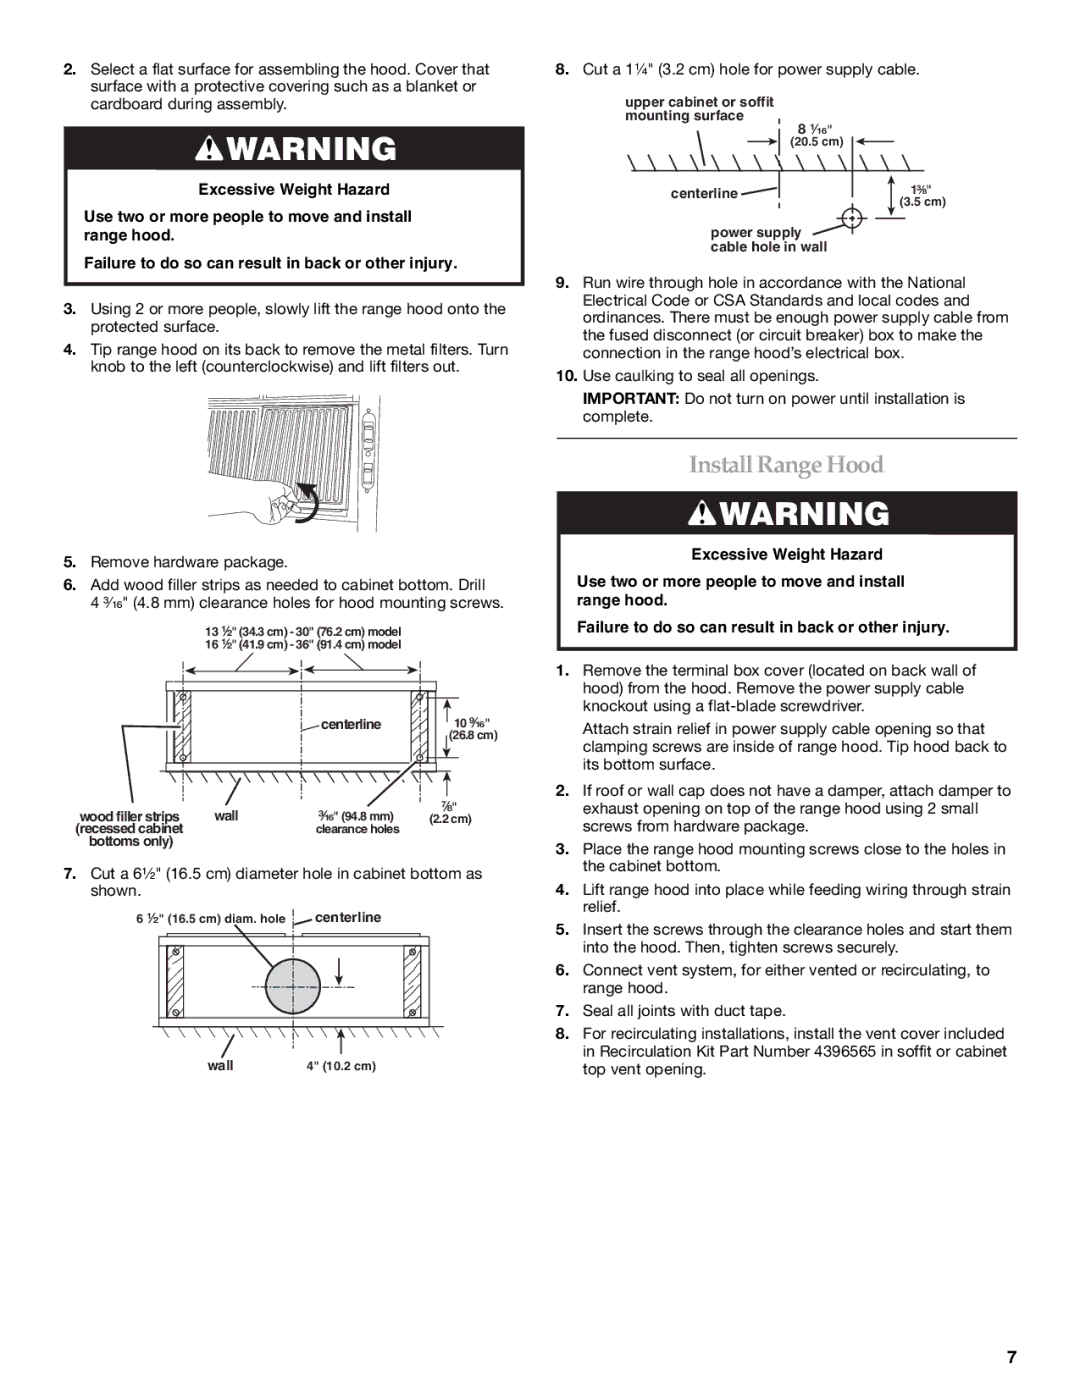
2.Select a flat surface for assembling the hood. Cover that surface with a protective covering such as a blanket or cardboard during assembly.

WARNING

Excessive Weight Hazard

Use two or more people to move and install range hood.

Failure to do so can result in back or other injury.

3.Using 2 or more people, slowly lift the range hood onto the protected surface.

4.Tip range hood on its back to remove the metal filters. Turn knob to the left (counterclockwise) and lift filters out.

5.Remove hardware package.

6.Add wood filler strips as needed to cabinet bottom. Drill

4 ³⁄₁₆" (4.8 mm) clearance holes for hood mounting screws.

13 ¹⁄₂" (34.3 cm) - 30" (76.2 cm) model 16 ¹⁄₂" (41.9 cm) - 36" (91.4 cm) model


centerline

10 ⁹⁄₁₆"


(26.8 cm)

wood filler strips

wall

³⁄₁₆" (94.8 mm)

⁷⁄₈"

(2.2 cm)

(recessed cabinet


clearance holes


bottoms only)

7.Cut a 6¹⁄₂" (16.5 cm) diameter hole in cabinet bottom as shown.

6 ¹⁄₂" (16.5 cm) diam. hole centerline

wall

4" (10.2 cm)

8.Cut a 1¹⁄₄" (3.2 cm) hole for power supply cable.

upper cabinet or soffit mounting surface

8 ¹⁄₁₆"

(20.5 cm)

centerline

1³⁄₈"


(3.5 cm)

power supply cable hole in wall

9.Run wire through hole in accordance with the National Electrical Code or CSA Standards and local codes and ordinances. There must be enough power supply cable from the fused disconnect (or circuit breaker) box to make the connection in the range hood’s electrical box.

10.Use caulking to seal all openings.

IMPORTANT: Do not turn on power until installation is complete.

Install Range Hood

WARNING

Excessive Weight Hazard

Use two or more people to move and install range hood.

Failure to do so can result in back or other injury.

1.Remove the terminal box cover (located on back wall of hood) from the hood. Remove the power supply cable knockout using a flat-blade screwdriver.

Attach strain relief in power supply cable opening so that clamping screws are inside of range hood. Tip hood back to its bottom surface.

2.If roof or wall cap does not have a damper, attach damper to exhaust opening on top of the range hood using 2 small screws from hardware package.

3.Place the range hood mounting screws close to the holes in the cabinet bottom.

4.Lift range hood into place while feeding wiring through strain relief.

5.Insert the screws through the clearance holes and start them into the hood. Then, tighten screws securely.

6.Connect vent system, for either vented or recirculating, to range hood.

7.Seal all joints with duct tape.

8.For recirculating installations, install the vent cover included in Recirculation Kit Part Number 4396565 in soffit or cabinet top vent opening.

7

Page 7
Image 7
KitchenAid 2005 installation instructions Install Range Hood, Cut a 1¹⁄₄ 3.2 cm hole for power supply cable

2005 specifications

In 2005, KitchenAid continued to establish itself as a leader in the kitchen appliance industry, innovating and enhancing its product line to cultivate a blend of style, functionality, and reliability. One of the standout products of this year was the KitchenAid Stand Mixer, which had solidified its reputation as an essential kitchen companion for both amateur cooks and professional chefs alike.

The 2005 model featured a powerful 575-watt motor that provided ample torque, allowing users to effortlessly mix even the thickest doughs. This enhanced motor capability was complemented by 10 different speed settings, enabling cooks to tailor their mixing to the specific needs of various recipes, from whipping cream to kneading bread.

One of the hallmark characteristics of KitchenAid stand mixers was their distinctive and iconic design. The 2005 models maintained a classic aesthetic while offering a wide palette of colors to suit any kitchen décor. Additionally, their durable metal construction promised longevity, making them not only a functional tool but also a stylish addition to countertops.

Another notable feature was the versatility of these mixers. The 2005 lineup had various attachments and accessories available, including a food grinder, pasta maker, and vegetable slicer, all of which expanded the mixer’s utility beyond simple mixing tasks. This adaptability encouraged creativity in the kitchen and promoted the idea of homemade meals.

KitchenAid also emphasized ease of use and convenience in their 2005 models. The tilting head design allowed for easy access to the bowl, simplifying the process of adding ingredients. Moreover, the bowl-lift design provided stability, particularly useful for larger batches and heavier mixtures.

The brand also integrated advanced technologies into their stand mixers, ensuring consistent performance. For instance, the unique planetary mixing action guaranteed thorough mixing by allowing the beater to spin in one direction while the shaft rotated in the opposite direction—ensuring that every ingredient was evenly incorporated.

In summary, KitchenAid's 2005 offerings combined powerful performance, stunning design, and innovative technology, making their appliances a beloved choice among culinary enthusiasts. The focus on durability and versatility transformed the everyday kitchen experience, solidifying KitchenAid's reputation for excellence in the realm of kitchen appliances.