Undercounter Installation

NOTE: Installation hardware is not provided with full cabinet models.

1.Measure the height of your cabinet opening. The top of the compactor should be at least ¹₈ " (3 mm) from the top of the cabinet opening.

The rear wheels are preset for a cabinet opening height of 34¹⁄₄" (87 cm) (Position 1).

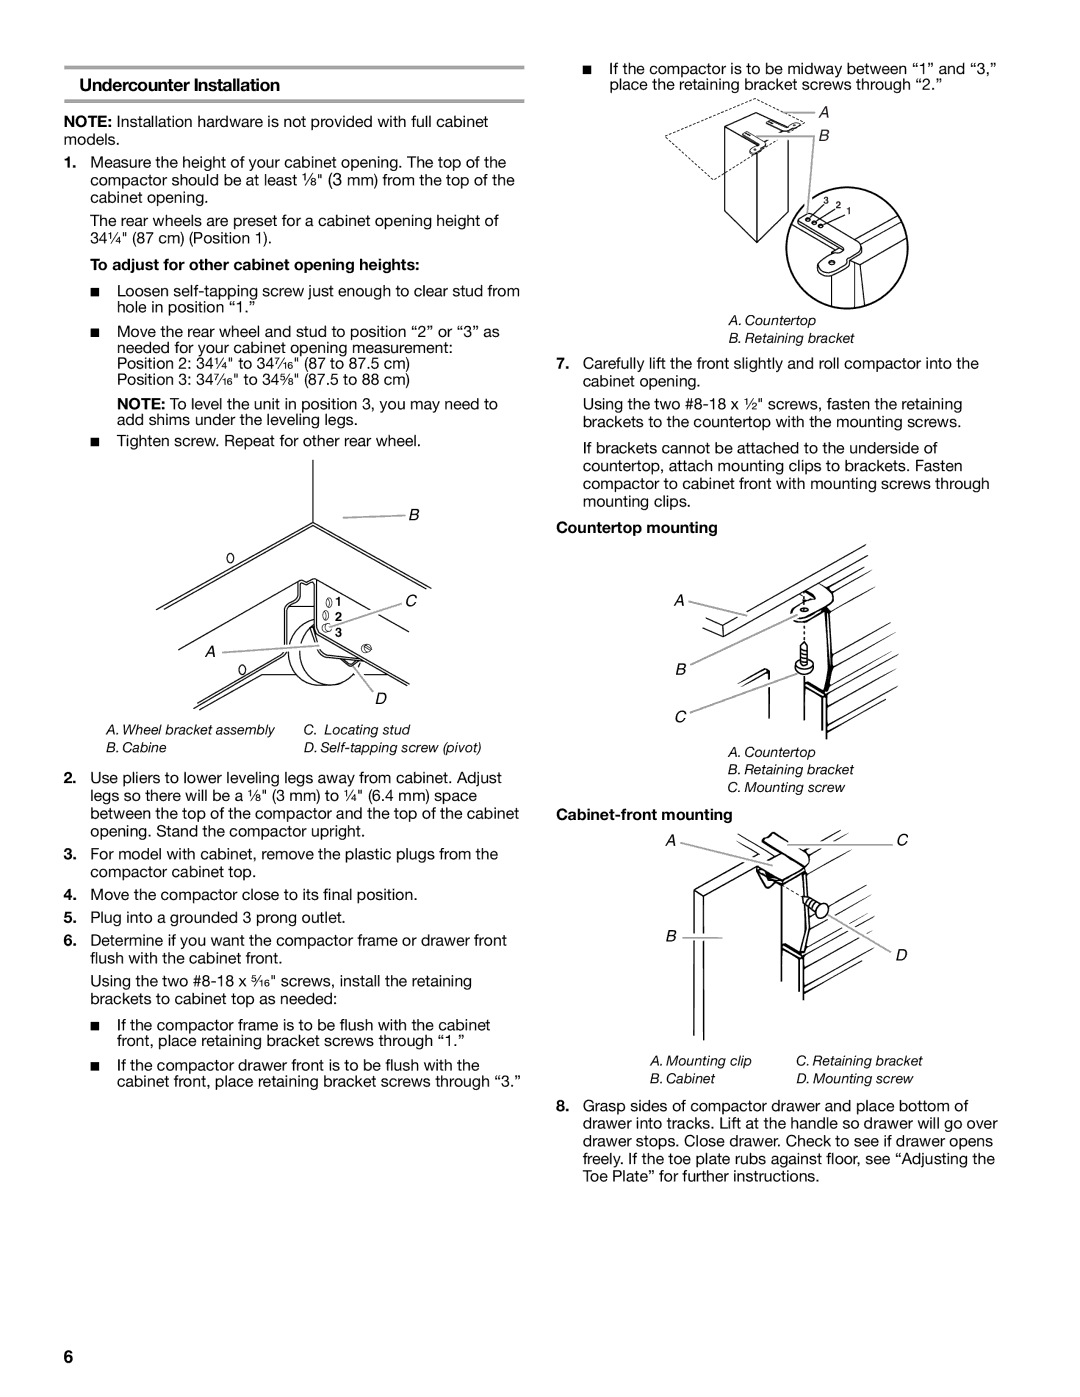
To adjust for other cabinet opening heights:

Loosen self-tapping screw just enough to clear stud from hole in position “1.”

Move the rear wheel and stud to position “2” or “3” as needed for your cabinet opening measurement: Position 2: 34¹⁄₄" to 34⁷⁄₁₆" (87 to 87.5 cm)

Position 3: 34⁷⁄₁₆" to 34⁵⁄₈" (87.5 to 88 cm)

NOTE: To level the unit in position 3, you may need to add shims under the leveling legs.

Tighten screw. Repeat for other rear wheel.

B

1C

2

3

A


D

A. Wheel bracket assembly

C. Locating stud

B. Cabine

D. Self-tapping screw (pivot)

2.Use pliers to lower leveling legs away from cabinet. Adjust legs so there will be a ¹⁄₈" (3 mm) to ¹₄ " (6.4 mm) space between the top of the compactor and the top of the cabinet opening. Stand the compactor upright.

3.For model with cabinet, remove the plastic plugs from the compactor cabinet top.

4.Move the compactor close to its final position.

5.Plug into a grounded 3 prong outlet.

6.Determine if you want the compactor frame or drawer front flush with the cabinet front.

Using the two #8-18 x ⁵₁₆ " screws, install the retaining brackets to cabinet top as needed:

If the compactor frame is to be flush with the cabinet front, place retaining bracket screws through “1.”

If the compactor drawer front is to be flush with the cabinet front, place retaining bracket screws through “3.”

If the compactor is to be midway between “1” and “3,” place the retaining bracket screws through “2.”

A

B

3 2 1

A.Countertop

B.Retaining bracket

7.Carefully lift the front slightly and roll compactor into the cabinet opening.

Using the two #8-18 x ¹₂ " screws, fasten the retaining brackets to the countertop with the mounting screws.

If brackets cannot be attached to the underside of countertop, attach mounting clips to brackets. Fasten compactor to cabinet front with mounting screws through mounting clips.

Countertop mounting

A

B

C

A.Countertop

B.Retaining bracket

C.Mounting screw

Cabinet-front mounting

A C

B

D

A. Mounting clip

C. Retaining bracket

B. Cabinet

D. Mounting screw

8.Grasp sides of compactor drawer and place bottom of drawer into tracks. Lift at the handle so drawer will go over drawer stops. Close drawer. Check to see if drawer opens freely. If the toe plate rubs against floor, see “Adjusting the Toe Plate” for further instructions.

6

Page 6
Image 6
KitchenAid 9871915A manual Undercounter Installation, To adjust for other cabinet opening heights, Countertop mounting

9871915A specifications

The KitchenAid 9871915A is a versatile and robust kitchen appliance designed to elevate your culinary experience. As a part of KitchenAid’s renowned lineup, this model showcases a blend of performance, functionality, and style, making it an essential addition to any modern kitchen.

One of the standout features of the KitchenAid 9871915A is its powerful motor, which ensures that it can handle a variety of tasks with ease. From mixing thick doughs to whipping egg whites, this appliance excels in delivering consistent results. The motor is designed to provide optimal torque, allowing for efficient blending and mixing, regardless of the recipe complexity.

The 9871915A also boasts multiple speed settings, providing flexibility for different mixing requirements. You can choose from a range of speeds to suit your culinary needs, whether you’re gently folding ingredients or mixing at high speeds for optimal incorporation. This level of control ensures precision in your cooking, allowing chefs of all skill levels to achieve the perfect consistency and texture.

Another highlight of this KitchenAid appliance is its innovative design, which includes a tilt-head mechanism making it easy to access the bowl and ingredients. This feature simplifies the process of adding components during mixing, allowing users to multitask efficiently. The bowl is typically made from high-quality stainless steel, ensuring durability and easy cleanup.

Additionally, the KitchenAid 9871915A is compatible with a wide range of attachments, expanding its versatility beyond mixing. Users can enhance their cooking capabilities with attachments for slicing, grinding, and more, transforming this kitchen staple into a multi-functional powerhouse.

Furthermore, the aesthetic appeal of the 9871915A cannot be overlooked. It comes in various colors and finishes, making it easy to match any kitchen décor. Its sleek and professional appearance adds a touch of elegance to the countertop.

Safety is also a key characteristic of the KitchenAid 9871915A. It incorporates features such as a locking mechanism during operation, ensuring a secure and stable process.

In summary, the KitchenAid 9871915A is an exemplary model that resonates with both amateur cooks and seasoned chefs. Its powerful motor, multiple speed settings, and versatile design make it a formidable tool in any culinary arsenal, and its aesthetic appeal enhances any kitchen environment. This appliance not only represents quality and performance but also embodies the innovation that KitchenAid is known for.