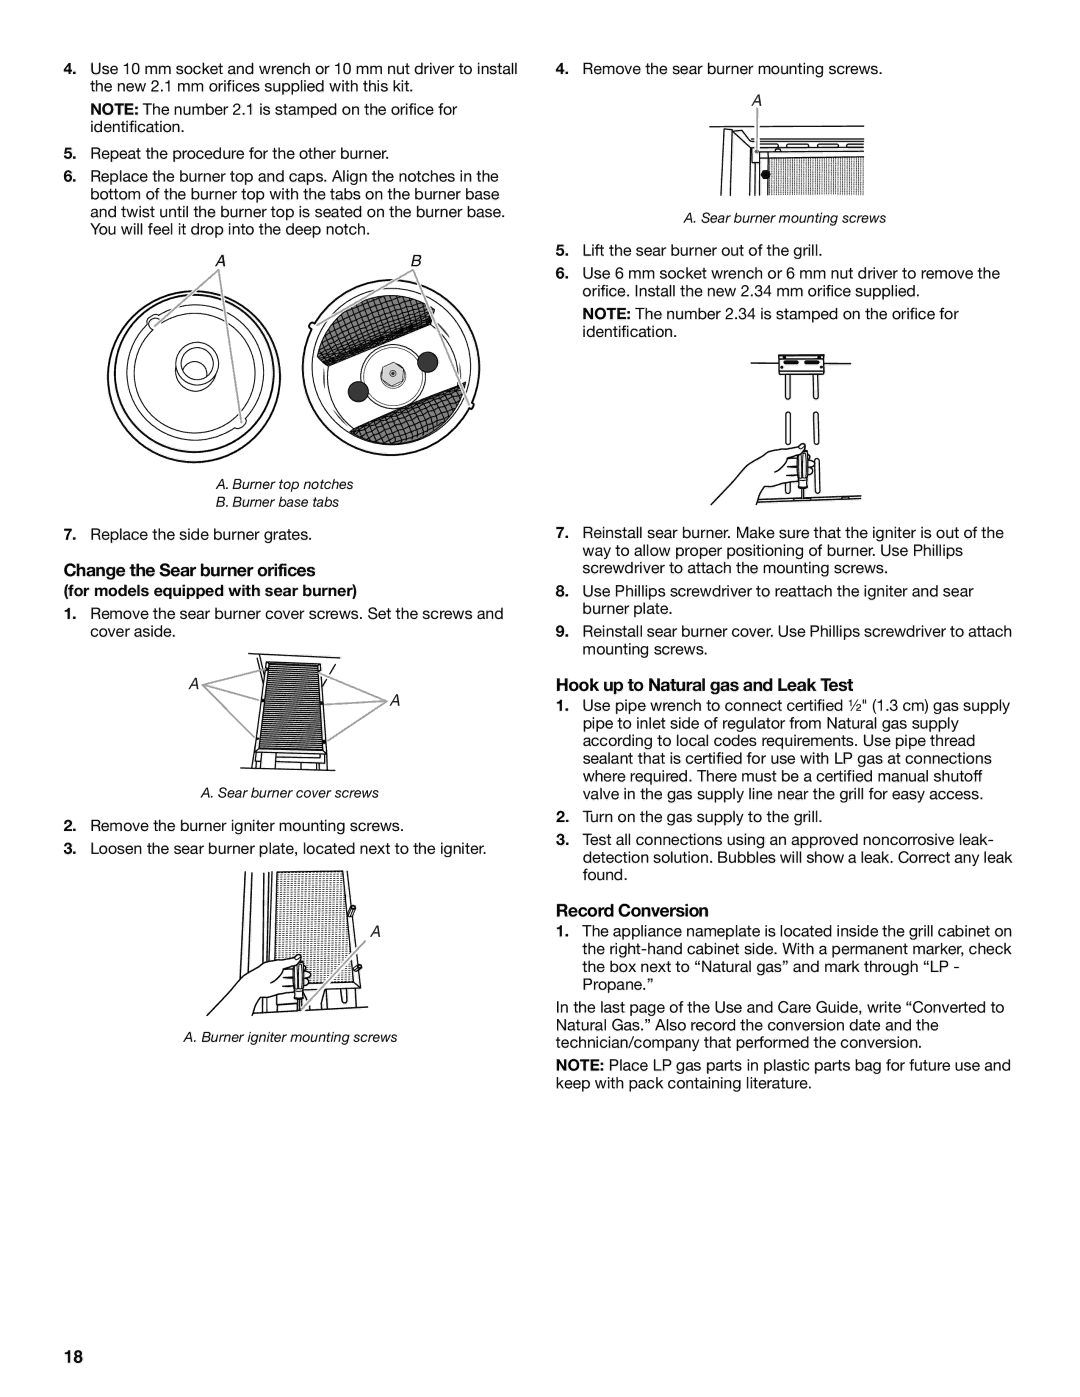
4.Use 10 mm socket and wrench or 10 mm nut driver to install the new 2.1 mm orifices supplied with this kit.

NOTE: The number 2.1 is stamped on the orifice for identification.

5.Repeat the procedure for the other burner.

6.Replace the burner top and caps. Align the notches in the bottom of the burner top with the tabs on the burner base and twist until the burner top is seated on the burner base. You will feel it drop into the deep notch.

AB

A. Burner top notches

B. Burner base tabs

7.Replace the side burner grates.

Change the Sear burner orifices

(for models equipped with sear burner)

1.Remove the sear burner cover screws. Set the screws and cover aside.

A

A

A. Sear burner cover screws

2.Remove the burner igniter mounting screws.

3.Loosen the sear burner plate, located next to the igniter.

A

A. Burner igniter mounting screws

4.Remove the sear burner mounting screws.

A

A. Sear burner mounting screws

5.Lift the sear burner out of the grill.

6.Use 6 mm socket wrench or 6 mm nut driver to remove the orifice. Install the new 2.34 mm orifice supplied.

NOTE: The number 2.34 is stamped on the orifice for identification.

7.Reinstall sear burner. Make sure that the igniter is out of the way to allow proper positioning of burner. Use Phillips screwdriver to attach the mounting screws.

8.Use Phillips screwdriver to reattach the igniter and sear burner plate.

9.Reinstall sear burner cover. Use Phillips screwdriver to attach mounting screws.

Hook up to Natural gas and Leak Test

1.Use pipe wrench to connect certified ¹⁄₂" (1.3 cm) gas supply pipe to inlet side of regulator from Natural gas supply according to local codes requirements. Use pipe thread sealant that is certified for use with LP gas at connections where required. There must be a certified manual shutoff valve in the gas supply line near the grill for easy access.

2.Turn on the gas supply to the grill.

3.Test all connections using an approved noncorrosive leak- detection solution. Bubbles will show a leak. Correct any leak found.

Record Conversion

1.The appliance nameplate is located inside the grill cabinet on the right-hand cabinet side. With a permanent marker, check the box next to “Natural gas” and mark through “LP - Propane.”

In the last page of the Use and Care Guide, write “Converted to Natural Gas.” Also record the conversion date and the technician/company that performed the conversion.

NOTE: Place LP gas parts in plastic parts bag for future use and keep with pack containing literature.

18

Page 18
Image 18
KitchenAid KFRS271TSS, KFRU368VSS, KFRU488VSS Change the Sear burner orifices, Hook up to Natural gas and Leak Test

KFRU271VSS, KFRU368VSS, KFRU365VSS, KFRU361VSS, KFRS271TSS specifications

The KitchenAid KFRU488TSS, KFRU488VSS, KFRS361TSS, KFRU368TSS, and KFRS271TSS represent a range of high-performance refrigerators designed for modern kitchens that demand style, functionality, and advanced technology. Each model is fortified with unique features that cater to various culinary needs while showcasing KitchenAid's commitment to quality and innovation.

The KFRU488TSS and KFRU488VSS are distinguished by their spacious French door design, which offers unparalleled access to fresh and frozen foods. Both models feature a generous capacity, allowing users to store large quantities of groceries effortlessly. A key highlight is the Preserva Food Care System, which uses a combination of a two-tiered cooling system and humidity-controlled crisper drawers to maintain optimal conditions for different food types. This technology extends the freshness of produce and prevents cross-contamination of odors.

The KFRS361TSS and KFRU368TSS models come equipped with the signature KitchenAid salt/pepper shakers and ice dispensers, bridging practicality with design. They boast the ExtendFresh Temperature Management System that monitors and adjusts temperatures in both fresh and frozen compartments, ensuring food retains its taste and texture. Additionally, these refrigerators feature an internal water dispenser, giving convenient access to chilled water without sacrificing space on the door.

For consumers focused on energy efficiency, the KFRS271TSS stands out with its Energy Star certification, signifying lower energy consumption without compromising performance. This model also incorporates a sleek, stainless steel finish that not only complements any kitchen aesthetic but also resists fingerprints and smudges for easy maintenance.

Another commonality among these KitchenAid models is their intuitive digital controls, which allow for precise temperature regulation and user-friendly navigation of different settings. Moreover, the LED lighting illuminates every corner of the refrigerator, making it easy to locate items.

In summary, the KitchenAid KFRU488TSS, KFRU488VSS, KFRS361TSS, KFRU368TSS, and KFRS271TSS embody a fusion of style, technology, and practicality, catering to the needs of modern households. With advanced preservation systems, energy efficiency, and user-centric features, these refrigerators exemplify KitchenAid's dedication to enhancing the culinary experience.