Check and Adjustthe Burners

The burners are tested and factory-set for most efficient operation. However, variations in gas supply and other conditions may make minor adjustments to air shutter or low flame setting necessary.

It is recommended that a qualified person make burner adjustments.

NOTE: The rotisserie burner cannot be adjusted.

Checking and adjusting the grill burner flames requires removing the grate and sear plates.

Burner Flame Characteristics

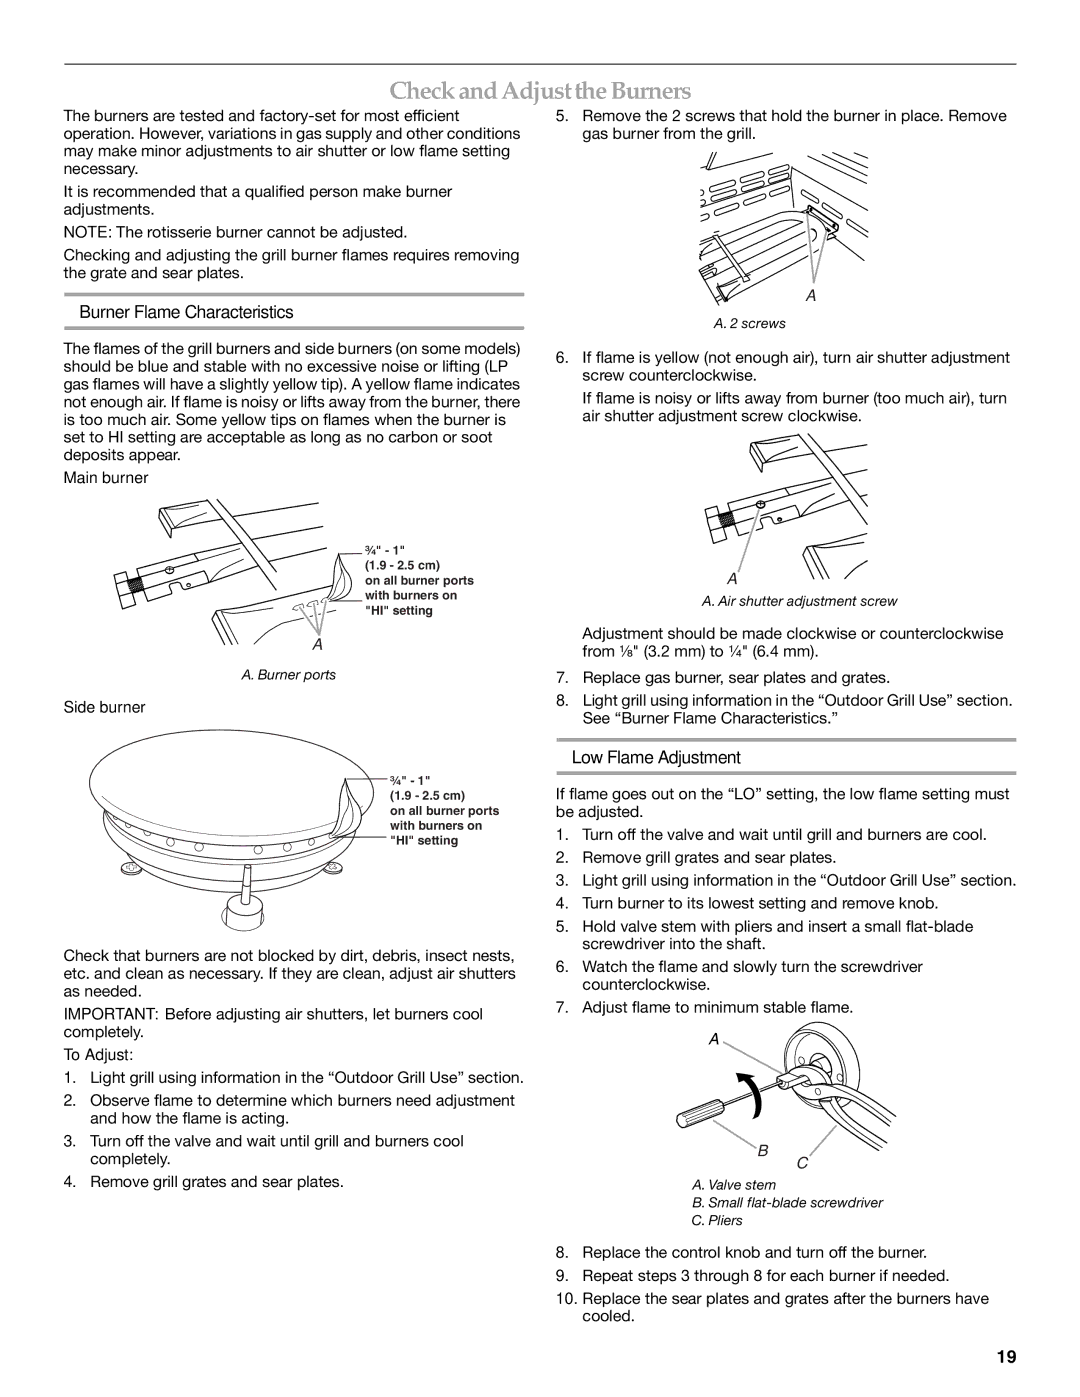
5.Remove the 2 screws that hold the burner in place. Remove gas burner from the grill.

A

A. 2 screws

The flames of the grill burners and side burners (on some models) should be blue and stable with no excessive noise or lifting (LP gas flames will have a slightly yellow tip). A yellow flame indicates not enough air. If flame is noisy or lifts away from the burner, there is too much air. Some yellow tips on flames when the burner is set to HI setting are acceptable as long as no carbon or soot deposits appear.

Main burner

6.If flame is yellow (not enough air), turn air shutter adjustment screw counterclockwise.

If flame is noisy or lifts away from burner (too much air), turn air shutter adjustment screw clockwise.

³⁄₄" - 1"

(1.9 - 2.5 cm)

on all burner ports with burners on "HI" setting

A

A. Burner ports

Side burner

A

A. Air shutter adjustment screw

Adjustment should be made clockwise or counterclockwise from ¹⁄₈" (3.2 mm) to ¹⁄₄" (6.4 mm).

7.Replace gas burner, sear plates and grates.

8.Light grill using information in the “Outdoor Grill Use” section. See “Burner Flame Characteristics.”

³⁄₄" - 1"

(1.9 - 2.5 cm)

on all burner ports with burners on "HI" setting

Check that burners are not blocked by dirt, debris, insect nests, etc. and clean as necessary. If they are clean, adjust air shutters as needed.

IMPORTANT: Before adjusting air shutters, let burners cool completely.

To Adjust:

1.Light grill using information in the “Outdoor Grill Use” section.

2.Observe flame to determine which burners need adjustment and how the flame is acting.

3.Turn off the valve and wait until grill and burners cool completely.

4.Remove grill grates and sear plates.

Low Flame Adjustment

If flame goes out on the “LO” setting, the low flame setting must be adjusted.

1.Turn off the valve and wait until grill and burners are cool.

2.Remove grill grates and sear plates.

3.Light grill using information in the “Outdoor Grill Use” section.

4.Turn burner to its lowest setting and remove knob.

5.Hold valve stem with pliers and insert a small flat-blade screwdriver into the shaft.

6.Watch the flame and slowly turn the screwdriver counterclockwise.

7.Adjust flame to minimum stable flame.

A

B

C

A. Valve stem

B.Small flat-blade screwdriver

C.Pliers

8.Replace the control knob and turn off the burner.

9.Repeat steps 3 through 8 for each burner if needed.

10.Replace the sear plates and grates after the burners have cooled.

19

Page 19
Image 19
KitchenAid KFRU368TSS, KFRU368VSS Check and Adjustthe Burners, Burner Flame Characteristics, Low Flame Adjustment

KFRU271VSS, KFRU368VSS, KFRU365VSS, KFRU361VSS, KFRS271TSS specifications

The KitchenAid KFRU488TSS, KFRU488VSS, KFRS361TSS, KFRU368TSS, and KFRS271TSS represent a range of high-performance refrigerators designed for modern kitchens that demand style, functionality, and advanced technology. Each model is fortified with unique features that cater to various culinary needs while showcasing KitchenAid's commitment to quality and innovation.

The KFRU488TSS and KFRU488VSS are distinguished by their spacious French door design, which offers unparalleled access to fresh and frozen foods. Both models feature a generous capacity, allowing users to store large quantities of groceries effortlessly. A key highlight is the Preserva Food Care System, which uses a combination of a two-tiered cooling system and humidity-controlled crisper drawers to maintain optimal conditions for different food types. This technology extends the freshness of produce and prevents cross-contamination of odors.

The KFRS361TSS and KFRU368TSS models come equipped with the signature KitchenAid salt/pepper shakers and ice dispensers, bridging practicality with design. They boast the ExtendFresh Temperature Management System that monitors and adjusts temperatures in both fresh and frozen compartments, ensuring food retains its taste and texture. Additionally, these refrigerators feature an internal water dispenser, giving convenient access to chilled water without sacrificing space on the door.

For consumers focused on energy efficiency, the KFRS271TSS stands out with its Energy Star certification, signifying lower energy consumption without compromising performance. This model also incorporates a sleek, stainless steel finish that not only complements any kitchen aesthetic but also resists fingerprints and smudges for easy maintenance.

Another commonality among these KitchenAid models is their intuitive digital controls, which allow for precise temperature regulation and user-friendly navigation of different settings. Moreover, the LED lighting illuminates every corner of the refrigerator, making it easy to locate items.

In summary, the KitchenAid KFRU488TSS, KFRU488VSS, KFRS361TSS, KFRU368TSS, and KFRS271TSS embody a fusion of style, technology, and practicality, catering to the needs of modern households. With advanced preservation systems, energy efficiency, and user-centric features, these refrigerators exemplify KitchenAid's dedication to enhancing the culinary experience.