8.After the cleaning cycle is complete, remove the drain cap from the water pan. Look for any cleaning solution left in the water pan. If cleaning solution drains from the water pan, you should run the clean cycle again. Be sure to refill the water pan with cleaner before starting the clean cycle again. Be sure to replace the drain cap securely on the water pan. If the drain cap is loose, water will empty from the water pan and you will have either thin ice or no ice.

NOTE: Severe scale buildup may require repeated cleaning with a fresh quantity of cleaning solution.

9.Press the ON/OFF button to resume ice production.

Condenser

A Dirty or Clogged Condenser

Obstructs proper airflow.

Reduces ice making capacity.

Causes higher than recommended operating temperatures which may lead to component failure.

WARNING

Electrical Shock Hazard

Disconnect power before cleaning.

Replace all parts and panels before operating.

Failure to do so can result in death or electrical shock.

1.Unplug ice maker or disconnect power.

2.Remove the 2 screws in the lower access panel and the

2 screws from the base grille area of the front panel support.

3.Pull the bottom forward and then pull down to remove the lower access panel.

4.Remove dirt and lint from the condenser fins and the unit compartment with a brush attachment on a vacuum cleaner.

A

A. Condenser fins

5.Replace the lower access panel using the 4 screws.

6.Plug in ice maker or reconnect power.

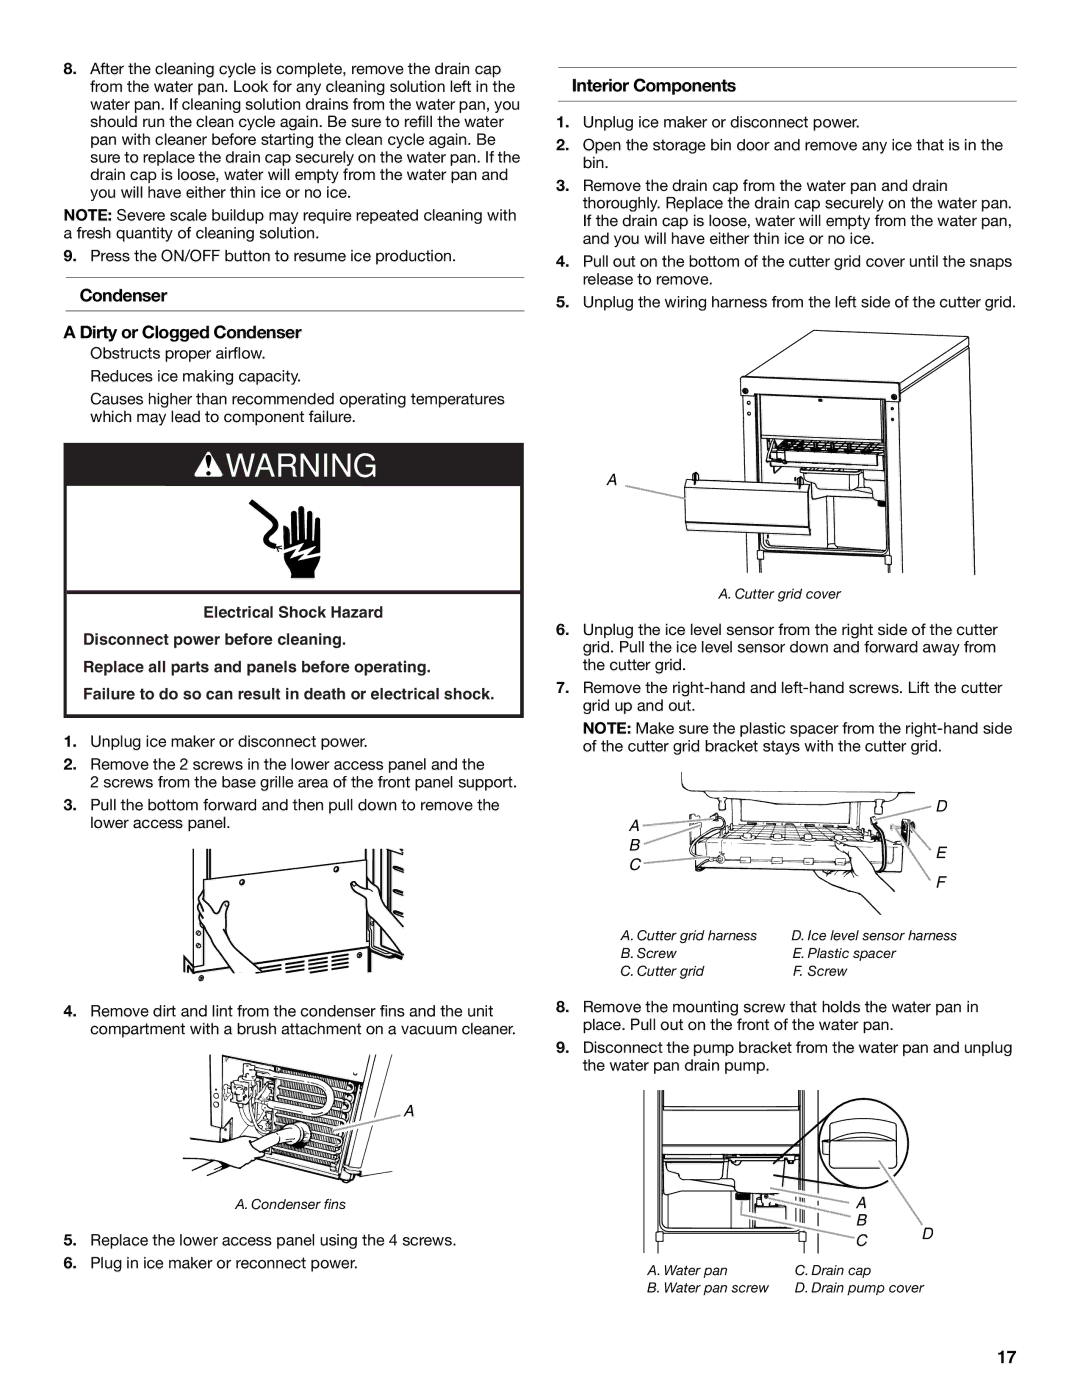
Interior Components

1.Unplug ice maker or disconnect power.

2.Open the storage bin door and remove any ice that is in the bin.

3.Remove the drain cap from the water pan and drain thoroughly. Replace the drain cap securely on the water pan. If the drain cap is loose, water will empty from the water pan, and you will have either thin ice or no ice.

4.Pull out on the bottom of the cutter grid cover until the snaps release to remove.

5.Unplug the wiring harness from the left side of the cutter grid.

A

A. Cutter grid cover

6.Unplug the ice level sensor from the right side of the cutter grid. Pull the ice level sensor down and forward away from the cutter grid.

7.Remove the right-hand and left-hand screws. Lift the cutter grid up and out.

NOTE: Make sure the plastic spacer from the right-hand side of the cutter grid bracket stays with the cutter grid.


D

A


B

E

C

F


A. Cutter grid harness

D. Ice level sensor harness

B. Screw

E. Plastic spacer

C. Cutter grid

F. Screw

8.Remove the mounting screw that holds the water pan in place. Pull out on the front of the water pan.

9.Disconnect the pump bracket from the water pan and unplug the water pan drain pump.

A


B

D

C


A. Water pan

C. Drain cap

B. Water pan screw

D. Drain pump cover

17

Page 17
Image 17
KitchenAid W10520792B manual Condenser Dirty or Clogged Condenser, Interior Components

W10520792B specifications

The KitchenAid W10520792B is an innovative component designed to elevate your culinary experience. This replacement part is particularly known for its reliability and efficiency, ensuring that your KitchenAid appliances function optimally. One of the main features of the W10520792B is its compatibility with various KitchenAid models, which makes it a versatile choice for users seeking to maintain their kitchen equipment in peak condition.

One notable characteristic of the W10520792B is its durable construction. Made from high-quality materials, it is designed to withstand the rigors of daily cooking tasks, providing longevity and consistent performance. This durability means that home chefs can rely on this part to perform under pressure, whether mixing, kneading, or whipping.

The W10520792B showcases KitchenAid's commitment to innovative design. The part utilizes advanced manufacturing techniques to ensure precision, which contributes to the overall efficiency of KitchenAid appliances. This attention to detail not only enhances the functionality of the equipment but also allows users to enjoy a more seamless cooking experience.

Another essential technology found within the W10520792B is its user-friendly installation process. Designed with the homeowner in mind, this component can typically be replaced without the need for professional assistance, saving both time and money. Clear instructional guidelines usually accompany the part, enabling even less experienced users to successfully complete the replacement with ease.

Moreover, the W10520792B is part of KitchenAid's commitment to sustainability. The materials used are often environmentally friendly, ensuring that customers can maintain their appliances while being conscious of their ecological footprint. This quality appeals to consumers who value both performance and environmental responsibility in their kitchen tools.

In summary, the KitchenAid W10520792B is an essential component that embodies quality, durability, and innovation. Its compatibility with various models, user-friendly installation, and sustainable materials make it an excellent choice for maintaining the high performance of KitchenAid appliances. Home cooks can rely on this part to enhance their cooking experience, allowing them to create delicious meals with confidence. Whether you are an aspiring chef or a seasoned culinary expert, the W10520792B is sure to play a pivotal role in your kitchen adventures.