Kodak EasyShare CX6200 digital camera User’s Guide
Eastman Kodak Company 343 State Street Rochester, New York
Front View
Back View
Side View
Top and Bottom Views
Table of Contents
Taking Videos
Formatting Internal Memory or SD/MMC Card
Viii
Getting Help
Page
Getting Started
Install Software First
Need This User Guide in Larger Print?
What Can I Do With My Pictures and Videos?
What Can I Do With My Camera?
Package Contents
Loading the Batteries
Attaching the Wrist Strap
Turning the Camera On and Off
Using the OK and Controller Buttons
Enter Liveview or off
If you want to Then do this
Turn off the camera
Setting the Date & Time, First Time
Setting the Date and Time
Setting the Date & Time, Anytime
Checking Camera Status
Capture Modes Camera/Picture Status
Camera Screen Icons
Inserting an SD/MMC Card
Choosing Internal Memory or SD/MMC Card
Managing Your Storage Location Setting
Internal Memory
Checking a Picture or Video’s Location
Checking Your Storage Setting
Any capture mode, press
Memory Card
Kodak Battery Replacement Types/Battery Life
Important Battery Information
Battery Safety and Handling
Extending Battery Life
Page
Take a Picture
Taking Pictures
Liveview-Framing with the Camera Screen
Important Liveview significantly reduces battery life
Quickview-Reviewing the Picture Just Taken
Using the Digital Zoom
Setting the Flash Mode
Using the Flash
To Access the Capture Menu
To Return to Capture From Another Mode
Changing Picture-Taking Options
Capture Menus
Putting Yourself in the Picture
Self Timer icon appears in the status area
Setting Exposure Compensation
Appears in the status area
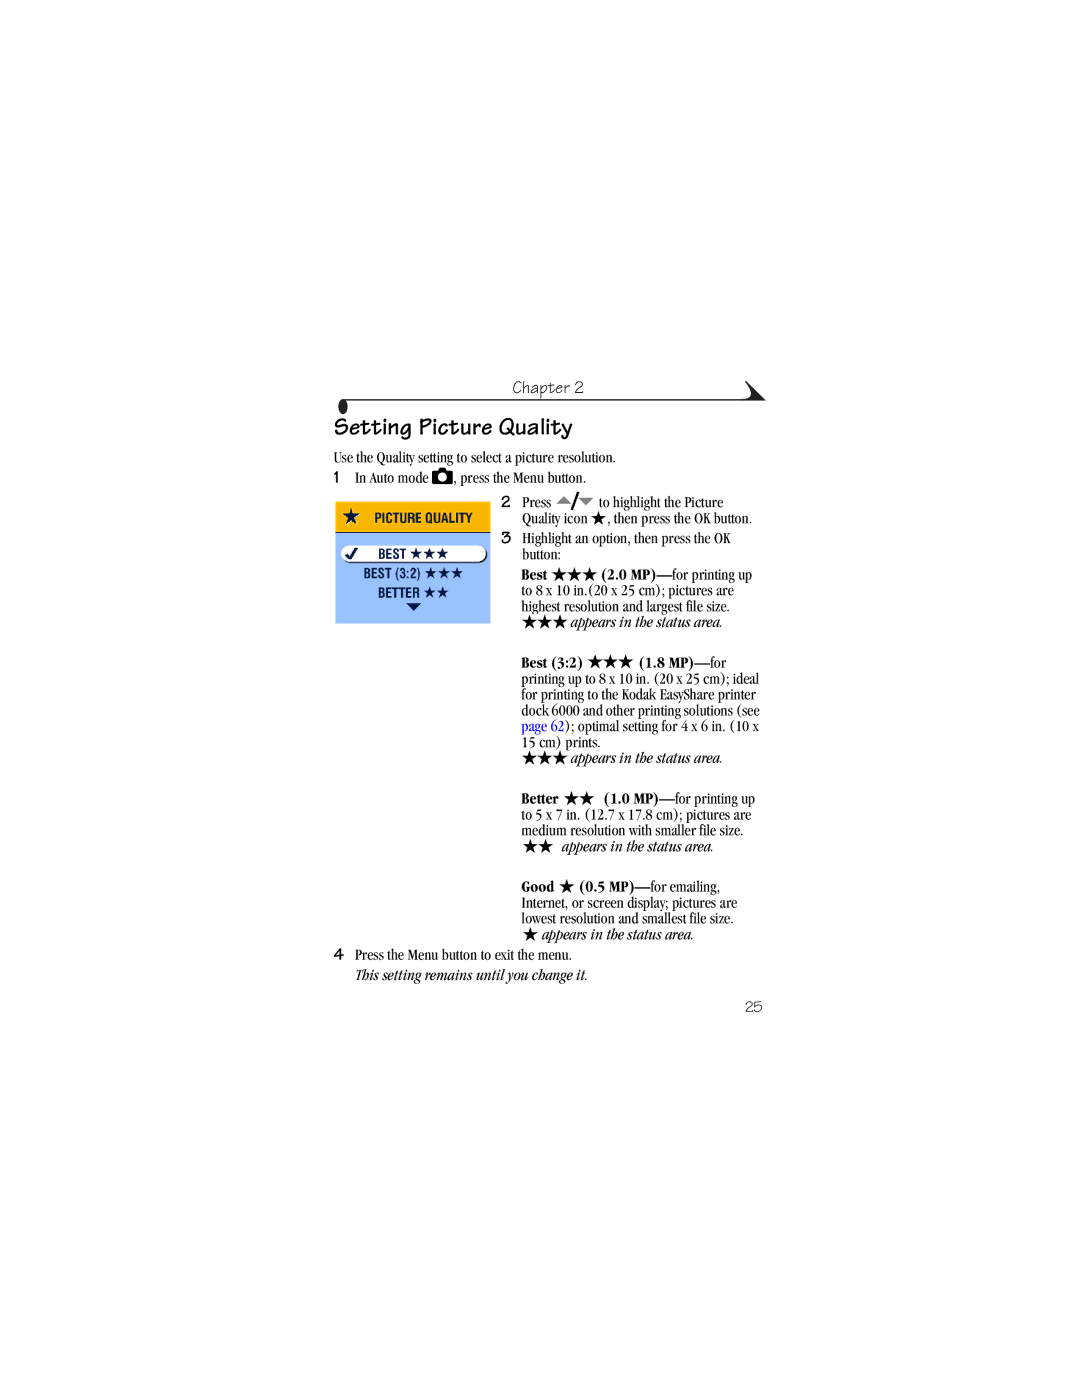
Setting Picture Quality
Setting Color Mode
First-On Your Computer
Pre-tagging for Album Names
Second-On Your Camera
Third-Transfer to Your Computer
Placing the Date on Pictures
Taking a Video
Taking Videos
Quickview-Reviewing the Video Just Taken
Changing Optional Video Settings
Video mode , press the Menu button Press
Putting Yourself in the Video
You are in the scene
Page
Viewing Single Pictures and Videos
Reviewing Pictures and Videos
Playing a Video
Viewing Multiple Pictures and Videos
Deleting Pictures and Videos
Magnifying Pictures
Changing Optional Review Settings
Protecting Pictures and Videos From Deletion
Tagging Pictures/Videos for Albums
Starting the Slide Show
Running a Slide Show
Changing the Slide Show Display Interval
Running a Continuous Slide Show Loop
Displaying Pictures/Videos on a Television
Before you copy, make sure that
Copying Pictures and Videos
Copy pictures or videos
Picture or VIDEO-copies the current picture or video
Viewing Picture/Video Information
Displaying Video Date
Page
Tagged Pictures
Sharing Pictures and Videos
Printing Tagged Pictures
Tagging Pictures for Printing
Third-Transfer and Email
Second-Tag On Your Camera
Need Help?
Using Favorites On Your Computer
To Access Setup Mode/Menus
Customizing Your Camera Settings
Setup Menus
Turning Off Quickview
Changing the Default Print Quantity
Setting Video Out
Turning On Liveview in Auto Mode
Selecting a Language
Viewing Camera Information
Formatting Internal Memory or SD/MMC Card
Page
Windows System Requirements
Installing the Software
Mac OS 8.6 and 9.x System Requirements
Mac OS X System Requirements
Install the Software
Follow the on-screen instructions to install the software
Transferring Pictures With the USB Cable
Connecting Camera to Computer
Print With or Without a Computer
Printing Pictures From Your Computer
Ordering Prints Online
Camera Dock 6000 Package Contents
Using the Camera Dock 6000
Install the Custom Insert
Installing the Custom Camera Insert
Remove the Universal Insert
Connecting the Camera Dock
Installing the Rechargeable Battery
Angle for viewing the camera screen
Docking the Camera
Charging Lights Status
Charging the Battery
Charging Lights Cause
Transferring Pictures With the Dock
Need Help Using the Software?
Transfer Light Status
Light Cause
Specifications-Kodak EasyShare camera dock
Camera Dock 6000 Specifications
Reviewing Pictures and Videos
Problem Cause Solution
Troubleshooting-Camera Dock
Earlier Cameras and Docks
Page
Camera Problems
Troubleshooting
Processing a picture
Check the picture storage
Taking picture Cm between the camera Subject
Camerasupport
Camera/Computer Communications
SD/MMC Cards and Internal Memory
Camera Screen Messages
Message Cause Solution
Format internal
Memory card is Switch on card is
Date and time have
Picture to the computer
Camera Ready Light Status
Status Cause Solution
Camera processing
Page
Helpful Web Links
Getting Help
Help in this Manual
Software Help
Before You Call
Telephone Customer Support
Telephone Numbers
Spain/Espana 91 749 76 Sweden/Sverige 08 587 704
Appendix
Camera Specifications
Kodak EasyShare CX6200 digital camera
Lens Type
Feature Factory Setting
Original Factory Settings
Tips, Safety, Maintenance
Video Storage Capacity
Storage Capacities
Picture Storage Capacity
Picture Naming Conventions
Locating Pictures and Videos on a Card
If No Camera To Turn It Back On
Power-Saving Features
Canadian DOC Statement
FCC Compliance and Advisory
Index
Index
Grip
Help
Magnify picture, 38 maintenance, camera, 94 memory
Quality setting, 25 quickview
Multi-up, 36 protecting, 39 slide show
Tagging
Videos

 appears in the status area.