Step 9. Installing the Glass Door

WARNING

Do notoperateappliancewiththe glass front removed, cracked or broken. Replacementoftheglass should be done by a licensed or qualified service technician.

WARNING

Do not attempt to substitute the materials used on this door, or replace cracked or broken glass with any materials other than those provided by the appliance manufacturer.

WARNING

Handle this glass with extreme care! Tempered glass is suscep- tible to damage – do not scratch or handle roughly while rein- stalling the glass door frame.

WARNING

The glass door of this appli- ance must only be replaced as a complete unit as provided by the manufacturer. Do not attempt to replacebroken,crackedorchipped glass separately.

WARNING

Do not attempt to touch the front enclosure glass with your hands while the fireplace is in use.

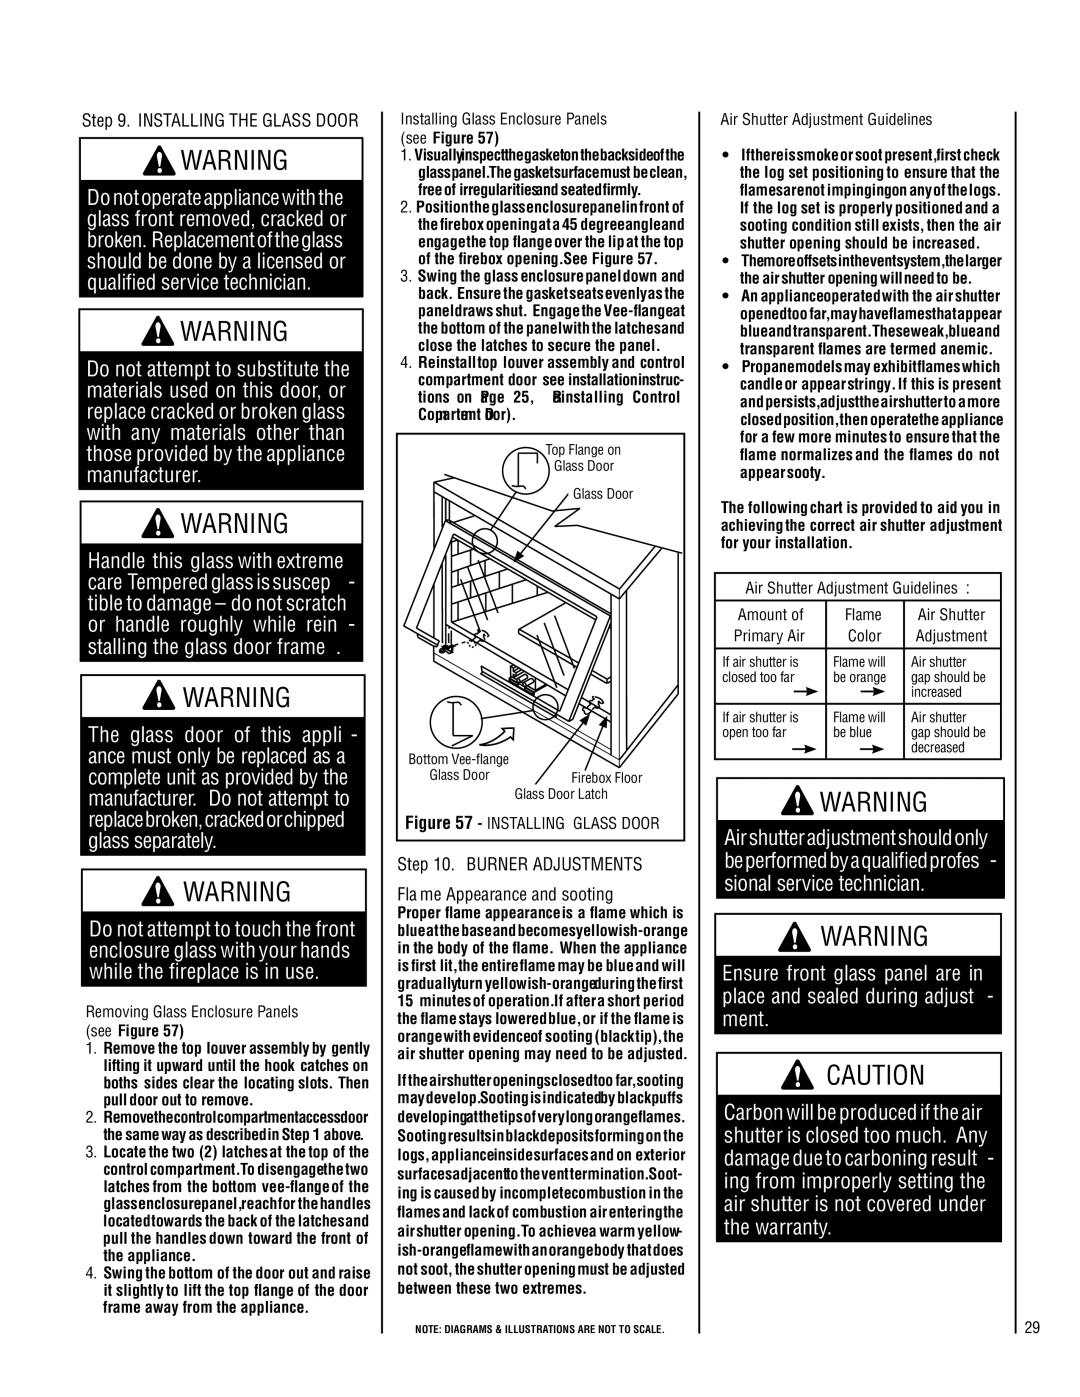
Removing Glass Enclosure Panels

(see Figure 57)

1.Remove the top louver assembly by gently lifting it upward until the hook catches on boths sides clear the locating slots. Then pull door out to remove.

2.Removethecontrolcompartmentaccessdoor the same way as described in Step 1 above.

3.Locate the two (2) latches at the top of the control compartment. To disengage the two latches from the bottom vee-flange of the glass enclosure panel, reach for the handles located towards the back of the latches and pull the handles down toward the front of the appliance.

4.Swing the bottom of the door out and raise it slightly to lift the top flange of the door frame away from the appliance.

Installing Glass Enclosure Panels

(see Figure 57)

1.Visuallyinspectthegasketonthebacksideofthe glass panel. The gasket surface must be clean, free of irregularities and seated firmly.

2.Position the glass enclosure panel in front of the firebox opening at a 45 degree angle and engage the top flange over the lip at the top of the firebox opening. See Figure 57.

3.Swing the glass enclosure panel down and back. Ensure the gasket seats evenly as the panel draws shut. Engage the Vee-flange at the bottom of the panel with the latches and close the latches to secure the panel.

4.Reinstall top louver assembly and control compartment door see installation instruc- tions on Page 25, Reinstalling Control Compartment Door).


Top Flange on


Glass Door


Glass Door

Bottom Vee-flange


Glass Door

Firebox Floor


Glass Door Latch

Figure 57 - INSTALLING GLASS DOOR

Step 10. Burner Adjustments Flame Appearance and sooting

Proper flame appearance is a flame which is blue at the base and becomes yellowish-orange in the body of the flame. When the appliance is first lit, the entire flame may be blue and will gradually turn yellowish-orange during the first

15minutes of operation. If after a short period the flame stays lowered blue, or if the flame is orange with evidence of sooting (black tip), the air shutter opening may need to be adjusted.

If the air shutter openings closed too far, sooting may develop. Sooting is indicated by black puffs developing at the tips of very long orange flames. Sooting results in black deposits forming on the logs, appliance inside surfaces and on exterior surfaces adjacent to the vent termination. Soot- ing is caused by incomplete combustion in the flames and lack of combustion air entering the air shutter opening. To achieve a warm yellow- ish-orange flame with an orange body that does not soot, the shutter opening must be adjusted between these two extremes.

NOTE: DIAGRAMS & ILLUSTRATIONS ARE NOT TO SCALE.

Air Shutter Adjustment Guidelines

If there is smoke or soot present, first check the log set positioning to ensure that the flames are not impinging on any of the logs. If the log set is properly positioned and a sooting condition still exists, then the air shutter opening should be increased.

Themoreoffsetsintheventsystem,thelarger the air shutter opening will need to be.

An appliance operated with the air shutter opened too far, may have flames that appear blue and transparent. These weak, blue and transparent flames are termed anemic.

Propane models may exhibit flames which candle or appear stringy. If this is present and persists, adjust the air shutter to a more closed position, then operate the appliance for a few more minutes to ensure that the flame normalizes and the flames do not appear sooty.

The following chart is provided to aid you in achieving the correct air shutter adjustment for your installation.

Air Shutter Adjustment Guidelines:

Amount of

Flame

Air Shutter

Primary Air

Color

Adjustment


If air shutter is

Flame will

Air shutter

closed too far

be orange

gap should be


increased


If air shutter is

Flame will

Air shutter

open too far

be blue

gap should be


decreased


WARNING

Airshutteradjustmentshouldonly beperformedbyaqualifiedprofes- sional service technician.

WARNING

Ensure front glass panel are in place and sealed during adjust- ment.

CAUTION

Carbon will be produced if the air shutter is closed too much. Any damage due to carboning result- ing from improperly setting the air shutter is not covered under the warranty.

29

Page 29
Image 29
Lennox Hearth LMDV-40 Series Installing the Glass Door, Removing Glass Enclosure Panels, Installing Glass Enclosure Panels

LMDV-3530-CNM, LMDV-35 Series, LMDVR-3328-CNE, LMDV-4035-CNE, LMDV-4035-CPM specifications

Lennox Hearth products are renowned for their quality, efficiency, and innovative technologies that optimize the home heating experience. Among the standout offerings in their lineup are the LMDV-3530-CPM, LMDVR-3328-CPM, LMDV-3530-CNE, LMDVT-3328-CPM, and LMDVR-3328-CNM models. Each of these products embodies the brand's commitment to performance and design, making them a popular choice for modern homeowners.

The LMDV-3530-CPM gas fireplace boasts a contemporary aesthetic combined with powerful heating capabilities. It features a clean face design that enhances the viewing experience while maximizing warmth in the room. The unit is equipped with advanced technology that includes multi-speed blowers for efficient air circulation, allowing users to enjoy consistent heat throughout the space. Its variable flame and heat control options ensure that homeowners can customize their ambience and comfort levels according to their preferences.

Similarly, the LMDVR-3328-CPM model is designed for versatility and efficiency. Its modern fireplace insert converts existing masonry fireplaces into high-efficiency heating systems. Featuring a sleek design, this insert incorporates innovative venting technologies that enable it to operate in diverse installation configurations, enhancing both aesthetic appeal and functionality. Homeowners can appreciate the adjustable flame and fan speed settings, which provide tailored heating solutions.

The LMDV-3530-CNE model distinguishes itself through eco-friendly features. It employs advanced combustion technology that reduces emissions without sacrificing heat output. This model stands out as an environmentally responsible option, suitable for conscious consumers who wish to reduce their carbon footprint. Its easy-to-use controls and stylish design make it a favored choice among discerning homeowners.

The LMDVT-3328-CPM continues the trend of performance and versatility. This model combines traditional charm with modern efficiency, featuring a large viewing area that allows for an inviting flame display. The unit’s heat exchanger is designed for maximum heat transfer, ensuring that warmth is efficiently distributed throughout the room.

Lastly, the LMDVR-3328-CNM model is perfect for those seeking an efficient upgrade for their traditional fireplace. With its stunning design and advanced features, including optional remote control and programmable settings, this model takes convenience to new heights.

Overall, Lennox Hearth’s suite of models combines elegance, efficiency, and innovation, ensuring that homeowners can find the perfect heating solution to complement their living spaces. Each product is engineered with state-of-the-art technologies that reflect Lennox’s dedication to quality and customer satisfaction.