TV + DVD CONNECTIONS
Home Theater System + TV + DVD Player
YOUR DVD PLAYER
VIDEO CABLE
(INCLUDED)
COAXIAL CABLE (INCLUDED)
CONNECT ALL SPEAKERS AS SHOWN ON PAGE 8 (OR THE QUICK SETUP DIAGRAM SHEET).
BACK OF |
HOME THEATER |
NOTE: Some newer TV sets have several VIDEO INPUT jacks. You may use one of these for your DVD player and the others for connecting to the VIDEO OUT jack. If your set is older and only has a single VIDEO INPUT jack, you may buy a switch box to change video inputs from DVD to game video out (Game), etc.
YOUR TV SET
VIDEO CABLE
(INCLUDED)
NOTE: On some TVs, this jack is in the front.
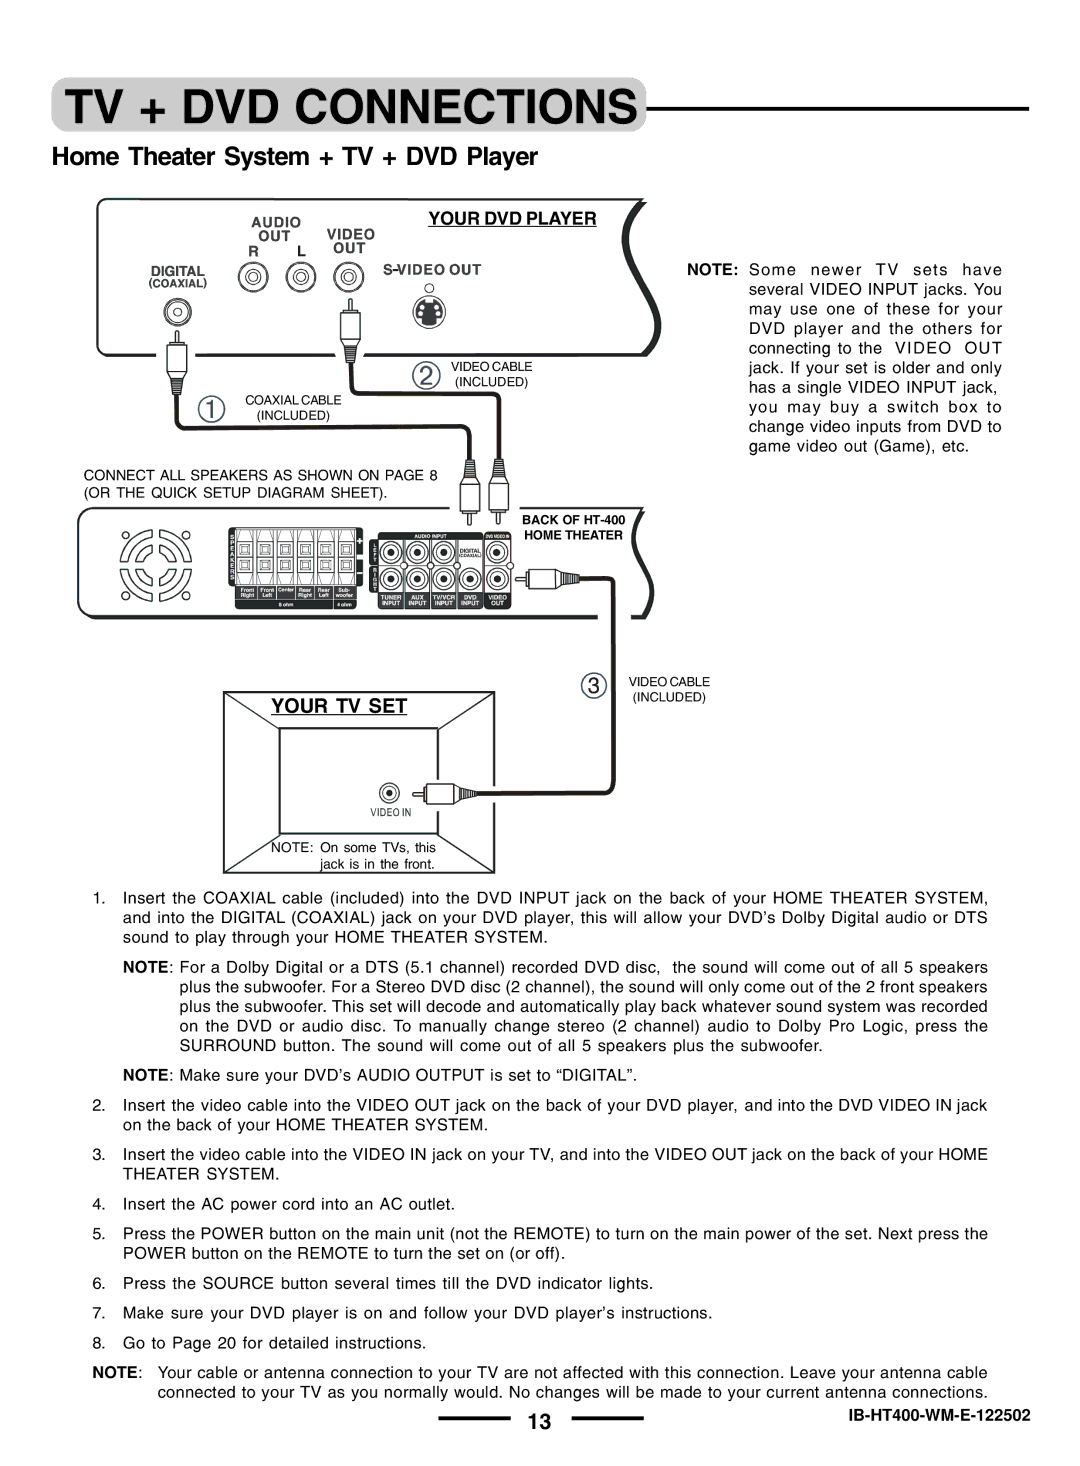
1.Insert the COAXIAL cable (included) into the DVD INPUT jack on the back of your HOME THEATER SYSTEM, and into the DIGITAL (COAXIAL) jack on your DVD player, this will allow your DVD’s Dolby Digital audio or DTS sound to play through your HOME THEATER SYSTEM.
NOTE: For a Dolby Digital or a DTS (5.1 channel) recorded DVD disc, the sound will come out of all 5 speakers plus the subwoofer. For a Stereo DVD disc (2 channel), the sound will only come out of the 2 front speakers plus the subwoofer. This set will decode and automatically play back whatever sound system was recorded on the DVD or audio disc. To manually change stereo (2 channel) audio to Dolby Pro Logic, press the SURROUND button. The sound will come out of all 5 speakers plus the subwoofer.
NOTE: Make sure your DVD’s AUDIO OUTPUT is set to “DIGITAL”.
2.Insert the video cable into the VIDEO OUT jack on the back of your DVD player, and into the DVD VIDEO IN jack on the back of your HOME THEATER SYSTEM.
3.Insert the video cable into the VIDEO IN jack on your TV, and into the VIDEO OUT jack on the back of your HOME THEATER SYSTEM.
4.Insert the AC power cord into an AC outlet.
5.Press the POWER button on the main unit (not the REMOTE) to turn on the main power of the set. Next press the POWER button on the REMOTE to turn the set on (or off).
6.Press the SOURCE button several times till the DVD indicator lights.
7.Make sure your DVD player is on and follow your DVD player’s instructions.
8.Go to Page 20 for detailed instructions.
NOTE: Your cable or antenna connection to your TV are not affected with this connection. Leave your antenna cable connected to your TV as you normally would. No changes will be made to your current antenna connections.
13 |
| |
|
