Setting up the printer to fax

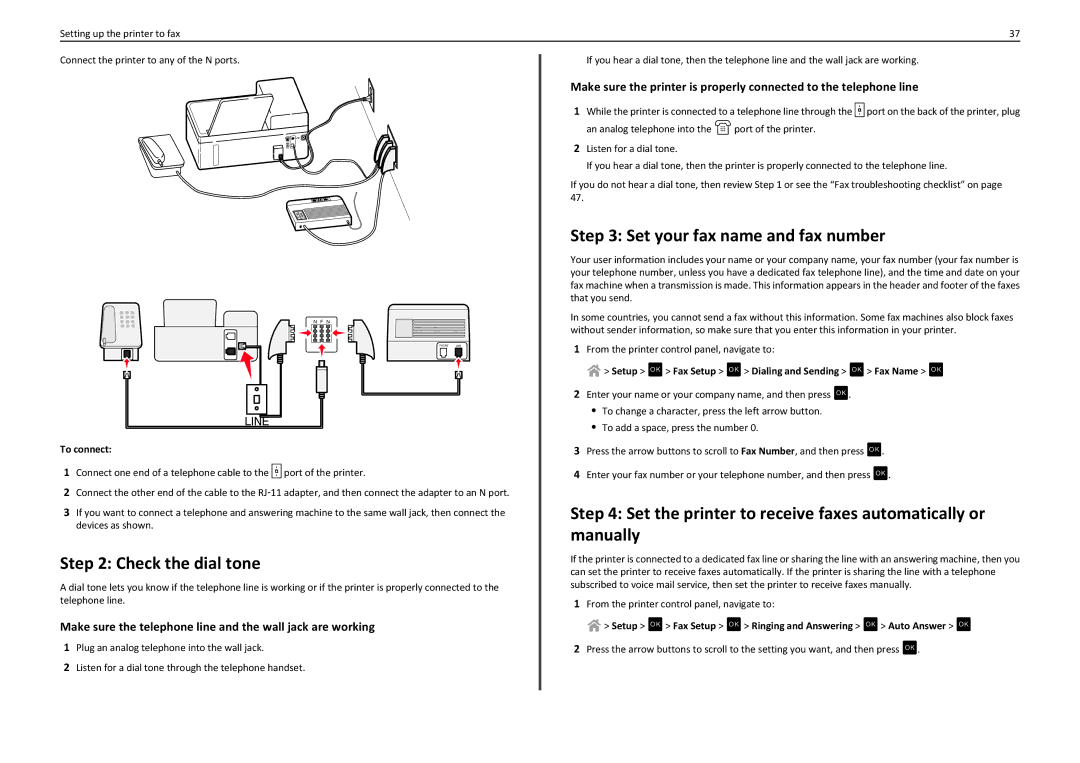
Connect the printer to any of the N ports.

EXT

LINE

N F N

PHONE

LINE


To connect:

1 Connect one end of a telephone cable to the port of the printer.

2Connect the other end of the cable to the RJ11 adapter, and then connect the adapter to an N port.

3If you want to connect a telephone and answering machine to the same wall jack, then connect the devices as shown.

Step 2: Check the dial tone

A dial tone lets you know if the telephone line is working or if the printer is properly connected to the telephone line.

Make sure the telephone line and the wall jack are working

1Plug an analog telephone into the wall jack.

2Listen for a dial tone through the telephone handset.

37

If you hear a dial tone, then the telephone line and the wall jack are working.

Make sure the printer is properly connected to the telephone line

1While the printer is connected to a telephone line through the port on the back of the printer, plug

an analog telephone into the port of the printer.

2Listen for a dial tone.

If you hear a dial tone, then the printer is properly connected to the telephone line.

If you do not hear a dial tone, then review Step 1 or see the “Fax troubleshooting checklist” on page 47.

Step 3: Set your fax name and fax number

Your user information includes your name or your company name, your fax number (your fax number is your telephone number, unless you have a dedicated fax telephone line), and the time and date on your fax machine when a transmission is made. This information appears in the header and footer of the faxes that you send.

In some countries, you cannot send a fax without this information. Some fax machines also block faxes without sender information, so make sure that you enter this information in your printer.

1From the printer control panel, navigate to:

> Setup > OK > Fax Setup > OK > Dialing and Sending > OK > Fax Name > OK

2Enter your name or your company name, and then press OK .

To change a character, press the left arrow button.

To add a space, press the number 0.

3Press the arrow buttons to scroll to Fax Number, and then press OK .

4Enter your fax number or your telephone number, and then press OK .

Step 4: Set the printer to receive faxes automatically or manually

If the printer is connected to a dedicated fax line or sharing the line with an answering machine, then you can set the printer to receive faxes automatically. If the printer is sharing the line with a telephone subscribed to voice mail service, then set the printer to receive faxes manually.

1From the printer control panel, navigate to:

> Setup > OK > Fax Setup > OK > Ringing and Answering > OK > Auto Answer > OK

2Press the arrow buttons to scroll to the setting you want, and then press OK .

Page 37
Image 37
Lexmark S415, S410, 90T4110 manual Check the dial tone, Set your fax name and fax number

S410, S415, 90T4110 specifications

The Lexmark S415 and S410 series of printers, along with the 90T4110 toner cartridge, are designed to meet the needs of small to medium-sized businesses that require reliable, efficient, and high-performance printing solutions.

The Lexmark S415 is a multifunction device that combines printing, copying, scanning, and faxing capabilities in a single compact unit. It boasts a print speed of up to 33 pages per minute (ppm) for black and white prints and up to 28 ppm for color. This model utilizes Lexmark's proprietary Unison toner, which ensures consistent, high-quality output and reduces the need for frequent cartridge replacements. The S415 supports a variety of paper types and sizes, making it versatile for various office tasks.

On the other hand, the Lexmark S410 is designed for everyday printing needs with its streamlined functionality. It provides print speeds similar to the S415 and is equipped with a user-friendly interface that simplifies operation. The S410 model emphasizes energy efficiency, featuring Eco Mode to minimize energy consumption and reduce printing costs. The printer also supports mobile printing technologies such as AirPrint and Google Cloud Print, allowing users to print directly from their smartphones or tablets.

Both models incorporate advanced security features to protect sensitive business information. These include secure printing, which ensures that documents are only printed when the user is present at the device. Additionally, the printers offer various connectivity options, including USB, Ethernet, and wireless capabilities, providing flexibility in a networked office environment.

The 90T4110 toner cartridge, compatible with both the S415 and S410 series, offers a generous page yield, delivering more prints while reducing overall printing costs. This toner cartridge is engineered to provide consistent print quality and prevent downtime associated with frequent replacements.

In summary, the Lexmark S415 and S410 printers, supported by the 90T4110 toner cartridge, deliver robust performance and versatile features tailored for modern business requirements. With their multifunction capabilities, high print speeds, and emphasis on security and energy efficiency, these devices are invaluable assets for enhancing productivity in any office setting.