No 38289U0527F d
37LC2D 50PC3D 42LC2D 60PC1D
Regulatory Information
Safety Instructions
For LCD TV
Contents
Reference
53~58 External Control Device Setup
IR Codes
Stand Installation for 32LC2D/U
Accessories
Button Buttons
Controls Model Name 42PC3D/3DV, 50PC3D, 60PC1D
DButtons
Connection Options Model Name 42PC3D/3DV, 50PC3D, 60PC1D
Service
Swivel Stand 42LC2D Only
Controls Model Name 32/37/42LC2D, 32LC2DU
Connection Options Model Name 32/37/42LC2D, 32LC2DU
Thumbstick Up/Down/Left/Right/ENTER
Remote Control Key Functions
Timer G p.45
Bright +
EZ PIC G p.35
VCR/DVD/DVHS/Camcorder Buttons
Mute G p.29
Dash
Between the wall and the product
Installing Batteries
42PC3D/3DV, 50PC3D 60PC1D 32/37/42LC2D, 32LC2DU
Ensure the eye-bolts or brackets are tightened securely
42PC3D/3DV, 50PC3D, 60PC1D
Installation
Ment, see the External equip Ment Connections section
How to remove Cable Management
32LC2D/U 37/42LC2D
When closing the stand for storage
How to use stand For 42PC3D/3DV
How to arrange the cable For 50PC3D
External Equipment Connections
Analog and Digital TV signals provided on antenna
Analog and Digital TV signals provided on cable
Analog and DTV signals provided on two separate antennas
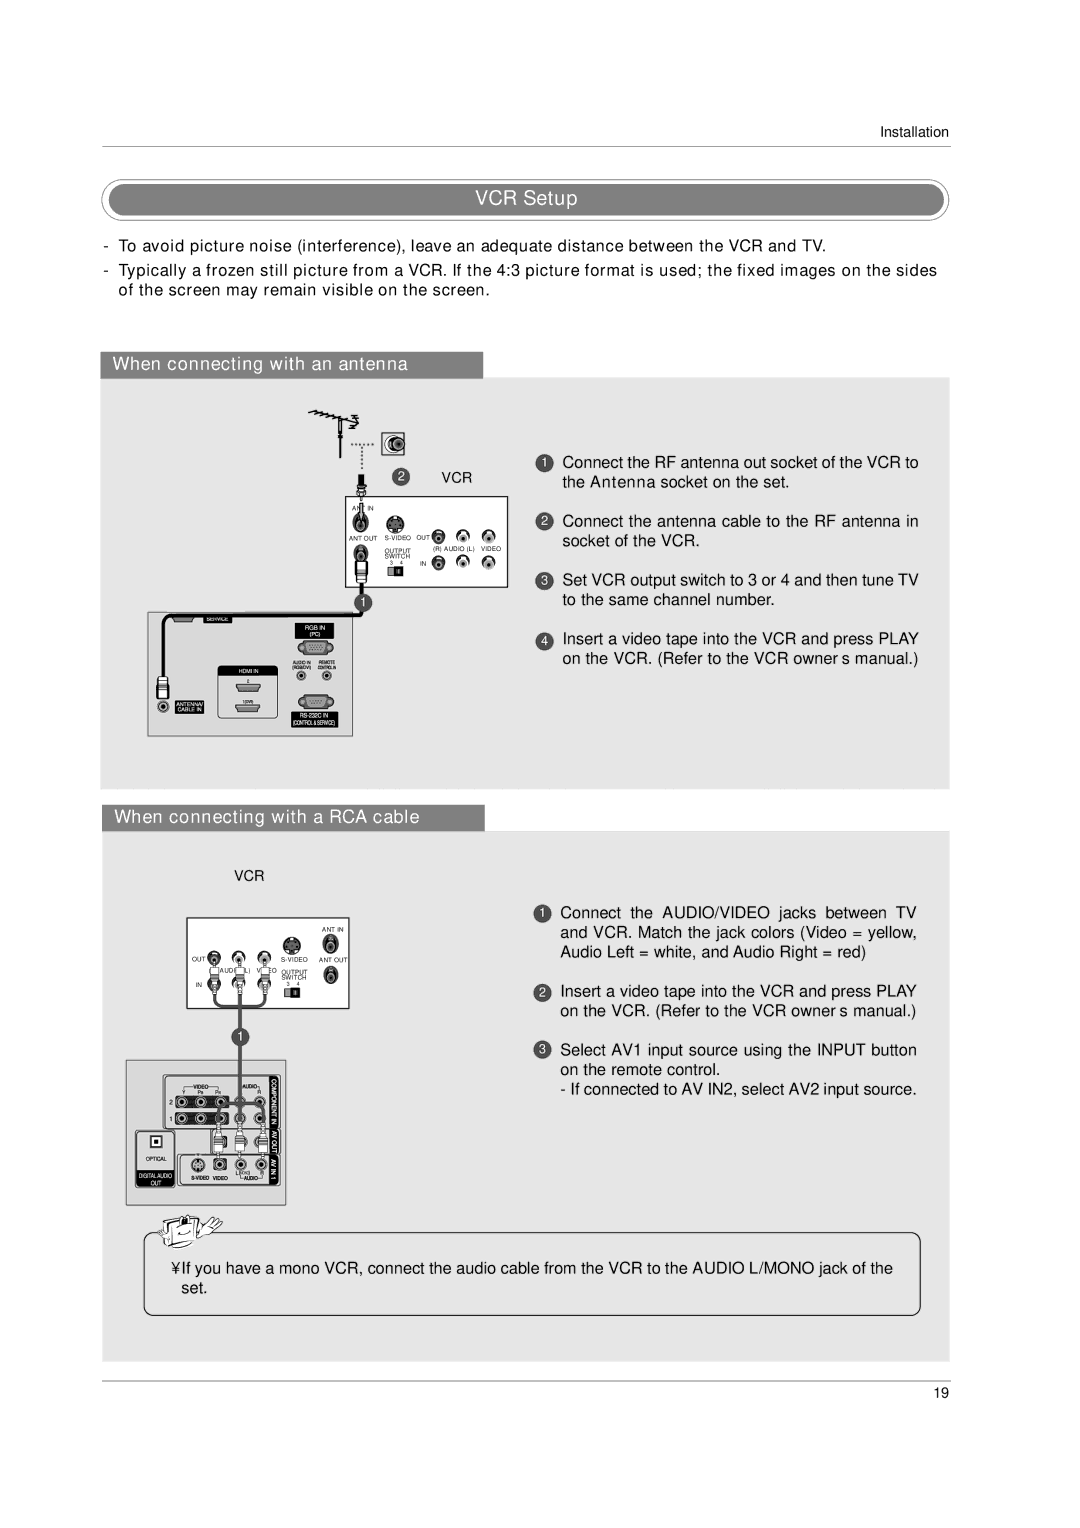
When connecting with an antenna
VCR Setup
When connecting with a RCA cable
When connecting with an S-Video cable
External AV Source Setup
When connecting with a S-Video cable
DVD Setup
When connecting with a Hdmi cable
Component Input ports
When connecting with a component cable
Hdstb Setup
When connecting with a Hdmi to DVI cable
Digital Audio Output
AV Out Setup
When connecting with a D-sub 15 pin cable
PC Setup
Frequency kHz Frequency Hz
Horizontal
Adjustment for screen Resolution, Position, Size, and Phase
Screen Setup for PC mode
Turning on the TV
Volume Adjustment
Basic operation
On Screen Menus Language Selection
How to adjust the OSD screen
On Screen Menus Selection and Adjustment
EZ Scan Channel Search
Setup Menu Options
Manual Scan
Bers and a preview picture
Channel Edit
Ber
TV, AV1, AV2, Component1, Component2, RGB-PC, HDMI1/DVI, or
DTV Signal Strength
Input Source
Being received
Component1-2, RGB-PC, HDMI1/DVI or HDMI2
Input Label
Press the F / G button to select the label
Video Menu Options
Color Temperature Control
Auto Picture Control EZ Picture
Manual Color Temperature Control
Press the G button and then use D / E button to select XD
Menu
Selecting the Manual
Black level
Advanced-Cinema 32 Mode / Black Level
Cinema 32 Mode
Press the G Button and then use D / E button to select
Video Reset
Audio Language
Audio Menu Options
Spanish, or French
Manual Sound Control EZ Sound-Useroption
Adjustments
SRS TruSurround XT
Selecting the Front Surround
Balance
TV Speakers On/Off Setup
Press the G button and then use D / E button to select On
Manual Clock Setup
Auto Clock Setup
Time Menu Options
For only On Timer function
Sleep Timer
On/Off Timer Setup
To cancel On/Off Timer function, select Off
Auto Off
Time Menu Options
Aspect Ratio Control
Option Menu Features
Tion languages English, Spanish, or French
Caption/Text
Caption Option
Low Power 42PC3D/3DV, 50PC3D, 60PC1D only
Orbiter
White Wash removes permanent images from the screen
Lock Menu Options
For USA
Parental Lock Setup
Wire Configurations
External Control Device Setup
Set ID
Command Reference List
Transmission / Receiving Protocol
Screen Mute Command2d
Power Command2a
Input Select Command2b Main Picture Input
Aspect Ratio Command2c Main picture format
Sharpness Command2k
Color Command2i
Remote Control Lock Mode Command2m
Tint Command2j
Low Power Command2q
ISM Method Command2p
Tune Command Command m a
Key Command m c
Channel Add/Del Command m b
Input selectCommand x b Main Picture Input
Remote Control IR Codes
How to Connect
IR Codes
Code Hexa Function
Programming the Remote
Programming a code into a remote mode
VCRs
Programming Codes
Cable Box
Audio
Digital Cable/Satellite Box
Troubleshooting Checklist
Speakers Unusual sound
Picture OK
No sound
No output from one
Dimensions With stand 51.3 x 34.3 x 14.0 inches
Dimensions With stand 60.8 x 40.8 x 16.0 inches
Weight With stand
Dimensions With stand 44.4 x 29.5x 15.0 inches
811 x 630 x 235 mm
Dimensions With stand 31.9 x 24.8 x 9.3 inches
32LC2D-UE 32LC2DU-UE Weight With stand
Dimensions With stand 41.5 x 32.0 x 11.9 inches