Monitor TV
Contents
111
107
108
109
Preparation
Illuminates blue when the set is switched on
Preparation
Front Panel Controls
Back Panel Information
Stand Base
Stand Installation
Preparation
M1962DP/M2062DP/M2262DP/M2362DP
Coin
M2762DP
Latch
Detaching Stand
Pull the stand base
Remove the screw 4 point Pull the stand body
Preparation Detaching Stand Body
Remove the screw 2 point Pull the stand body
Model
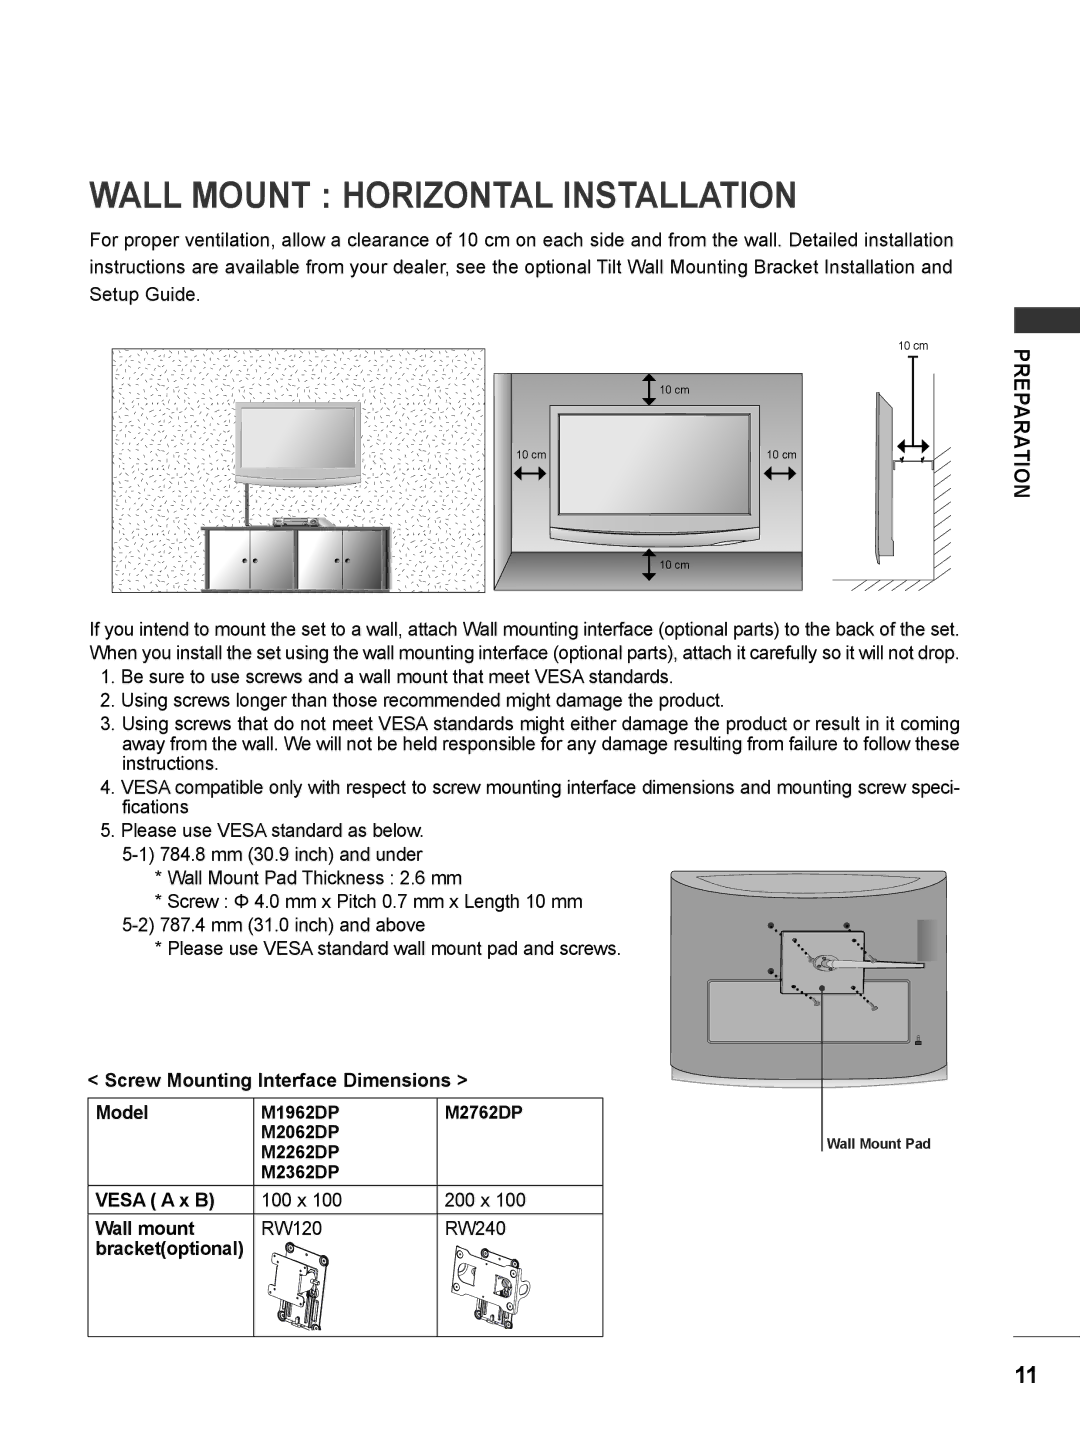
Wall Mount Horizontal Installation
Screw Mounting Interface Dimensions
515
Preparation Desktop Pedestal Installation
Positioning Your Display
Tilt range
Location
Swivel STANDOnly M2762DP
Preparation
Desk
Screw
Provided as parts of the product
Preparation Kensington Security System
Antenna Connection
External Equipment Setup
External Equipment Setup
480i 576i
External Equipment Setup
HD Receiver Setup
Connecting with a component cable
On the SET
Connecting a set-top box with a Hdmi cable
Connecting with an Hdmi to DVI cable
Component Input ports
DVD Setup
Connect the video outputs Y, PB, PR of the DVD
To the Component in Video jacks on the SET
RGB
Connecting with a Euro Scart cable
Connecting the Hdmi cable
Antenna
External Equipment Setup VCR Setup
Connecting with a RF cable
Scart
External Equipment Setup Insertion of CI Module
Digital Audio OUT Setup
Memory Stick USB Cable
External Equipment Setup USB Setup
Headphone Setup
Press the Input button to select RGB
External Equipment Setup PC Setup
When connecting with a D-sub 15 pin cable
RGB/DVI sockets of the SET
Connecting with an Hdmi to DVI cable
Connecting with an Hdmi to Hdmi cable
Back Cover for Wire Arrangement
M2062DP
External Equipment Setup Supported Dispaly Resolution
Rgbpc / Hdmipc mode M1962DP
720 x 1280 x 1920 x
Component mode
31.5 720 x
67.5
Watching TV / Programme Control
Remote Control KEY Functions
Watching TV / Programme Control
UP/DOWN
Volume Adjusts the volume
Programme Selection
Volume Adjustment
Tuning
Watching TV / Programme Control Turning on the TV
Programme Control
Quick Menu
Watching TV
Control
Watching TV / Programme
Run Auto tuning
Auto Programme Tuning
Select Auto Tuning Select Antenna
Password in Lock System ‘On’
Only for Finland, Sweden, Denmark and Norway
Watching TV / Programme Control Auto Programme Tuning
If you want to select the Cable
Select Setup Select Close
Select Auto Tuning
Operators Select Default, Full or User
Watching TV / Programme Control
Setup → Auto Tuning → Cable
Auto Programme Tuning
If you select Cable, you can see Cable
DTV Setting menu
When Channel Auto Update in On,
When Channel Auto Update is Off,
Select Manual Tuning
Manual Programme Tuning in Digital Mode
Select Setup
TV / Programme Control
Manual Programme Tuning in Analogue Mode
Select V/UHF or Cable
Commence searching Select Store
Select Name
Assigning a station name
Select TV
Select Programme Edit Enter the Programme Edit
Programme Edit
Deleting a programme
Watching TV / Programme Control DTV/RADIO Mode
TV Mode
Skipping a programme number
No longer edit programmes
Auto Sort
Start Auto Sort After activating Auto Sort once, you can
That new software is found
Watching TV / Programme Control Software Update
Select Software Update
Select On or Off
Occasionally, a transmission
When setting Software Update
Updated digital software infor
Simple Update for current update stream
Select Diagnostics
Watching TV / Programme Control Diagnostics
Select CI Information
CI Common Interface Information
Watching
Paging through a programme list
Programme
Displaying programme List
Selecting a programme in the programme list
Displaying the favourite programme list
Favourite Programme Setup
Selecting favourite programme
Select Favourite
Hdmi RGB
Watching TV / Programme Control Input List
Antenna Component
EPG Electronic
EPG Electronic Programme Guide in Digital Mode
Guide Switch on or off EPG
Programme Guidein Digital Mode
Guidein Digital Mode
EPG Electronic Programme Guide in Digital Mode
Text Up/Down
Guide Switch off EPG
Select Schedule List
Switch off EPG
EPG
Select your desired OptionModify/Delete/Delete All
Picture Control
Picture Control
Picture Size Aspect Ratio Control
Cinema Zoom
Picture Control
Zoom
Changes will not be applied
Adjustment value is saved to Expert
Picture Wizard
Select Picture
Energy Saving
Picture Mode
Vivid
Preset Picture Settings
Picture Mode-Preset
Picture
Picture Control Manual Picture Adjustment
Picture Mode-User option
Picture Improvement Technology
Picture Control Expert Picture Control
Picture Mode Expert
SD/HD
Colour Management System
Select Yes or No
Picture Reset
Select Picture Reset
Select Screen
Picture Control Screen Setup for PC Mode
Selecting Resolution
Select Resolution
Select Auto Config
Auto Configure RGB PC mode only
Auto configure
Using OSD
1920 x 1080 Resolution
Using Auto Config. Remocon
Press Auto Config
1600 x 900 Resolution
Select Position, Size or Phase
Adjustment for screen Position, Size, Phase
Run Reset
Screen Reset
Select Screen Select Reset Select Yes
Sound
Auto Volume Leveler
Select Auto Volume
Sound Control
Select Clear Voice
Feature will not work
Sound Control Clear Voice
Select Balance
Balance
Sound Control
Sound Control Preset Sound SETTINGS-SOUND Mode
Standard
Music
Select Surround
Preset Sound SETTINGS-USER Mode
Set the desired sound level
Sound Control Audio Reset
Audio Input Digital Audio output
Digital Audio OUT
Select Digital Audio Out
Select TV Speaker
Sound Control TV Speakers on / OFF Setup
DTV Audio Setting in Digital Mode only
Dual
Stereo/Dual Reception In Analogue Mode Only
Sound Control
Stereo
Speaker Sound Output Selection
Nicam Reception In Analogue Mode Only
Select Clock
Time Setting
Clock Setup
Select Off Time or On Time
Auto ON/OFF Time Setting
Time Setting
Time Setting Sleep Timer Setting
Select your desired language or country
Option Setting
Select your desired language
Select Menu Language or Country
Option Setting Language Selection in Digital Mode only
Select Volume Make desired adjustment
Audio Description in Digital Mode only
Select Disabled Assistance Select Audio Description
Select Data Service Select Mheg or Teletext
Option Setting Data Service
Settin
Input Label
Selects a label for each input source
Option
Select Power Indicator
Option Setting Power Indicator
Power indicator On
Power indicator Off
Select On to show the various logo of TV
Demo Mode
Select Demo Mode
Select Mode Setting Select Store Demo or Home Use
Option Setting Mode Setting
Start Factory Reset
Word, press 0, 3, 2, 5 on the remote control
Select Factory Reset
Select Lock System
SET Password & Lock System
Parental Control / Ratings
Parental
Enter the Block Programme
Block Programme
Select
Lock
Select Parental Guidance
Select Input Block
Input Block
Select On or Off
Parental Control / Ratings KEY Lock
Select Key Lock
Be turned on
To USE a USB Device
When Connecting a USB Device
To USE a USB Device
Movie List
Only a USB storage device is recognizable
To USE a USB Device
Select USB
Photo List
Screen Components
PHOTO*.JPEG supporting file
Close Close the PopUp menu
Photo Selection and PopUp Menu
Delete or Delete Marked Delete the selected photo item
How to view photo
Hide
Show the Slide Speed or Music Folder
Using the Photo List function
Select Set Photo View, Set Video or Set Audio
To USE
Make appropriate adjustments. Refer to p to
Make appropriate adjustments.Refer to p , 73
Show the Sound Mode, Auto Volume, Clear Voice II, Balance
Select Music List
Music List
Music *.MP3 supporting file Bit rate 32 to
Delete or Delete Marked Delete the selected music titles
Music Selection and PopUp Menu
As shown, up to 6 music titles are listed per
Select Set Audio Play or Set Audio
Using the Music List function, play
‘Screen Saver’?
Show the Set Audio Play
Movie List
122
Movie List
Movie Selection and PopUp Menu
Select Set Video Play, Set Video or Set Audio
Using the Movie List function, play
Show the Picture Size, Audio Language or Subtitle Language
When you select the Set Video Play
126
Play
Using the remote control
Select DivX Reg. Code Display DivX Reg. Code
To USE a USB Device Divx Registration Code
Display Deactivation
Deactivation
Menu Select USB
Select Deactivation
TOP Text
Switch ON/OFF
Teletext
Simple Text
Special Teletext Function
Fastext
This function works in UK, Ireland only
Teletext Within Digital Service
Teletext in Digital Service
Digital Teletext
Appendix
Troubleshooting
Appendix
134
Appendix
Use the screen saver function
Quickly
Is the screen position Wrong?
Screen color is abnormal
Extended Absence
Maintenance
Cleaning the Screen
Cleaning the Cabinet
AC 100-240 V~ 50 / 60 Hz 0.8 a
Appendix Product Specifications
M1962DP
AC 100-240 V~ 50 / 60 Hz 1.2 a
M2062DP
M2262DP
M2362DP
142
IR Codes
This feature is not available for all models
RS-232C Configurations
Appendix External Control Device Setup
RS-232C Setup
Type of Connector D-Sub 9-Pin Male
Select Option Select Set ID
Set ID
Baud rate 9600 bps Uart Stop bit 1 bit Data length 8 bits
Communication Parameters
147
148
149
150
Page
UK Only
Page
Model Serial