LCD TV
Model Serial
Page
FCC Notice
Safety Instructions
Important Safety Instructions
Cables on the back of the TV
Install the TV by the hanging power and signal
Thunder or lighting storm
Grounding
Only Hg lamp used LCD TV
Antennas
Contents
Appendix
Features of this TV
BURN-IN on Your TV Screen
CD Manual
Accessories
Preperation
Sub 15 pin Cable
Front Panel Information
Speaker
Channel D,E
Back Panel Information
32/37/42LH250H, 32/37/42LH255H, 37/42LH260H, 37LH265H
Preparation
Reset
Remote Control OUT
Update
HDMI/DVI
Stand Instruction
Two Torx plus star head
Detachment
RW230
Vesa Wall Mounting
200
AW-47LG30M
Secure the power cable with the Protective
Cable Management
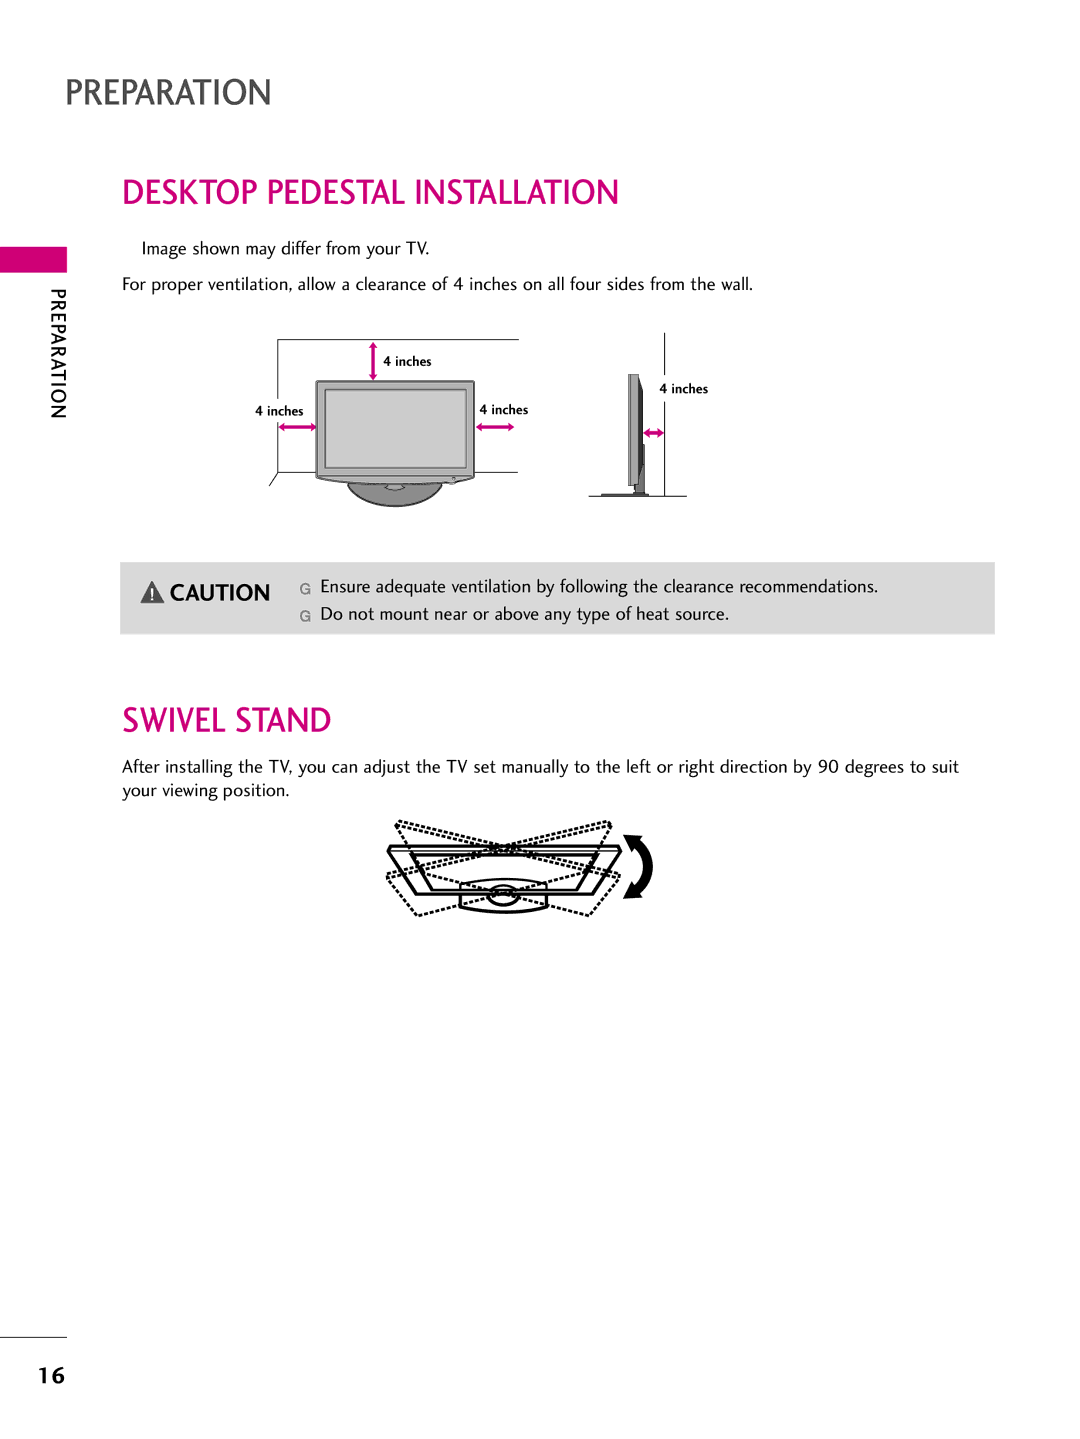
Desktop Pedestal Installation
Swivel Stand
Attaching the TV to a Desk
Screw Provided as parts of the product
Stand
Preparation
Antenna or Cable Connection
Antenna Analog or Digital
External Equipment Setup
HD Receiver Setup
Component Connection
Equipment Setup HDMI-DTV
Hdmi Connection
External
Connect the DVI output of the digital set-top box to
Equipment Setup
DVI to Hdmi Connection
HDMI/DVI in 1 jack on the TV
Component Input ports
DVD Setup
External Equipment Setup
Connect the video outputs Y, PB, PR of the DVD to
Composite RCA Connection
VCR Setup
Antenna Connection
Other A/V Source Setup
Camcorder
PC Setup
640x480
640x350
720x400
800x600
Select Picture
Screen Setup for PC mode
Enter Select the desired resolution
Enter Select Screen RGB-PC
Select Auto config
Can adjust the Position, S i z e or Phase
Enter Select Yes
Adjustment for screen Position, Size, and Phase
Screen Reset Reset to original factory values
Select Yes
USB Connection
Connect the USB device to the USB I N jack on the side of TV
Remote Control Functions
Watching TV / Channel Control
Control
Loose the bolt on the battery compartment cover
Watching TV / Channel Control
Volume Adjustment
Turning on TV
Channel Selection
ON-SCREEN Menus Selection
Watching
TV / Channel Control
Channel Setup
Auto Scan Auto Tuning
Select Channel
Watching TV / Channel
Add/Delete Channel Manual Tuning
ENTERSelect Manual Tuning
Select channel you want to add or delete
Channel Editing
Select Channel Edit
Select a channel
Channel Label
Select Channel
Input List
Select the desired input source
HDMI2 HDMI1 RGB-PC Component
USB
Entry Modes
Press the Eject button before removing the USB device
Precautions when using the USB device
Select USB
Photo List
Screen Components
Select Photo List
Use the CH button to navigate in the photo
Photo Selection and Popup Menu
Enter Show the Popup menu
Select the desired photos
Full Screen Menu
Photo List
Enter Select the Slideshow, BGM
Music List
Select Music List
Music Selection and Popup Menu
Show the Popup menu
Use the CH button to navigate in the music
USB
Picture Size Aspect Ratio Control
You can also adjust Aspect Ratio in the Picture menu
Picture Control
Picture Control
Zoom
Set by program
169
Just Scan
Select Picture Mode
Preset Picture Settings
Picture Mode Preset
Select Vivid, Standard, Natural
Color Tone Preset
Select Advanced Control
Select Backlight, Contrast, Brightness
Manual Picture Adjustment User Mode
Make appropriate adjustments
Sharpness, Color, or Tint
Picture Improvement Technology
Select Dynamic Contrast, Dynamic
Color, Noise Reduction, Gamma, Color
Advanced Control Black Darkness Level
Select Black
Select Low or High Return to the previous menu
Select Eye
Advanced Control EYE Care
Picture
Select O n or Off Return to the previous menu
Advanced Control Real Cinema
Select Real Cinema
Enter Initialize the adjusted value
Picture Reset
Demo Mode
Select Picture Reset
Auto Volume Leveler Auto Volume
Sound & Language Control
Sound & Language Control
Preset Sound Settings Sound Mode
Select Standard, Music
Sound Setting Adjustment User Mode
Adjust the sound to suit your taste and room situations
Select Treble or Bass
SRS Trusurround XT
Select SRS TruSurround XT
Adjustment for Clear Voice Level With selecting O n
Clear Voice
Select Clear Voice
Balance
TV Speakers ON/OFF Setup
Select TV
Audio Reset
Initialize the adjusted value
STEREO/SAP Broadcast Setup
Mono, Stereo, or SAP appear in turn Return to TV viewing
Each time you press the SAP button
Audio Language
ON-SCREEN Menus Language Selection
Menus can be shown on the screen in the selected language
Return to the previous menu Return to TV viewing
Sound & Language
Caption Mode
Analog Broadcasting System Captions
Caption
Digital Broadcasting System Captions
Select Option
Select O n
Caption Option
Custom
Time Setting
Clock Setting
Auto Clock Setup
Manual Clock Setup
Time Setting
Select Off Time or On
Auto ON/OFF Time Setting
Select Time
Select and set Hour or Minute Return to the previous menu
Sleep Timer Setting
Sleep Time turns the TV off at the preset time
You can also adjust Sleep Timer in the Time menu
Parental Control / Ratings
SET Password & Lock System
Setting up Your Password
Control / Rating
Input the password
Select Lock System When you select O n, the Lock System
Is enable
Lock System
Enter Select Lock Input the password Select Set password
Set Password
Change the password by inputting a new password twice
Same 4 digits on the Confirm
Channel Blocking
Parental Control / Rating
Movie & TV Rating
Movie Rating Mpaa
Select Age or Fantasy Violence
TV Rating Children
Select TV Rating-Children Age applies to TV-Y, TV-Y7
Fantasy Violence applies to TV-Y7
TV Rating General
Input the password Porarily
Downloadable Rating
If a Downloadable rating is locked
Enables you to block an input
External Input Blocking
Appendix
Troubleshooting
Remote control Doesn’t work Power is suddenly Turned off
No picture &No sound
See troubleshooting flow chart
Check the signal cable
Or single color Reinstall the PC video card
No Power
Maintenance
Output waveform
Configuration of frame
IR Codes
Lead code Repeat code
Dash/LIST Remote control Button
Remote control Button
10-19 Number Key Remote control Button
Remote control Button Ratio
Open Source License
Version 2, June
Preamble
Page
No Warranty
END of Terms and Conditions
GNU Lesser General Public License
Version 2.1, February
Page
100
101
How to apply these terms to your new libraries
Mozilla Public License
Description of modifications
Distribution Obligations Application of license
Availability of source code
Intellectual property matters Third party claims
Distribution of executable versions
Representations
Required notices
Larger works
106
Exhibit a -Mozilla Public License
Provisions of license are applicable instead of those
Commercial Mode Setup Guide
For Customer Support/Service, please call
Power Sources
Cleaning
Accessories, Carts, and Stands
Power Cord Polarization Some models
Replacement Parts
Power Lines
Damage Requiring Service
Safety Check
Table of Contents
Setup Checklist
Commercial Mode Setup for Master TV
TLL-1100A Clone Programmer
Installer Overview
LG Installer Remote
Typical
Receives RF signals
FTG Card Mode of Operation Overview
LMT7Z7 Configured Card in FTG Mode of Operation
LMT7Z7 card
FTG Card Mode of Operation Contd
Communications Setup Menu
Exits menu and returns to logical channel listing
FTG Channel Map Overview
Video only
Removes channel from lineup
FTG Installer Menu Overview
LMT7Z7 Configured Card in FTG Mode of Operation
FTG Operation Troubleshooting
Error Messages
Problem Probable Cause Solution
Typical Installer Remote Control
Installing Batteries in Installer Remote Control
Installer Remote Control Typical Key Functions
Volume UP/DOWN
Rear Connections Panel
2 Input Side Connections Panel / RF Antenna Connection
RF Antenna Connection
Connect to video output port on external device
Connect to composite Video/Audio output jacks on
Connection for RGB hookup from RJP
RGB/DVI Audio input from RJP
MPI Card Slot / PPV Card Installation
TV Features Configuration Menus Overview
Main TV Menus
On TLL-1100A
TLL-1100A Cloning Connections/Learning Setup
On Master TV
On Target TV
LT2002 Cloning Connections/Learning Setup
Antenna Or Catv
LT2002 Cloning Learning Setup Learning the Master TV Setup
Learn Setup from Master TV
Set the Clock Optional
Teach Master TV’s Setup to the target TV
Disconnect TV Power for 15 Seconds
Clone Programmer Troubleshooting
Reference LT2002 Cloning Procedure Troubleshooting
Reset Clone After Static Shock
Problem Possible Causes Possible Solutions Clone Programmer
Using the Installer’s Menu
Installer Menu
Accessing the Installer’s Menu
Installer Menu Items 000 through
Installer Menu Items 035 through
= Broadcast
Detailed Descriptions of Installer Menu Items
Specifies entry sequence to the Installer Menu
= Last channel ~ 125 = Ch
= Video = Hdmi = Component
= Video = Hdmi
= Blue = Red
Timeout = 25.5MS + 25.5 MS* Handshake time
= Black = Cyan
= Green = Violet
Set to 1 for blank
= Remote jack pack is not available or disabled
= Dimmest picture, 100 = Brightest picture
G E 3
Making a Master TV
Clonable Menu Features Chart in this manual
Reference Detailed Instructions For Making a Master TV
Detailed Instructions
Adding Channel Icons and Labels in the 2-5-4 + Menu Mode
TV Speaker Violence
Reference Clonable Menu Features
Caption Mode
TV Rating General Age
View Pictures
USB End User Features
USB Device Setup
View Picture with Music
Reference USB Cloning Master TV Profile Setup-Learning
Optional Edit / Change File Name
Reference USB Cloning Master TV Profile Setup-Teaching
For 32LH240H
TV Camport Auto Sense Operation
Camport Operation Stand-Alone
Camport Operation PPV
TV Aux Input Configuration / Troubleshooting
Troubleshooting
Channel not included in channel scan in TV controller
Troubleshooting
G E 4
Troubleshooting Flow Chart
Controller Quick Check
Commercial Mode Check
TV is controlled by external network
Programming provided by a cable service
Glossary of Terms
High-definition multi-media interface
LAN Setup and Overview Except 32LH240H
MPI Slot Power
LAN Overview
Reference RJP Model List and Input Hierarchy
RJP Model List Legacy Models Scaler Models