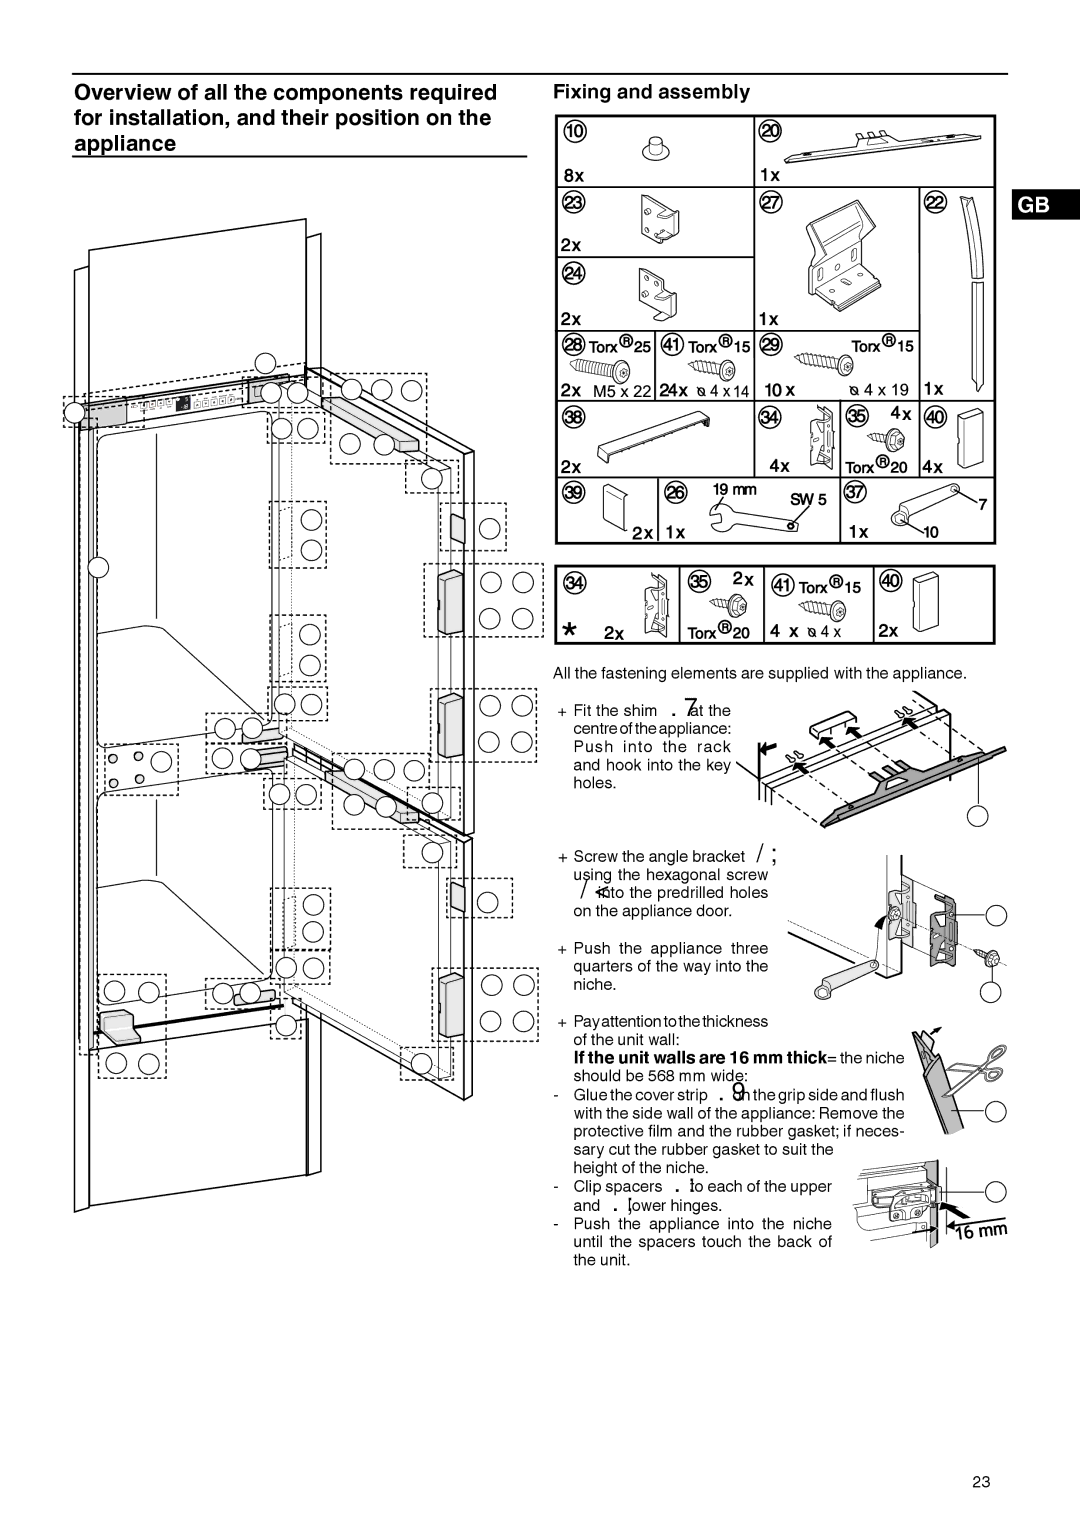
Overview of all the components required | Fixing and assembly | ||||
for installation, and their position on the |
| ||||
appliance |
|
|
|
|
|
|
|
|
|
| GB |
20 |
|
|
|
|
|
9 | 6 | 30 | 31 | 32 |
|
5 | 23 |
|
|
|
|
29 | 33 | 38 |
|
| |
|
|
|
| ||
|
|
|
| 11 |
|
| 34 |
|
| 39 |
|
|
|
|
|
| |
22 | 35 |
|
|
|
|
|
|
| 40 | 41 | |
|
|
|
| ||
|
|
|
|
| 34 |
|
| 35 | 34 |
|
|
|
|
|
|
|
|
|
|
|
|
| |
|
|
|
|
| 35 |
|
|
|
| All the fastening elements are supplied with the appliance. |
|
|
|
|
| 24 | 29 |
|
| 40 | 41 | W Fit the shim cl at the |
|
|
|
| 7 | 9 |
|
|
|
|
| centreoftheappliance: |
|
|
|
| 6 | 9 |
|
|
| 35 | 34 | Push into the rack |
|
|
| 8 |
| 30 | 31 | 32 |
| and hook into the key |
| ||
|
|
|
| 23 | 29 | 33 | 38 | 11 |
| holes. |
|
|
|
|
|
|
| 20 | |||||
|
|
|
|
|
|
|
| ||||
|
|
|
|
|
|
|
|
|
|
| |
|
|
|
|
|
|
|
| 11 |
| W Screw the angle bracket dp |
|
|
|
|
|
|
|
|
|
|
| using the hexagonal screw |
|
|
|
|
|
| 34 |
|
| 39 |
| dq into the predrilled holes |
|
|
|
|
|
|
|
|
| on the appliance door. | 34 | ||
|
|
|
|
|
|
|
|
| |||
|
|
|
|
| 35 |
|
|
|
| W Push the appliance three |
|
|
|
|
|
|
|
|
|
|
|
| |
|
|
|
| 24 | 29 |
|
|
|
| quarters of the way into the |
|
29 | 27 |
| 7 | 9 |
|
|
| 40 | 41 | niche. | 35 |
|
|
|
|
|
|
| |||||
|
|
|
| 25 |
|
|
| 35 | 34 | W Payattentiontothethickness |
|
|
|
|
|
|
|
|
|
|
| of the unit wall: |
|
25 | 28 |
|
|
|
|
|
| 11 |
| If the unit walls are 16 mm thick= the niche |
|
|
|
|
|
|
|
|
|
|
| should be 568 mm wide: |
|
|
|
|
|
|
|
|
|
|
| - Glue the cover strip cnon the grip side and flush |
|
|
|
|
|
|
|
|
|
|
| with the side wall of the appliance: Remove the | 22 |
|
|
|
|
|
|
|
|
|
| protective film and the rubber gasket; if neces- |
|
|
|
|
|
|
|
|
|
|
| sary cut the rubber gasket to suit the |
|
|
|
|
|
|
|
|
|
|
| height of the niche. |
|
|
|
|
|
|
|
|
|
|
| - Clip spacers co to each of the upper | 23 |
|
|
|
|
|
|
|
|
|
| and cp lower hinges. |
|
|
|
|
|
|
|
|
|
|
| - Push the appliance into the niche |
|
|
|
|
|
|
|
|
|
|
| until the spacers touch the back of |
|
|
|
|
|
|
|
|
|
|
| the unit. |
|
23
