Manuals
/
Lindy
/
Computer Equipment
/
Network Card
Lindy
32351, 32352
manual
Models:
32351
32352
1
31
70
70
Download
70 pages
7.96 Kb
28
29
30
31
32
33
34
35
Specs
Install
Password
Activity indicators
Connecting your devices
Warranty
Configuring your PCs
Appendix B. Problem Solving
User Timeout
Setting an Admin password
Page 31
Image 31
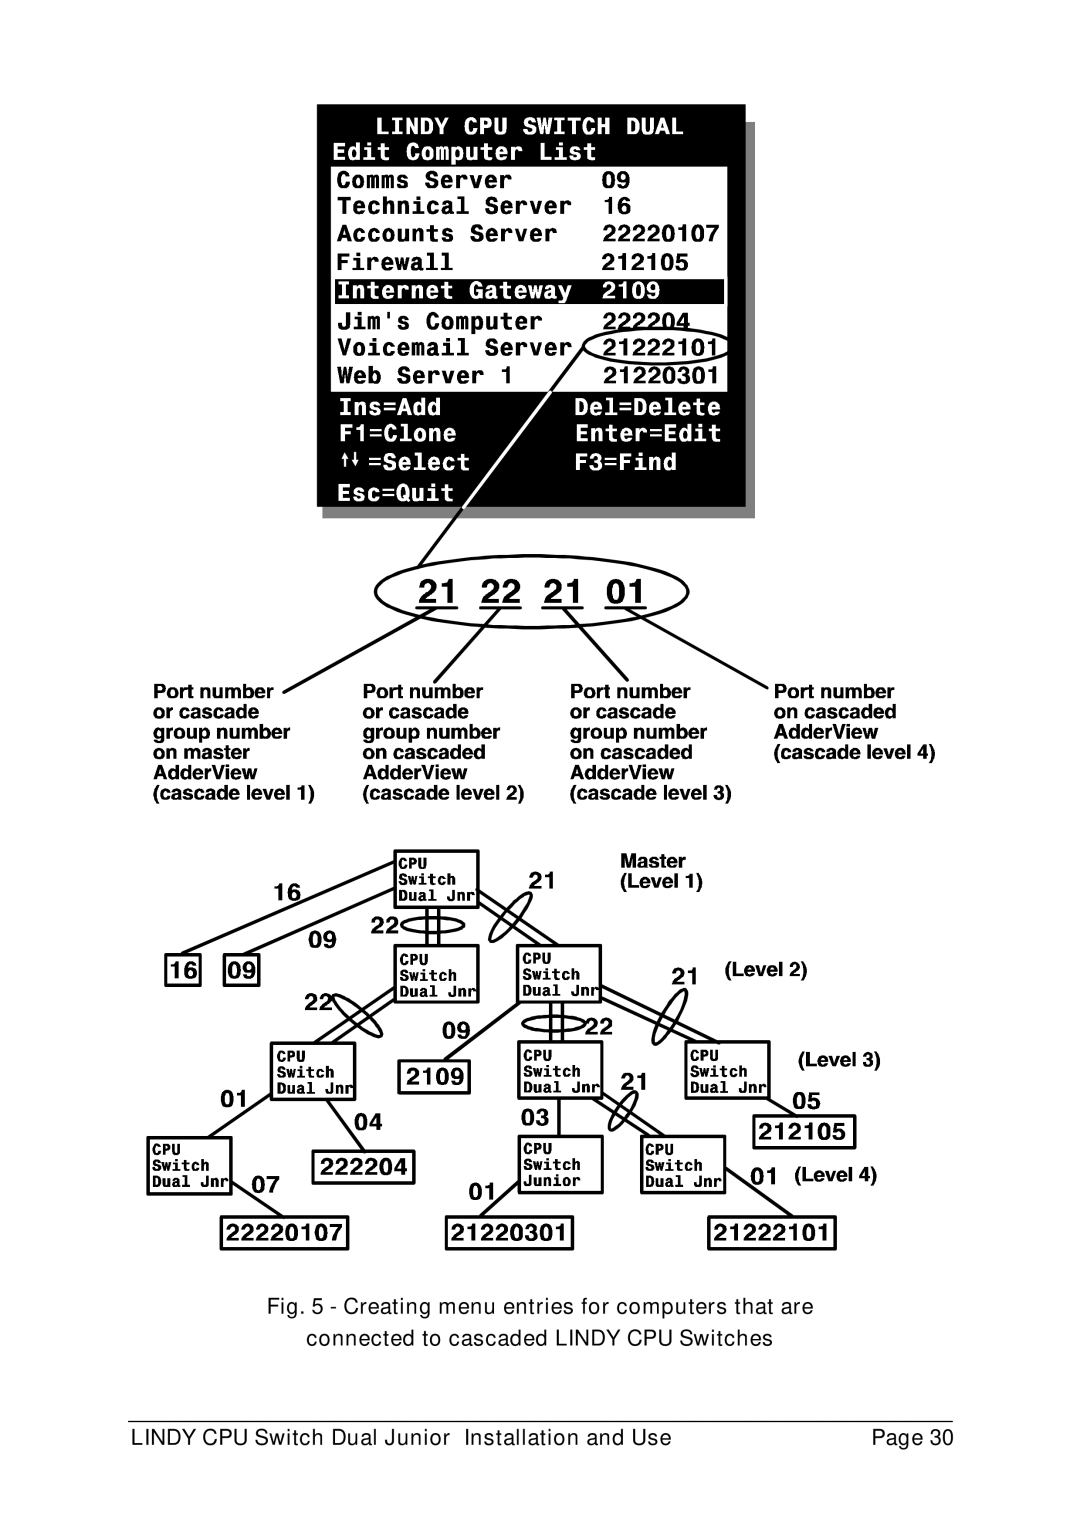
Fig. 5 - Creating menu entries for computers that are
connected to cascaded LINDY CPU Switches
LINDY CPU Switch Dual Junior Installation and Use
Page 30
Page 30
Page 32
Page 31
Image 31
Page 30
Page 32
Contents
Dual Junior
About this manual
Lindy CPU Switch Dual Junior Installation and Use
Languages please check the Lindy website
Warranty
Safety information
European EMC directive 89/336/EEC
Radio Frequency Energy
Contents
Appendices
Using the Lindy CPU Switch Dual Junior
Lindy explains
Introduction
What does KVM stand for?
Key features and benefits
Lindy CPU Switch Dual Junior Installation and Use
Lindy CPU Switch Dual Junior package contents
Product information
Page
For the computer connections you will need
Installation
Flexible configuration
What you will need
For the user port connections you will need
Mounting the Lindy CPU Switch
Connecting your devices
Structuring your Lindy CPU Switch Dual Junior installation
Configuring your PCs
Lindy CPU Switch Dual Junior Installation and Use
Lindy CPU Switch Dual Junior Installation and Use
Page
Page
Maximising the video quality
Re-enabling a disconnected PS/2 mouse
Other useful installation information
Lindy CPU Switch Dual Junior Installation and Use
Lindy extender requirements
Connecting a Lindy extender
Create an Admin administration account password
Configuring the Lindy CPU Switch Dual Junior
Configuration summary
Decide if you are going to use password security
Add / edit names to identify your computers
Enabling password security
Set the required Setup Options and Global Preferences
Create user accounts
Setting an Admin password
Follow a similar process to edit users
Creating and editing user accounts
Creating and editing computer names
To create user accounts
Follow a similar process to edit computer names
To create computer names
Lindy CPU Switch Dual Junior Installation and Use
Page
Possible cascade groups and their associated names
Setting the Setup Options and Global Preferences
Language
Security
Hotkeys
Exclusive USE
Keypad Controls
Automatic Logout
Mouse Switching
Screen Saver
To define the autoscan list
Autoscan Mode
13 RS232 Mouse Type
User Timeout
Autoscan Period
OSD Dwell Time
Lindy CPU Switch Dual Junior Installation and Use
User display and key switch
Using the Lindy CPU Switch Dual Junior
Rear panel special function switches
Power supply connections and indicators
Computer display and key switch
Selecting a computer using the front panel controls
Activity indicators
Logging on to the Lindy CPU Switch Dual Junior
Keyboard hotkeys
‘HOTKEYs’ and ‘1 then 3’ selects channel
‘HOTKEYs’ and ‘1 then 0’ selects channel
‘HOTKEYs’ and ‘1 then 1’ selects channel
‘HOTKEYs’ and ‘1 then 2’ selects channel
Press bavrelease vpress Release vpress vrelease vba
Press ba2 release 2ba
Selecting computers using the mouse
Press baM release Mba
Selecting computers using the on-screen menu
Lindy CPU Switch Dual Junior Installation and Use
Je or jf
Lindy CPU Switch Dual Junior Installation and Use
Reminder banner
Baw
OSD Colour
Setting the User Preferences
Reminder Banner
Reminder Colour
Using the Functions menu
Restore Standard Mouse
Restore Intellimouse
Querying the routing status
Cascading Lindy CPU Switches
Press ba0release Press 1release Press 4release 4ba
Resetting user port keyboards and mice
What to do if you forget your Admin password
Using the Lindy extender
To save the menu names and configuration settings
To edit the menu names and configuration settings
Baud 19200, bits 8, stopbits 1, paritynone
Switching channels by sending RS232 data
Upgrading the Lindy CPU Switchs firmware
Prepare your computers
Connect your computer to the Lindy CPU Switch Dual Junior
LYDJNR.EXE
Power off the Lindy CPU Switch Dual Junior
Power on the Lindy CPU Switch with the Upgrade switch on
Run the upgrade program
Lydjnr Datfilename.DAT
216V129.DAT
Lydjnr 216V129.DAT
Important Note
Cable specifications
Appendix A. Cable and connector specifications
A2. Lindy CPU Switch Dual Junior to PCs 1 to
Cable specification
Recommended cables
Part Code Description
Problem
Appendix B. Problem Solving
Action
Lindy CPU Switch Dual Junior Installation and Use
Top
Page
Image
Contents