User Guide
Contents
Safety Notices
Appendix C Specifications Appendix D Warranty Information
Avis d’Industrie Canada Wireless Disclaimer
Appendix F Software End User License Agreement
Product Overview
Top
Back
Horizontal Placement
Wall-Mounting Placement
Bottom
To install the Router Attach the antennas to the Router
Installation
Cisco Connect
Insert the CD into your CD-ROM drive
Connection steps are displayed
Plug the power adapter into an electrical outlet
Installation is complete.. Click OK
Local Access versus Guest Access
When Cisco Connect starts up, the main menu appears
Guest Access versus Local Access Diagram
Main Menu Router Settings
Main Menu Guest Access
Computers and Other Devices
Main Menu Computers and Devices
Please wait while settings are copied to the Easy Setup Key
Create or Update the Easy Setup Key
Connect Manually
After your device connects, click Next
Wireless Printer
Guest Access
Easy Setup Key
Router Settings
Change Router Name or Password
Personalize
How to Access Cisco Connect
How to Exit Cisco Connect
How to Access the Browser-Based Utility
Advanced Configuration
Setup Basic Setup
Internet Setup
Static IP
Automatic Configuration Dhcp
PPPoE
Minutes
Telstra Cable
Optional Settings
Dhcp Server Settings
Network Setup
Router IP
Dhcp Reservation
Time Settings
Ddns Service
DynDNS..org
Setup Advanced Routing
Setup MAC Address Clone
MAC Address Clone
Advanced Routing
Wireless Basic Wireless Settings
Manual Setup
Routing Table
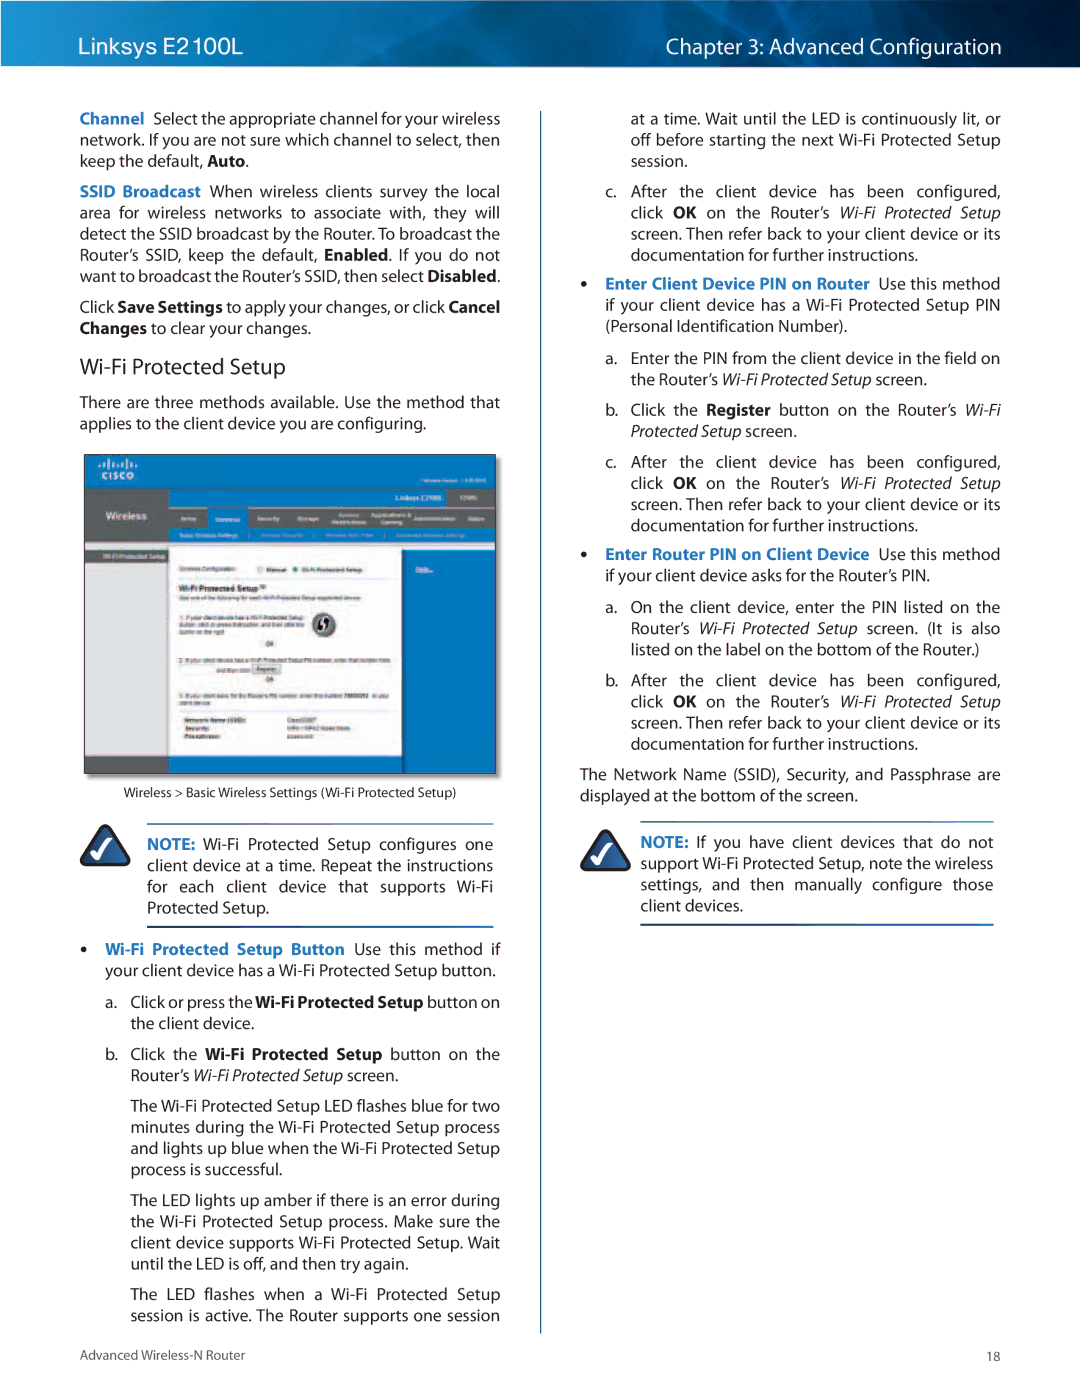
Wi-Fi Protected Setup
Security Mode
Wireless Wireless Security
Personal Options
Office Option
WEP
Wireless Advanced Wireless Settings
Wireless Wireless MAC Filter
Wireless MAC Filter
Advanced Wireless
Linksys E2100L
Security VPN Passthrough
Security Firewall
Firewall
Web Filters
Disk Management
Storage Disk
Shared Folder
Format Disk
Claim Disk
Create a Shared Folder
Storage Media Server
Setup
Edit a Shared Folder
UPnP Media Server
Storage FTP Server
Database Setup
Add a Media Folder
FTP Server
Access
Create an FTP Folder
FTP Summary
Edit an FTP Folder
Storage Administration
Information
After you clicked Edit, the FTP Folder screen appears
User Management
Group Management
Create or Edit a Group Account
Create or Edit a User Account
Access Restrictions Internet Access
Internet Access Policy
Summary
Single Port Forwarding
Applications and Gaming Single Port Forwarding
Applications & Gaming Port Range Triggering
Applications and Gaming Port Range Forwarding
Port Range Forwarding
Port Range Triggering
QoS Quality of Service
Applications and Gaming DMZ
Applications and Gaming QoS
Applications
Category
Online Games
Add a New Game
Administration Management
Summary
Management
Log
Administration Log
Diagnostics
Administration Diagnostics
Traceroute Test
Ping Test
Administration Factory Defaults
Administration Firmware Upgrade
Status Router
Status Local Network
Status Wireless Network
Click the Connections tab
Appendix a Troubleshooting
Click OK
Connect the USB storage device directly to your computer
Click the Exceptions tab
Install the USB Storage Device
Appendix B How to Install and Access USB Storage
Access the USB Storage Device
Overview
Map a Drive
Double-click the mapped drive to access it
Access the Mapped Drive
Windows Vista
Click Finish
On your desktop, double-click the Network icon
Windows XP
Create a Shared Folder,
On your desktop, double-click the My Computer icon
Map a Drive
Mac OS
From your desktop, select Go Network
Double-click the server name
Click Connect As
Display the Shared Folder on the Desktop
Add to Startup Login Items
Go to the Apple menu and select System Preferences
Click Accounts
Access the Browser-Based Utility
Advanced Configuration Advanced Users Only
Drag the shared folder to the Login Items window
Click the Storage tab Click the Disk tab
Create a User Group Account
Click the Storage tab Click the Administration tab
Create a User Account
Appendix C Specifications
A, Canada, Asia Pacific, Australia, New Zealand
Appendix D Warranty Information
Obtaining Warranty Service
Appendix E Regulatory Information
Avis de non-responsabilité concernant les appareils sans fil
Wireless Disclaimer
Cisco Products
Appendix F Software End User License Agreement
Software Licenses
Schedule Cisco Software License Agreement
Advanced Wireless-N Router
Advanced Wireless-N Router
Advanced Wireless-N Router
Schedule 2-A
Schedule Open Source and Third Party Licenses
Preamble
Version 2, June
Advanced Wireless-N Router
No Warranty
Version 2..1, February
Schedule 2-B
Advanced Wireless-N Router
Advanced Wireless-N Router
Advanced Wireless-N Router
END of Terms and Conditions END of Schedule 2-B
Schedule 2-C
OpenSSL License
Original SSLeay License
END of Schedule 2-C
10012110NC-JL