Outdoor Knight Boiler Installation & Operation Manual

2 Prepare boiler

Remove boiler from wood pallet

1.After removing the outer shipping carton from the boiler, remove the installation kit.

2.Remove the front access covers to access the lag bolts in front of the unit (FIG. 2-1).

3.To remove the boiler from the pallet (after removing the front access covers):

a.Remove the two lag bolts from the wood pallet inside the boiler (FIG. 2-1).

b.Detach the boiler from the lag bolts in the rear of the unit, see FIG. 2-1.

NOTICE

Do not drop the boiler or bump the jacket

on the floor or pallet. Damage to the


boiler can result.

Figure 2-1Boiler Mounted on Shipping Pallet

. 2

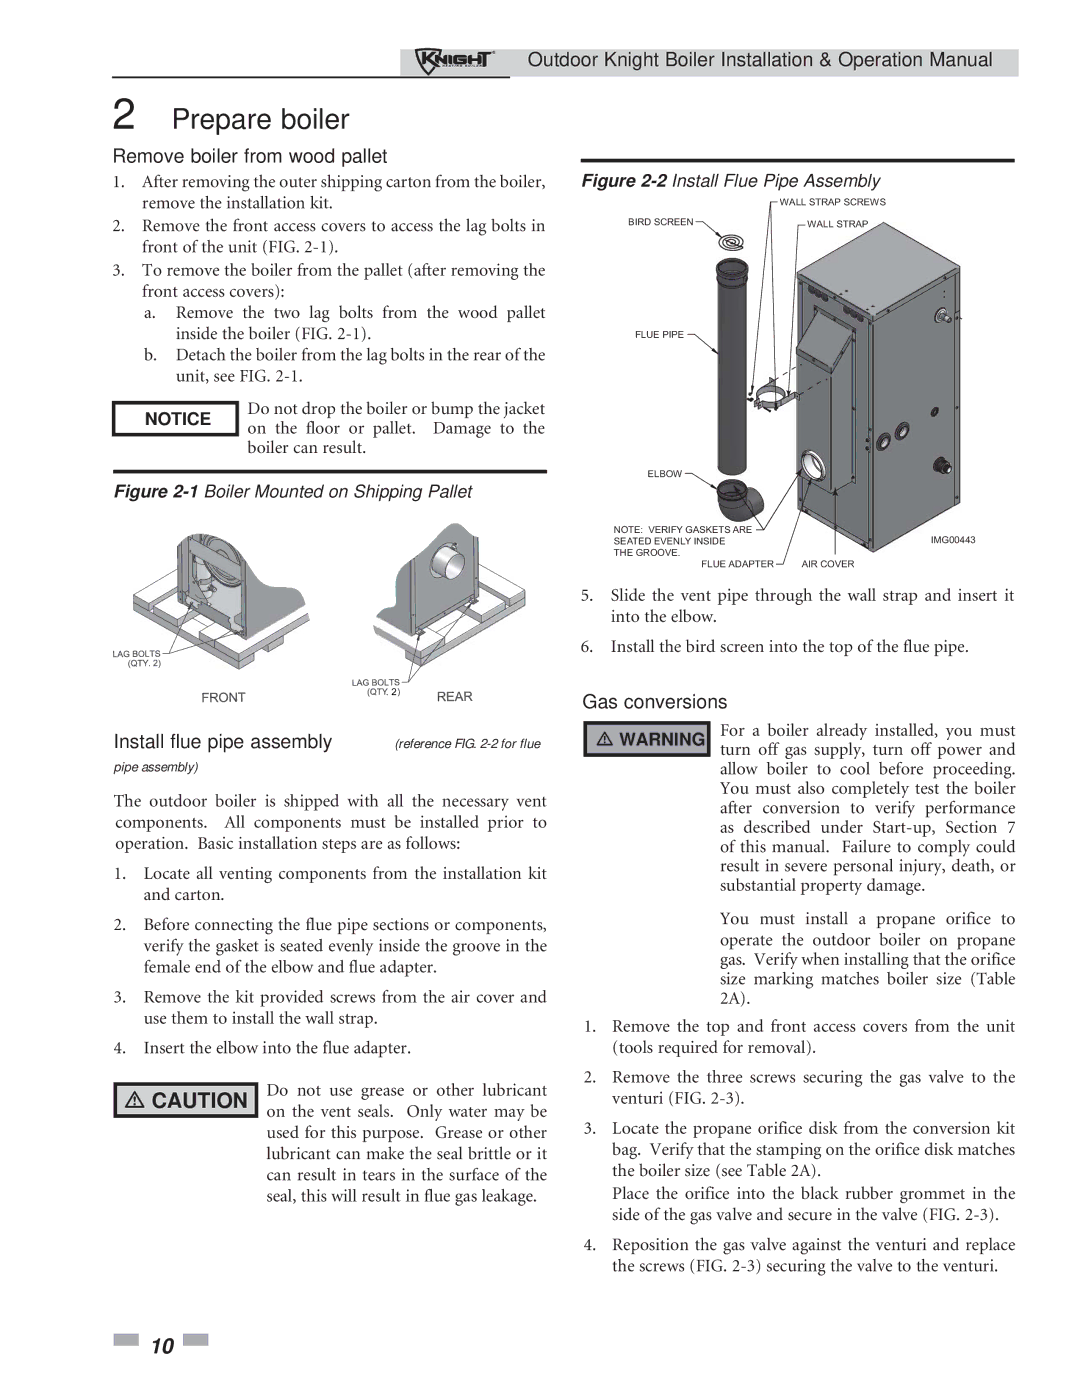
Figure 2-2Install Flue Pipe Assembly


WALL STRAP SCREWS

BIRD SCREEN

WALL STRAP

FLUE PIPE

ELBOW

NOTE: VERIFY GASKETS ARE

IMG00443

SEATED EVENLY INSIDE

THE GROOVE.


FLUE ADAPTER

AIR COVER

5.Slide the vent pipe through the wall strap and insert it into the elbow.

6.Install the bird screen into the top of the flue pipe.

Gas conversions

Install flue pipe assembly (reference FIG. 2-2 for flue pipe assembly)

The outdoor boiler is shipped with all the necessary vent components. All components must be installed prior to operation. Basic installation steps are as follows:

1.

Locate all venting components from the installation kit


and carton.

2.

Before connecting the flue pipe sections or components,


verify the gasket is seated evenly inside the groove in the


female end of the elbow and flue adapter.

3.

Remove the kit provided screws from the air cover and


use them to install the wall strap.

￿WARNING

For a boiler already installed, you must turn off gas supply, turn off power and allow boiler to cool before proceeding. You must also completely test the boiler after conversion to verify performance as described under Start-up, Section 7 of this manual. Failure to comply could result in severe personal injury, death, or substantial property damage.

You must install a propane orifice to operate the outdoor boiler on propane gas. Verify when installing that the orifice size marking matches boiler size (Table 2A).

4. Insert the elbow into the flue adapter.


Do not use grease or other lubricant

￿ CAUTION


on the vent seals. Only water may be

used for this purpose. Grease or other lubricant can make the seal brittle or it can result in tears in the surface of the seal, this will result in flue gas leakage.

1.Remove the top and front access covers from the unit (tools required for removal).

2.Remove the three screws securing the gas valve to the venturi (FIG. 2-3).

3.Locate the propane orifice disk from the conversion kit bag. Verify that the stamping on the orifice disk matches the boiler size (see Table 2A).

Place the orifice into the black rubber grommet in the side of the gas valve and secure in the valve (FIG. 2-3).

4.Reposition the gas valve against the venturi and replace the screws (FIG. 2-3) securing the valve to the venturi.

10

Page 10
Image 10
Lochinvar 151-286 operation manual Prepare boiler, Remove boiler from wood pallet, Gas conversions

151-286 specifications

Lochinvar 151-286 is a high-efficiency water heater designed for both residential and commercial applications. This model stands out due to its advanced technology, user-friendly controls, and robust construction, making it a reliable choice for those seeking to optimize their hot water supply.

One of the key features of the Lochinvar 151-286 is its impressive heating capacity. With a maximum input of 286,000 BTU/hr, it can efficiently meet hot water demands for a variety of settings, including hotels, restaurants, and other commercial facilities. This substantial output ensures that even during peak usage hours, hot water availability is maximized, reducing wait times and enhancing customer satisfaction.

The water heater utilizes a state-of-the-art condensing technology that maximizes efficiency by capturing and utilizing flue gas heat. This process allows the Lochinvar 151-286 to achieve an impressive thermal efficiency rating of up to 98%. The benefit of such high efficiency translates to significant energy savings and reduced operational costs over time, making it an environmentally friendly option as well.

The Lochinvar 151-286 is equipped with a user-friendly control system featuring advanced microprocessor controls. These controls allow for precise temperature management and monitoring, enabling users to set optimal temperatures according to their specific needs. Additionally, the heater includes built-in diagnostics, allowing for easy troubleshooting and maintenance, which minimizes downtime and extends the life of the unit.

Another standout characteristic of the Lochinvar 151-286 is its durable construction. Built with high-quality materials, including a robust stainless steel heat exchanger, this model is designed to withstand the rigors of daily use. The unit also features a compact design, which facilitates easy installation in various locations, whether it be in a utility closet or alongside existing equipment.

Safety features are paramount in the Lochinvar 151-286, with multiple safeguards in place to protect against overheating and other potential issues. The unit is designed to operate reliably, ensuring peace of mind for users who depend on consistent hot water availability.

In summary, the Lochinvar 151-286 water heater combines high capacity, exceptional efficiency, and user-friendly technology, making it an excellent choice for those seeking reliable hot water solutions. Its advanced features deliver performance and durability that stand out in the competitive market of water heating systems.