Manual del propietario Instalación
Installation Instructions
Manuel d’utilisation Et d’installation
Write the model and serial numbers here Model # Serial #
Consumer
Installation Instructions Operating Instructions
Support Troubleshooting Tips
Before You Throw Away Your Old Refrigerator or Freezer
Instructions Troubleshooting Tips Consumer Support
Operating Instructions Installation
Ge.com
Changing the Temperature
About the controls with temperature settings
Consumer Support Troubleshooting
For Controls-on-the-Door Models
About TurboCool. on some models
About Door Alarm on some models
Safety
How it Works
Installation Instructions Tips
About the water filter. on some models
Consumer Support
Spillproof Shelves on some models
About the shelves and bins
Rearranging the Shelves
Refrigerator Compartment
About the additional features
Safety
Instructions
Instructions Troubleshooting Tips Consumer Support
About the crispers and pans
About the freezer
Safety Instructions
Tips Installation Instructions Operating Instructions
Freezer Shelves and Baskets
Instructions Operating Instructions Installation
About the automatic icemaker
Care and cleaning of the refrigerator
Cleaning the Outside
Cleaning the Inside
Behind the Refrigerator
Preparing for Vacation
Preparing to Move
Replacing the light bulbs
Refrigerator Lights
Freezer Light
Panels less than 1/4 ″ 6 mm thick
Troubleshooting Tips
Trim kits and decorator panels
Read these instructions completely and carefully
Dimensions for Custom Wood Panels
Instructions Operating Instructions Safety Instructions
Troubleshooting Tips Installation
Support
Materials YOU MAY Need not included
Before YOU Begin
Preparation
Tools YOU MAY Need
Measure Cabinet Opening Available VS. Refrigerator Width
Locating the ANTI-TIP Floor Bracket
ANTI-TIP Bracket Installation
Locating the ANTI-TIP
Floor Bracket
Refrigerator Location
Installing the Refrigerator
Connecting the Refrigerator to the House Water Line
Clearances
Plug in the Refrigerator
Connecting the Refrigerator to the House Water Line
Turn on the Water Supply
PUT the Refrigerator in Place
Stainless steel on some models
Remove the Fresh Food Door Handle
Remove the Freezer Door Handle
Plastic handle on some models
Stainless steel handle
Attach the Fresh Food Door Handle
Attach the Freezer Door Handle
Plastic handle
Icemaker models
SET the Controls
Remove Packaging Start Icemaker
Leveling legs have 2 purposes
Remove the Drawer Front from the Slides
Remove the Basket
Remove the Base Grille
If needed
Attach and Secure the Drawer Front to the Slides
Two people may be required to complete this procedure
Replace the Freezer Basket
Hang the drawer front onto open slots on the slides
Important Notes
Tools YOU will Need
Remove the Refrigerator Door
Transfer Refrigerator Door Stop
Install Center Hinge
Remove Center Hinge
Transfer Refrigerator Door Handle to Right
Install the Logo Badge
Rehang Refrigerator Door
Remove the Refrigerator Doors
Remove water coupling and power coupling
Removing the Doors Double Door Refrigerator Models only
Tape the doors shut with masking tape
Remove Opposite Door
Remove
Refrigerator Doors
Remove Freezer Drawer
Replace Opposite Door
Replacing the Doors Double Door Refrigerator Models only
Rehang Refrigerator Doors
Align Double Doors
Installing the Water Line Icemaker Models
What YOU will Need
Choose the Valve Location
Installing the Water Line
Shut OFF the Main Water Supply
Drill the Hole for the Valve
Connect the Tubing To the Valve
Fasten the Shutoff Valve
Tighten the Pipe Clamp
Route the Tubing
Before you call for service…
Problem Possible Causes What To Do
Normal operating sounds
Safety Instructions
Ice cubes have
See Care and cleaning
See Installing the Refrigerator
Odor/taste
Water in first glass
Water has poor
Taste/odor
Is warm
Changed color
Water filter indicator
My display is showing
Remains red even after
General Electric Company
Consumer Product Ownership Registration
Ownership Registration
Page
Instructions Troubleshooting
GE Will Replace
What GE Will Not Cover
Customer Warranty
General Installation/Operation/Maintenance Requirements
Performance Data Sheet
Operating Specifications
Special Notices
Water Treatment Device
Fonctionnement
Fonctionnement Installation
Consommateur
Réfrigérants
Installation Conseils de dépannage Consommateur Soutien au
Raccordement Électrique
Mesures de sécurité
Les commandes avec réglages
Installation Dépannage
Soutien au Consommateur
Conseils de dépannage
Au sujet de TurboCool. sur certains modèles
De sécurité
Fonctionnement
Sécurité Le filtre à eau
Remplacement du filtre
Installation de la cartouche du filtre à eau
Mesures de
Clayettes anti-déversement sur certains modèles
Les clayettes et les balconnets
Mise en place des clayettes
Compartiment réfrigération
Installation Conseils de dépannage Soutien au Consommateur
Caractéristiques supplémentaires
Sécurité
Installation
Bacs à rangement et bacs à légume
Conseils de dépannage Consommateur Soutien au
Clayettes et paniers du compartiment congélation
Installation Conseils de dépannage
Congélateur
Enlèvement du panier
Machine à glaçons automatique
Consommateur Soutien au
Entretien et nettoyage de votre réfrigérateur
Nettoyage de l’extérieur
Nettoyage de l’intérieur
Derrière le réfrigérateur
Départ en vacances
Déménagement
Remplacement des ampoules
Lumières du compartiment réfrigération
Panneaux de moins de 6 mm 1/4 po d’épaisseur
Ensembles de moulures et de panneaux décoratifs
Mesures de sécurité Fonctionnement
Veuillez lire toutes les directives attentivement
Dimensions pour les panneaux en bois sur mesure
Panneaux de 19 mm 3/4 po ou en relief
Matériaux Dont Vous Pouvez
Avant DE Commencer
Préparation
Outils Dont Vous Pouvez
Outils Dont Vous Pouvez Avoir Besoin Suite
Positionnement DU Support DE SOL ANTI-BASCULEMENT
Installation DU Support ANTI-BASCULEMENT
Positionnement DU Support DE SOL ANTI-BASCULEMENT suite
Dégagements
Installation DU Réfrigérateur
Emplacement DU Réfrigérateur
Enlevez LE Capuchon DU Haut
Branchez LE Cordon DU Réfrigérateur Dans LA Prise
Ouvrez L’ALIMENTATION D’EAU
Mettez LE Réfrigérateur EN Place
Mettez LE Réfrigérateur DE Niveau
Installation DU Réfrigérateur Suite
Enlevez LA Poignée DE LA Porte DU Compartiment Congélation
Poignée en acier inoxydable
Fixez LA Poignée DE LA Porte DU Compartiment Aliments Frais
Fixez LA Poignée DE LA Porte DU Compartiment Congélation
Poignée en matière plastique
Mettez LE Réfrigérateur DE Niveau
11 Réglez LES Commandes
Réglez les commandes selon les recommandations
Modèles avec machine à glaçons
Enlevez L’AVANT DU Tiroir DES Guides
Sur certains modèles
Enlevez LE Panier
Enlevez L’AVANT DU Tiroir DES Guides suite
Suite
Placement ET Fixation DE ’AVANT DU Tiroir AUX Guides
Remise EN Place DU Panier DU Compartiment Congélation
Vissez complètement les vis il y a 10 vis
Outils Nécessaires
Changement DU Sens D’OUVERTURE DES Portes
Modèles de réfrigérateurs à une porte uniquement
Enlèvement DE LA Porte DU Compartiment Réfrigération
Enlèvement DE LA Charnière DU Centre
Installation DE LA Charnière DU Centre
Modèles de réfrigérateurs à une porte uniquement Suite
Transfert À Droite DE
RE-SUSPENSION DE
Fixez LE Logo
LA Porte DU Compartiment Réfrigération
Enlèvement DES Portes DU Compartiment Réfrigération
Fermez les portes et attachez-les avec le ruban masque
Enlevez les raccords d’eau et d’électricité
Enlèvement DE LA Porte Opposée
Enlèvement DES Portes DU Compartiment Réfrigération suite
Enlevez LA Charnière DU Centre
Enlèvement DU Tiroir DU Compartiment Congélation
RE-SUSPENSION DES Portes DU Compartiment Réfrigération
Alignement DES Deux Portes
Remettez EN Place
Remettez EN Place LA Porte Opposée
CE Dont Vous Aurez Besoin
Installation DE LA Conduite D’EAU
Modèles Avec Machine À Glaçons Avant DE Commencer
Dans votre maison
CE Dont Vous Aurez Besoin Suite
Installation DE LA Conduite D’EAU Suite
Choisissez L’EMPLACEMENT DU Robinet
Percez UN Trou Pour LE Robinet
Acheminez LE Tuyau
Fixez LE Robinet D’ARRÊT
Branchez LE Tuyau AU Robinet
Purgez LE Tuyau
Avant d’appeler un réparateur…
Mesures de sécurité Fonctionnement Installation
Bruits de fonctionnement normaux
Problème
Causes possibles Correctifs Le moteur fonctionne
Consultez Les commandes
Consultez Installation de la conduite d’eau
Ou démarre et s’arrête
Avant d’appeler un réparateur…
Problème Causes possibles
’eau versée dans le
Mauvais goût/odeur
De l’eau
Premier verre est
Couleur Le voyant lumineux de
Mon écran indique
Le voyant lumineux du
Du filtre d’eau
Page
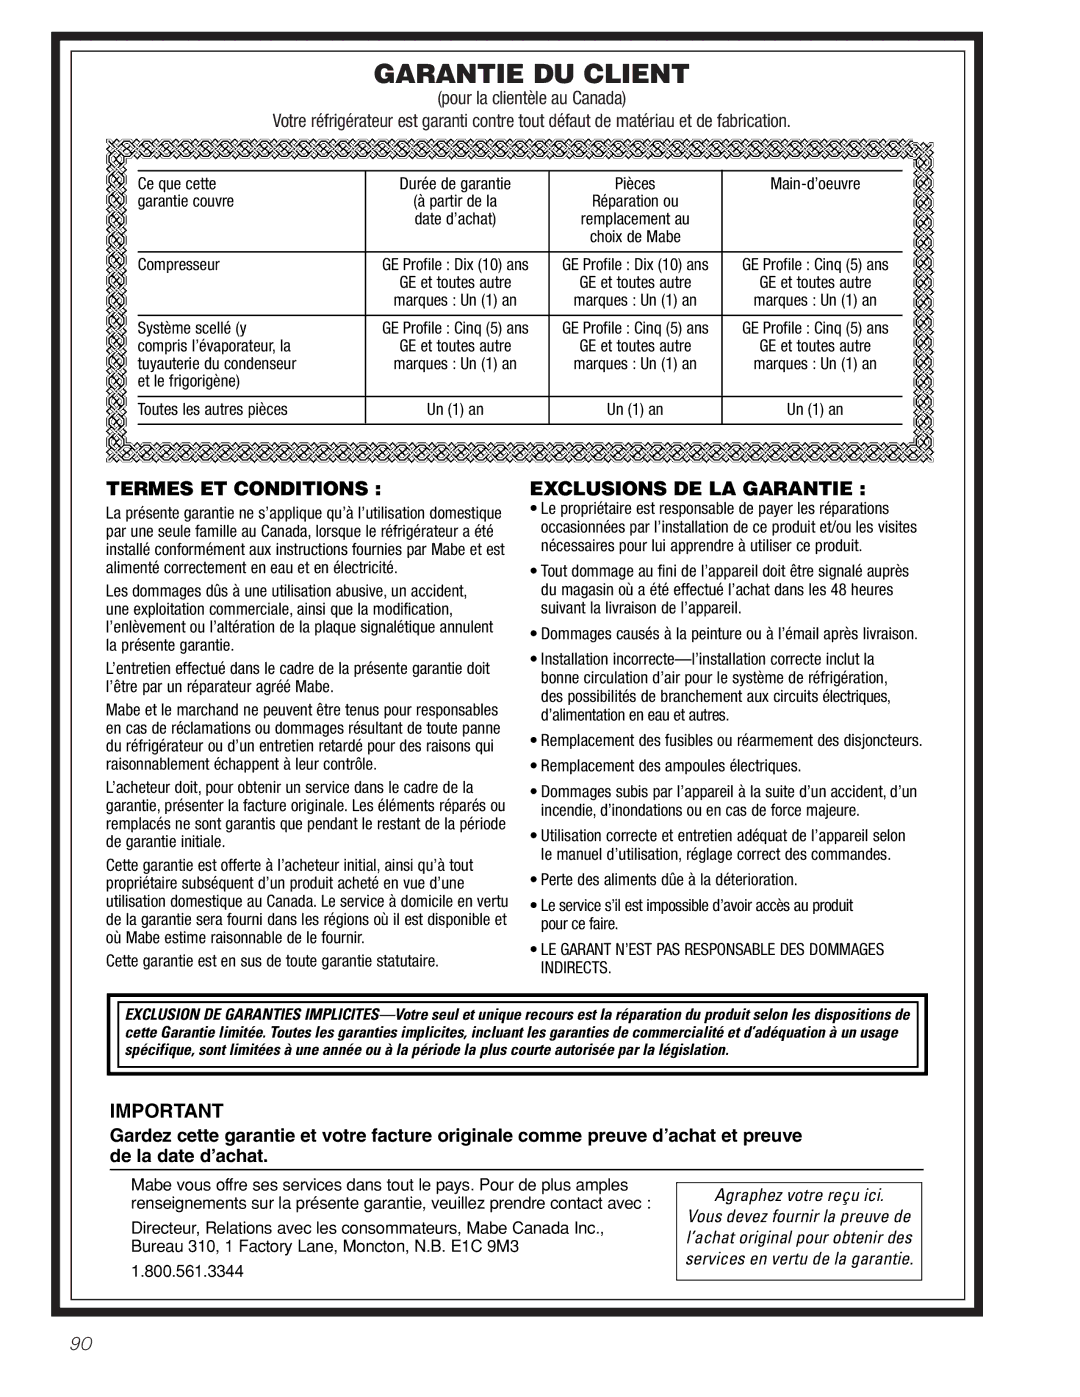
Garantie DU Client
Spécifications d’opération
Exigences générales d’installation/opération/entretien
Feuillet de données relatives à la performance
Avis spéciaux
Service de réparations
Soutien au consommateur
Prolongation de garantie
Seguridad Operación Instalación
Anote aquí los números de modelo y de serie No
Antes de deshacerse de su viejo refrigerador o congelador
Operación Instalación
Servicio al
Refrigerantes
Guarde Estas Instrucciones
Cómo cambiar la temperatura
Operación Instalación Problemas
Los controles con niveles
Para modelos con controles en la puerta
Seguridad
Sobre la alarma de la puerta en algunos modelos
Acerca de TurboCool. en algunos modelos
Cómo funciona
Precaución Si se ha
El filtro de agua
Reorganización de los estantes
Problemas Servicio al consumidor
Sobre los estantes y compartimientos
Estantes a prueba de salpicaduras en algunos modelos
Compartimientos ajustables en la puerta
Instalación Servicio al consumidor Solucionar problemas
Sobre las características adicionales
Compartimientos no ajustables en la puerta
Problemas Servicio al consumidor
Sobre las gavetas preservadoras y contenedores
Solucionar
Retiro de la canasta
Sobre el congelador
Estantes y canastas del congelador
Para retirar la canasta de ancho medio
Máquina de hielo automática
Door Alarm Alarma de puerta
Sobre la máquina de hielo automática
Kit de accesorios de la máquina de hielos
Cuidado y limpieza del refrigerador
Limpiar el exterior
Limpiar el interior
Atrás del refrigerador
Preparación para vacaciones
Luces del refrigerador
Servicio al consumidor Solucionar problemas
Cómo reemplazar las bombillas
Luz del congelador
Paneles de menos de 1/4 ″ 6 mm de grosor
Equipos de recorte y paneles de decoración
Seguridad Operación
Lea estas instrucciones por completo y con detenimiento
Servicio
Al consumidor Solucionar problemas
Dimensiones para paneles de madera a medida
″ 19 mm o panel elevado
Materiales QUE Necesita no incluidos
Antes DE Iniciar
Preparación
Herramientas QUE Usted Puede Necesitar
Cómo Ubicar EL Soporte DE Piso ANTI-VOLCADURAS
110
Nota
Cómo Ubicar EL Soporte DE Piso ANTI-VOLCADURAS
LOS Soportes DE Base
Instalación DE Soporte ANTI-VOLCADURAS
Espacio Libre
Instalación DEL Refrigerador
Ubicación DEL Refrigerador
Retiro DE LA Tapa Superior
Cómo Nivelar EL Refrigerador
Active LA Conexión DE Agua
Conecte EL Refrigerador
Coloque EL Refrigerador EN SU Lugar
Retire LA Manija DE LA Puerta DEL Congelador
Retire LA Manija DE LA Puerta DE Alimentos Frescos
114
115
Sujete LA Manija DE LA Puerta DE Alimentos Frescos
Sujete LA Manija DE LA Puerta DEL Congelador
Manija plástica
Retire EL Embalaje Inicie LA Máquina DE Hielo
10 Cómo Nivelar EL Refrigerador
Ajuste LOS Controles
Modelos con máquina de hielos
Retire LA Canasta
Cómo Retirar LA Gaveta DEL Congelador
En algunos modelos
Retire LA Rejilla DE LA Base
UNA Y Asegure EL Frente DE LA Gaveta a LAS Correderas
Cómo Reemplazar LA Gaveta DEL Congelador
Reemplace LA Canasta DEL Congelador
Cont
Notas Importantes
Cómo Invertir EL Vaivén DE LA Puerta
Modelos de refrigerador de una sola puerta únicamente
Herramientas Necesarias
Traslade EL Freno DE LA Puerta DEL Refrigerador
Retire LA Bisagra Central
Instale LA Bisagra Central
120
Instale LA Insignia DEL Logo
Vuelva a Colgar LA Puerta DEL Refrigerador
121
Retire LAS Puertas DEL Refrigerador
Cómo Retirar LAS Puertas
Modelos de refrigerador de doble puerta únicamente
122
Cómo Quitar LA Bisagra Central
Retire LA Puerta
DEL Refrigerador
Retire LA Puerta Opuesta
Reemplace LA Puerta Opuesta
Cómo Volver a Colocar LAS Puertas
Vuelva a Colgar LAS Puertas DEL Refrigerador
Vuelva a Colgar LAS Puertas DEL Refrigerador
Cómo Alinear LAS Puertas Dobles
Reemplace LA Gaveta DEL Congelador
125
QUÉ Necesita
Instalación DE LA Tubería DEL Agua
Modelos CON Máquina DE Hielos Antes DE Iniciar
126
Perfore EL Orificio Para LA Válvula
Seleccione LA Ubicación DE LA Válvula
Cierre EL Suministro Principal DE Agua
127
Lave LA Tubería
Apriete LA Abrazadera DEL Tubo
Dirija LA Tubería
Instale LA Válvula DE Apagado
Antes de solicitar un servicio…
Problema Causas Posibles Qué hacer
Sonidos normales de la operación
129
Servicio al consumidor Solucionar
Cubos pequeños o
Sonido de zumbido
Frecuente
Huecos
Cierra sola
La puerta/gaveta no se
Consulte la sección Instalación del refrigerador
La puerta/gaveta del
Filtro de agua continúa
La pantalla muestra
Filtro de agua cambió De color
Filtro de agua no está
Por el período de GE reemplazará
Lo que GE no cubrirá
134
Especificaciones de Operación
Avisos Especiales
Notas
137
138
Garantías ampliadas
Servicio al consumidor Página Web de GE Appliances
Solicite una reparación
Piezas y accesorios
Schedule Service
Consumer Support