English

16 Getting Started

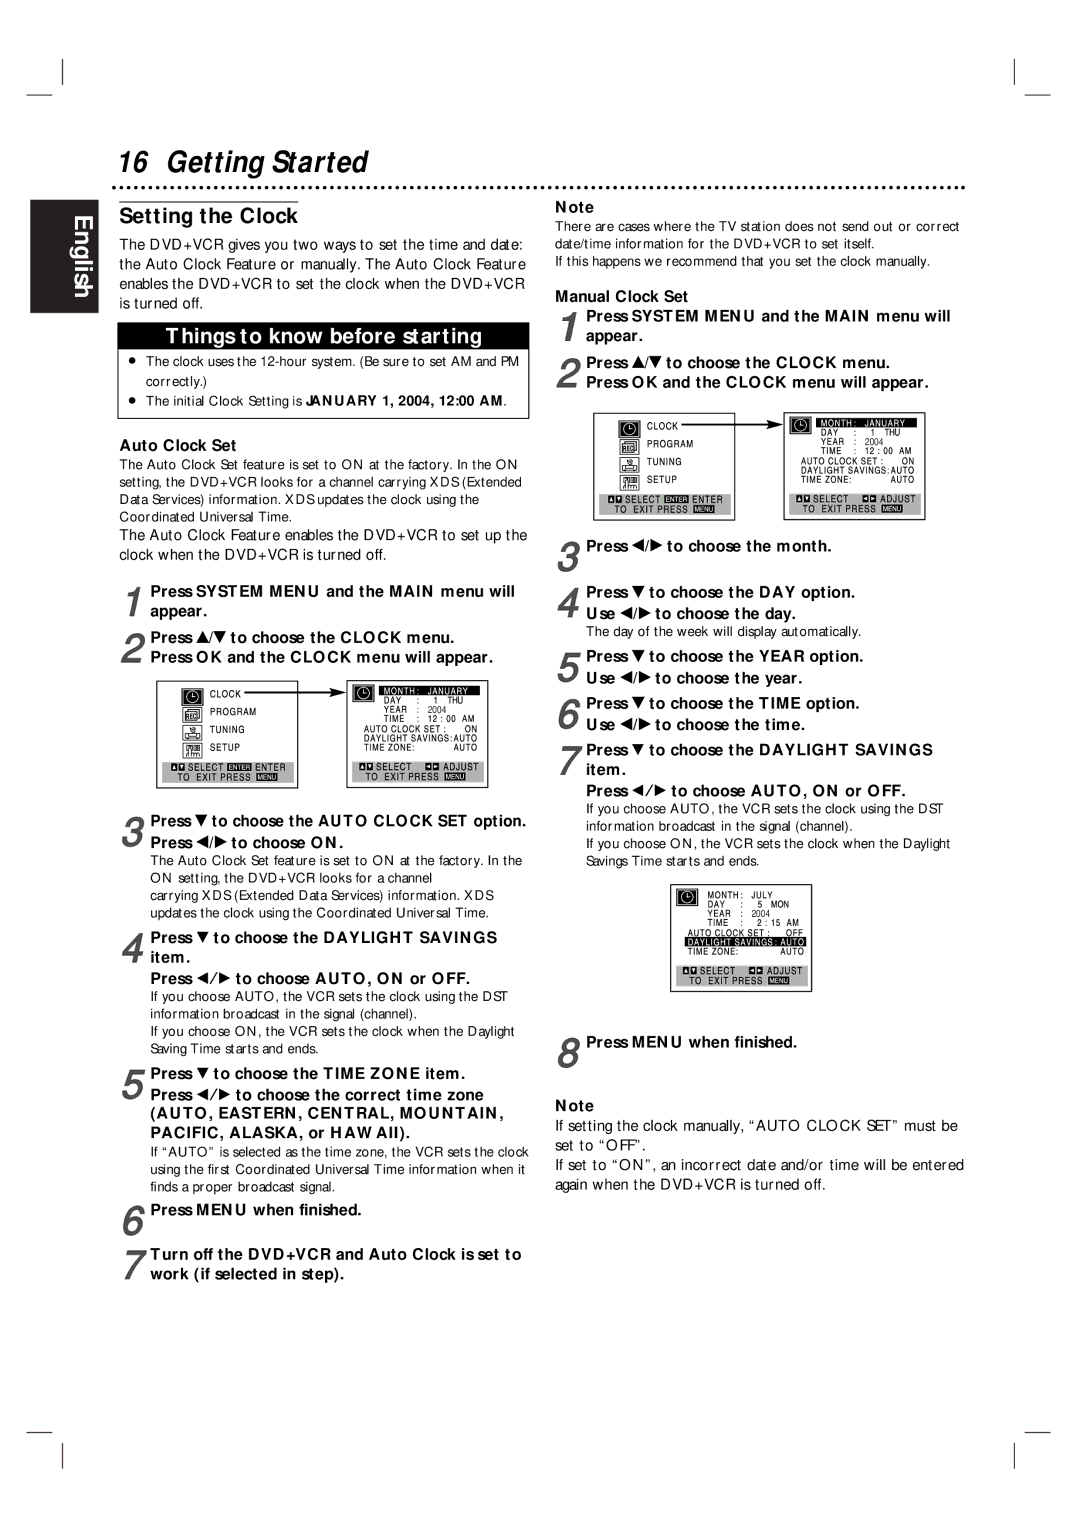
Setting the Clock

The DVD+VCR gives you two ways to set the time and date: the Auto Clock Feature or manually. The Auto Clock Feature enables the DVD+VCR to set the clock when the DVD+VCR is turned off.

Things to know before starting

The clock uses the 12-hour system. (Be sure to set AM and PM correctly.)

The initial Clock Setting is JANUARY 1, 2004, 12:00 AM.

Auto Clock Set

The Auto Clock Set feature is set to ON at the factory. In the ON setting, the DVD+VCR looks for a channel carrying XDS (Extended Data Services) information. XDS updates the clock using the Coordinated Universal Time.

The Auto Clock Feature enables the DVD+VCR to set up the clock when the DVD+VCR is turned off.

1

Press SYSTEM MENU and the MAIN menu will

appear.

2 Press v/V to choose the CLOCK menu. Press OK and the CLOCK menu will appear.

2004￿

3 Press V to choose the AUTO CLOCK SET option. Press b/B to choose ON.

The Auto Clock Set feature is set to ON at the factory. In the ON setting, the DVD+VCR looks for a channel

carrying XDS (Extended Data Services) information. XDS updates the clock using the Coordinated Universal Time.

4 Press V to choose the DAYLIGHT SAVINGS item.

Press b/B to choose AUTO, ON or OFF.

If you choose AUTO, the VCR sets the clock using the DST information broadcast in the signal (channel).

If you choose ON, the VCR sets the clock when the Daylight Saving Time starts and ends.

5 Press V to choose the TIME ZONE item. Press b/B to choose the correct time zone

(AUTO, EASTERN, CENTRAL, MOUNTAIN, PACIFIC, ALASKA, or HAWAII).

If “AUTO” is selected as the time zone, the VCR sets the clock using the first Coordinated Universal Time information when it finds a proper broadcast signal.

Note

There are cases where the TV station does not send out or correct date/time information for the DVD+VCR to set itself.

If this happens we recommend that you set the clock manually.

Manual Clock Set

1 Press SYSTEM MENU and the MAIN menu will appear.

2 Press v/V to choose the CLOCK menu. Press OK and the CLOCK menu will appear.

2004￿

3 Press b/B to choose the month.

4 Press V to choose the DAY option. Use b/B to choose the day.

The day of the week will display automatically.

5 Press V to choose the YEAR option. Use b/B to choose the year.

6 Press V to choose the TIME option. Use b/B to choose the time.

7 Press V to choose the DAYLIGHT SAVINGS item.

Press b/B to choose AUTO, ON or OFF.

If you choose AUTO, the VCR sets the clock using the DST information broadcast in the signal (channel).

If you choose ON, the VCR sets the clock when the Daylight Savings Time starts and ends.

2004

8 Press MENU when finished.

Note

If setting the clock manually, “AUTO CLOCK SET” must be set to “OFF”.

If set to “ON”, an incorrect date and/or time will be entered again when the DVD+VCR is turned off.

6

7

Press MENU when finished.

Turn off the DVD+VCR and Auto Clock is set to work (if selected in step).

Page 16
Image 16
Magnavox MDV560VR/17 warranty Setting the Clock, Auto Clock Set, Press Menu when finished

MDV560VR/17 specifications

The Magnavox MDV560VR/17 is a versatile and feature-rich device that combines the functionalities of a DVD player and a video recorder. This appliance is designed to meet the entertainment needs of consumers looking for a reliable way to enjoy their favorite films and record live television shows.

One of the standout features of the MDV560VR/17 is its dual functionality. With the ability to play DVDs and VHS tapes, it caters to a wide range of media formats, making it an ideal choice for those who still own a collection of VHS recordings while also wanting to enjoy the clarity of DVDs. This feature alone makes the MDV560VR/17 a valuable addition to any home entertainment system.

The device boasts advanced recording capabilities, allowing users to record directly from TV broadcasts onto VHS tapes. With its built-in TV tuner, users can easily capture their favorite shows in real-time, ensuring that they never miss an episode. This is particularly advantageous for those who have a busy schedule and want to enjoy television at their convenience.

In terms of connectivity, the Magnavox MDV560VR/17 is equipped with multiple input and output options. These include composite video inputs and outputs, as well as S-Video connections for improved video quality. This allows users to connect the device to a variety of televisions and audio systems, enhancing the overall viewing experience.

Another notable characteristic of the MDV560VR/17 is its user-friendly interface. The remote control is designed for easy navigation, enabling users to access a range of functions, from basic playback controls to advanced recording settings. This simplicity is ideal for users of all ages, ensuring that everyone can enjoy the device without a steep learning curve.

The MDV560VR/17 also incorporates high-quality audio and video technologies, ensuring that playback is smooth and crisp. With support for various sound formats, it provides an immersive viewing experience that complements its visual performance.

In summary, the Magnavox MDV560VR/17 is an all-in-one entertainment solution that offers a blend of DVD playback and video recording. Its range of features, ease of use, and versatile connectivity options make it a top choice for consumers looking to merge the past and present of home video technology.