ZC352MW8
Laser Safety
Precautions
Make your contribution to the environment
Precautions
Important Safeguards
Moisture Condensation Warning
Installation Location
Supplied Accessories
Avoid the Hazards of Electrical Shock and Fire
Cleaning the disc lens Disc handling
Maintenance Servicing
Cleaning the cabinet
Cleaning discs
Contents
Features
Front Panel
Functional Overview
14 13
Rear Panel
Functional Overview
Open the cover Insert batteries
Remote Control
Installing the Batteries in the Remote Control
Using a Remote Control
Setup button
Confirm button Analog mode
Digital mode
REC Mode button
Supplied cables used in this connection are as follows
Antenna Cable Connection
RF Modulator Connection
Plug in the power cords of the devices to the AC outlet
You cannot record one channel while watching another channel
With this setup
Connections
Connection to a TV
This unit
Digital audio coaxial cable
Connection to AN Audio System
Audio
Analog audio Digital audio Input jacks
Broadcast station Program title max lines displayed
On-Screen Display / Menu
Main Menu
Guide to ON-SCREEN Displays and Menus
Use K / L to select the type
Initial Setting
When scanning is over, press Setup to exit
Channel Setting
Press Setup Use K / L to select Channel, then press OK
Use K / L to select Auto Channel Preset, then press OK
To add/delete channels
Channel Setting
Press DTV/TV to select the mode
Adding / Deleting Channels
Use K / L to select Add or Delete, then press OK
Press Setup to exit
Select the channel number to add or delete
Select the channel number to delete
Auto Clock Setting
Setting the Clock
Use / B to select an item to set
Setting the Clock
Use K / L to select Clock, then Press Setup Press OK
Daylight Saving Time
Switching Analog Mode Digital Mode
Tuner Settings
Channel Selection
Selecting TV Audio
Tuner Settings
Stereo
Selecting TV Audio cont’d
SAP secondary audio program
Use K / L to select DTV CC, then press OK
Press Setup to exit
Service 1 to Service
DTV Closed Caption
Closed Caption Style
Use K / L to select User Setting, then press OK
Use K / L to select ON, then press OK
Font Opacity
Font Size
Font Style
Edge Type
Unrecordable Discs
Recording Mode
Information on DVD Recording
Recordable Discs
Make Recording Compatible
Setting for Auto Chapter
Press Setup to exit
Before Recording
It may take a while to load Disc completely
Press REC Mode to select a recording mode
Press STANDBY-ON y
Press OPEN/CLOSE a to close the disc tray
Press Stop C to exit the title list
Basic Recording & ONE-TOUCH Timer Recording
Use K / L to select a program
Timer Recording
Number, then press OK
Use K / L to enter the date, then press B
Timer Recording
To stop the timer recording in process
Priority of Overlapped Settings
Hints for Timer Recording
Overwriting in the Middle of the Title
Overwriting Unnecessary Title
Overwriting from the Beginning
Title
Overwrite recording a Existing title B Existing title C
Overwriting Unnecessary Title
Hints for Overwriting
Overwrite recording a Existing title B After overwriting
External device
Settings, then press OK
Connection to an External Device
Use K / L to select Video Input
Recording from an External Device
Settings for AN External Device
To cancel the disc protect
Setting a Disc to Protect
Use K / L to select Yes, then press OK
DVD-RW only
Press Setup Use K / L to select Disc Edit, then press OK
Finalizing a Disc
Finalizing is completed
Use K / L to select Auto Finalize, then press OK
Playing the Discs in Other DVD Players
Auto Finalizing
Use K / L to select Recording, then press OK
Information on Playback
Press Stop C once to stop playback temporarily
Basic Playback
Direct Playback
Press Play B to start playback
Playback from the Title List
Basic Playback
Press OK
Use K / L to select a desired title
Temporarily
Use K / L to select Play, then
Follow steps 1 to 2 in Direct Playback on
Playing Back a CD-RW/-R with MP3 Files
Playback will be paused and sound will be muted
Using the Title / Disc Menu
Pause
During playback, press Pause F
Skipping TV Commercials During Playback
Special Playback
Resume Playback
Fast Forward / Fast Reverse Playback
Slow Forward / Slow Reverse Playback
Special Playback
Rapid Playback
Step by Step Playback
Zoom
Marker Setting
Audio CD
Title / Chapter Search
Using Prev H / Next G
Using Display
Search
Time Search
Search
MP3 files
Repeat Playback
Random Playback
Audio CD, video CD
Repeat this step until you program all the desired tracks
REPEAT/RANDOM/PROGRAM Playback
Program Playback
You can program the disc to play back in your desired order
Switching Audio Soundtrack
Switching Subtitles
For DVD-video Audio soundtrack will switch
Reducing Block Noise
Switching Virtual Surround System
Switching Camera Angles
Selecting the Format of Audio and Video
Press Title
Information on Disc Editing
Guide to a Title List
Editing Discs
Use K / L to select Edit, then
Editing Discs
Deleting Titles
Press Title
After this operation is completed, press Return to exit
Editing Discs
Putting Names on Titles
Use K / L to select Edit Title
Submenu will appear
Setting Chapter Marks
Use K / L to select Add, then press OK
Press Return twice to exit
Chapter Mark Delete
Clearing Chapter Marks
To delete all chapter marks
Clearing Chapter Marks cont’d
All chapter marks will be deleted
Chapter, then press OK. Submenu will appear
Hiding Chapters
Press Return to exit
Setting Pictures for Thumbnails
Follow steps 1 to 3 in Deleting
You can divide one title into 2 new titles
Dividing a Title
Title will be divided into 2 new titles
Window for entering a title name will appear
When you finish entering a title name, press
Putting Name on Disc
Name, then press OK. e.g. DVD+RW
Setting or Releasing Disc Protect
Releasing disc from protect
Setting or Releasing Disc Protect cont’d
OFF, then press OK. e.g. DVD+RW
You can erase all titles on a disc
Erasing Disc
Making Edits Compatible
Setup Items highlight is the default Contents
List of Setting
Setup Items highlight is the default
List of Setting
Refer to
Setups
Required Setting
When you finish with setting, press Setup to exit
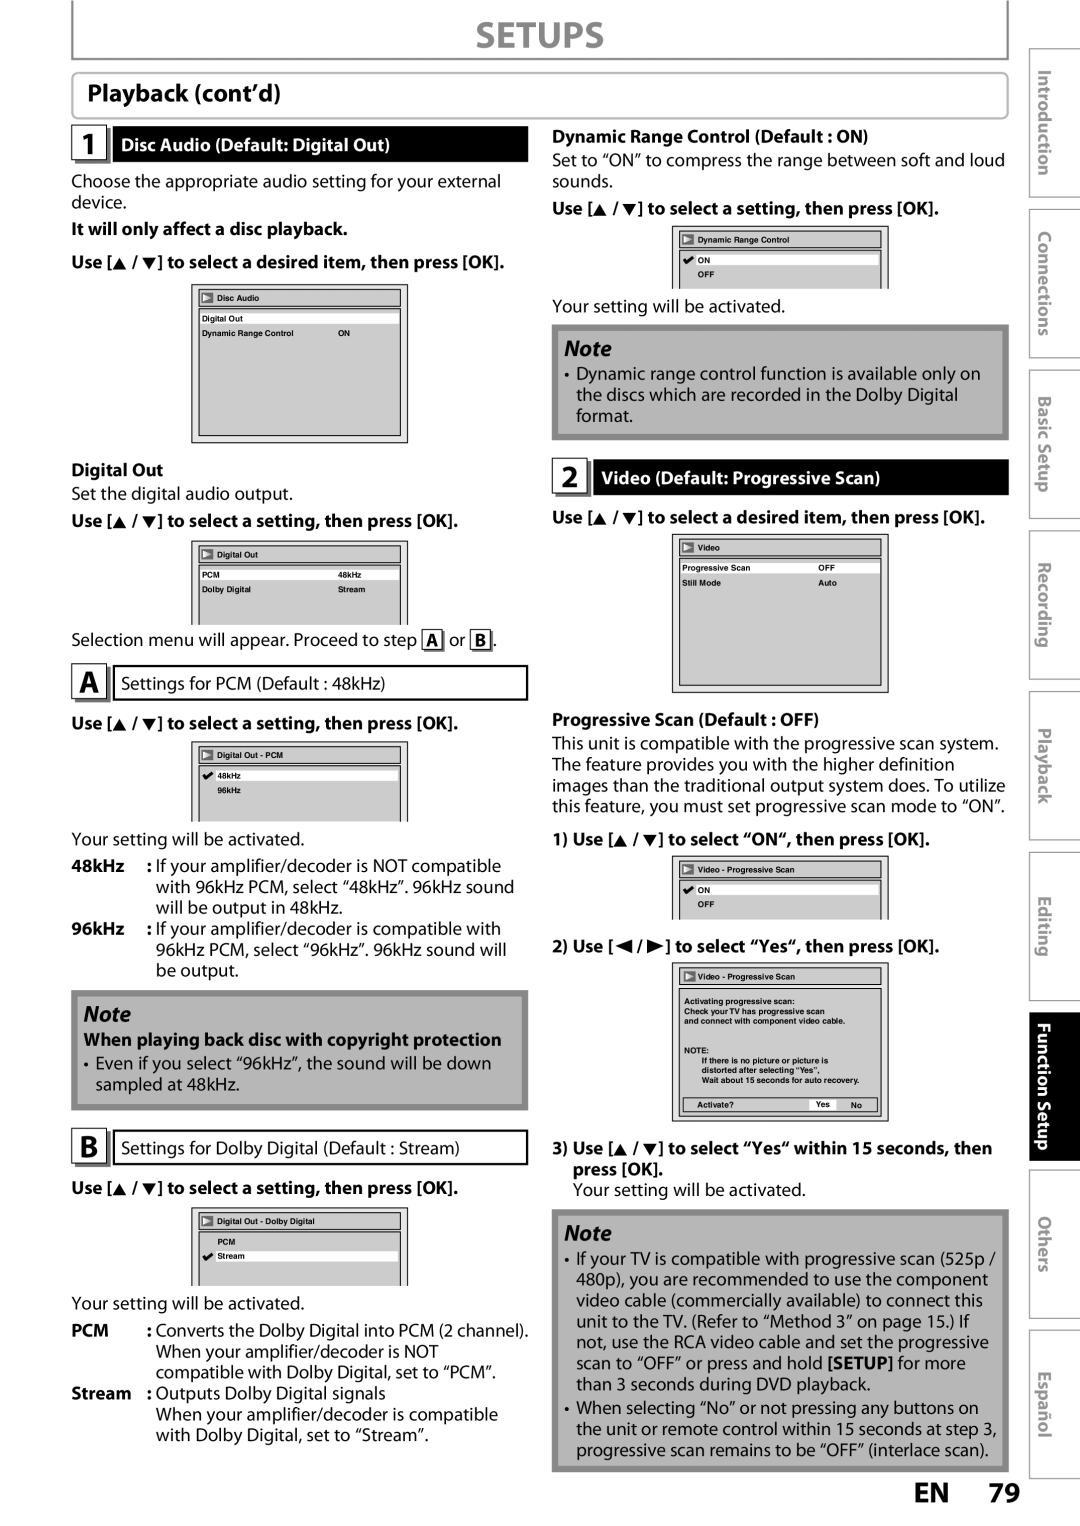
Playback
Setups
Use K / L to select Playback, then
Video Default Progressive Scan
Disc Audio Default Digital Out
Playback cont’d
Language
Use K / L to select the desired level, then press OK
Parental Lock Default OFF
Use the Number buttons to enter the current password
Function Setup Others
Display
OSD Language Default English
Angle Icon Default on
Screen Saver Default 10 minutes
Picture
Troubleshooting
Power
Remote control
You press OPEN/CLOSE a
Troubleshooting
Recording / Timer recording / Editing
Others
Repairing process MAY not work
OPEN/CLOSE a to take out the disc. The disc canceled during
It may take several minutes up to about several hours
Frequently Asked Questions
Language Code
Language Code
Glossary
Tuner
Specifications
General
Recording
Disco Grabable
Español
Discos Reproducibles
Códigos de Región
Cable coaxial de RF
Español
Presione REC I para iniciar la grabación
Presione STANDBY-ON y
Presione OK para activar Ajste Manual de Reloj
Arriba
Número de programa, y luego
Presione Timer
Configure una programación del temporizador Presione OK
Utilice K / L para seleccionar un
Tel
Customer Service
1VMN23378A