Repair | P 3/ 17 |
| |
[3] DISASSEMBLY/ASSEMBLY |
|
|
|
DISASSEMBLING |
|
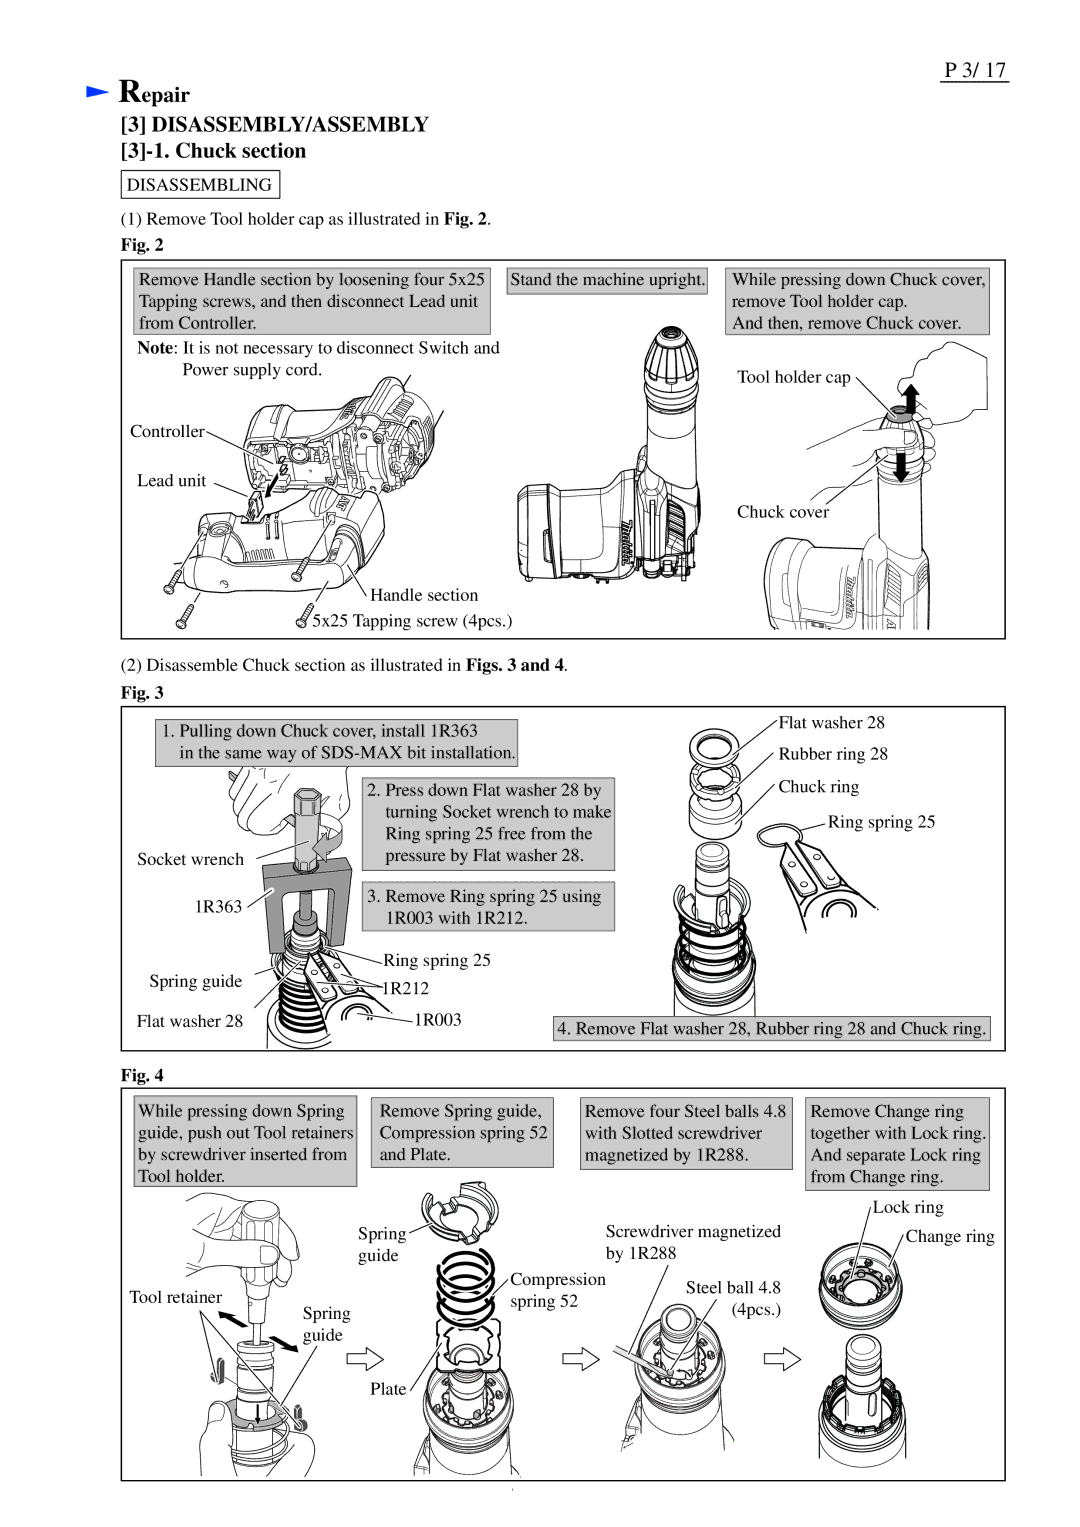
(1) Remove Tool holder cap as illustrated in Fig. 2. |
|
Fig. 2 |
|
Remove Handle section by loosening four 5x25 Stand the machine upright. | While pressing down Chuck cover, |
Tapping screws, and then disconnect Lead unit | remove Tool holder cap. |
from Controller. | And then, remove Chuck cover. |
Note: It is not necessary to disconnect Switch and |
|
Power supply cord. | Tool holder cap |
| |
Controller |
|
Lead unit |
|
| Chuck cover |
Handle section |
|
5x25 Tapping screw (4pcs.) |
|
(2)Disassemble Chuck section as illustrated in Figs. 3 and 4.
Fig. 3
1. Pulling down Chuck cover, install 1R363 |
| Flat washer 28 | |
|
| ||
in the same way of |
| Rubber ring 28 | |
| 2. Press down Flat washer 28 by | Chuck ring | |
| turning Socket wrench to make | Ring spring 25 | |
| Ring spring 25 free from the | ||
|
| ||
Socket wrench | pressure by Flat washer 28. |
| |
1R363 | 3. Remove Ring spring 25 using |
| |
1R003 with 1R212. |
|
| |
|
|
| |
| Ring spring 25 |
|
|
Spring guide | 1R212 |
|
|
|
|
| |
Flat washer 28 | 1R003 | 4. Remove Flat washer 28, Rubber ring 28 and Chuck ring. | |
|
| ||
Fig. 4 |
|
|
|
While pressing down Spring | Remove Spring guide, | Remove four Steel balls 4.8 | |
guide, push out Tool retainers | Compression spring 52 | with Slotted screwdriver | |
by screwdriver inserted from | and Plate. | magnetized by 1R288. | |
Tool holder. |
|
|
|
| Spring | Screwdriver magnetized | |
| guide | by 1R288 |
|
Tool retainer | Compression | Steel ball 4.8 | |
spring 52 |
| ||
| (4pcs.) | ||
Spring |
|
| |
guide![]()
![]()
![]()
![]()
![]() Plate
Plate 
![]()
Remove Change ring together with Lock ring. And separate Lock ring from Change ring.
Lock ring
Change ring
