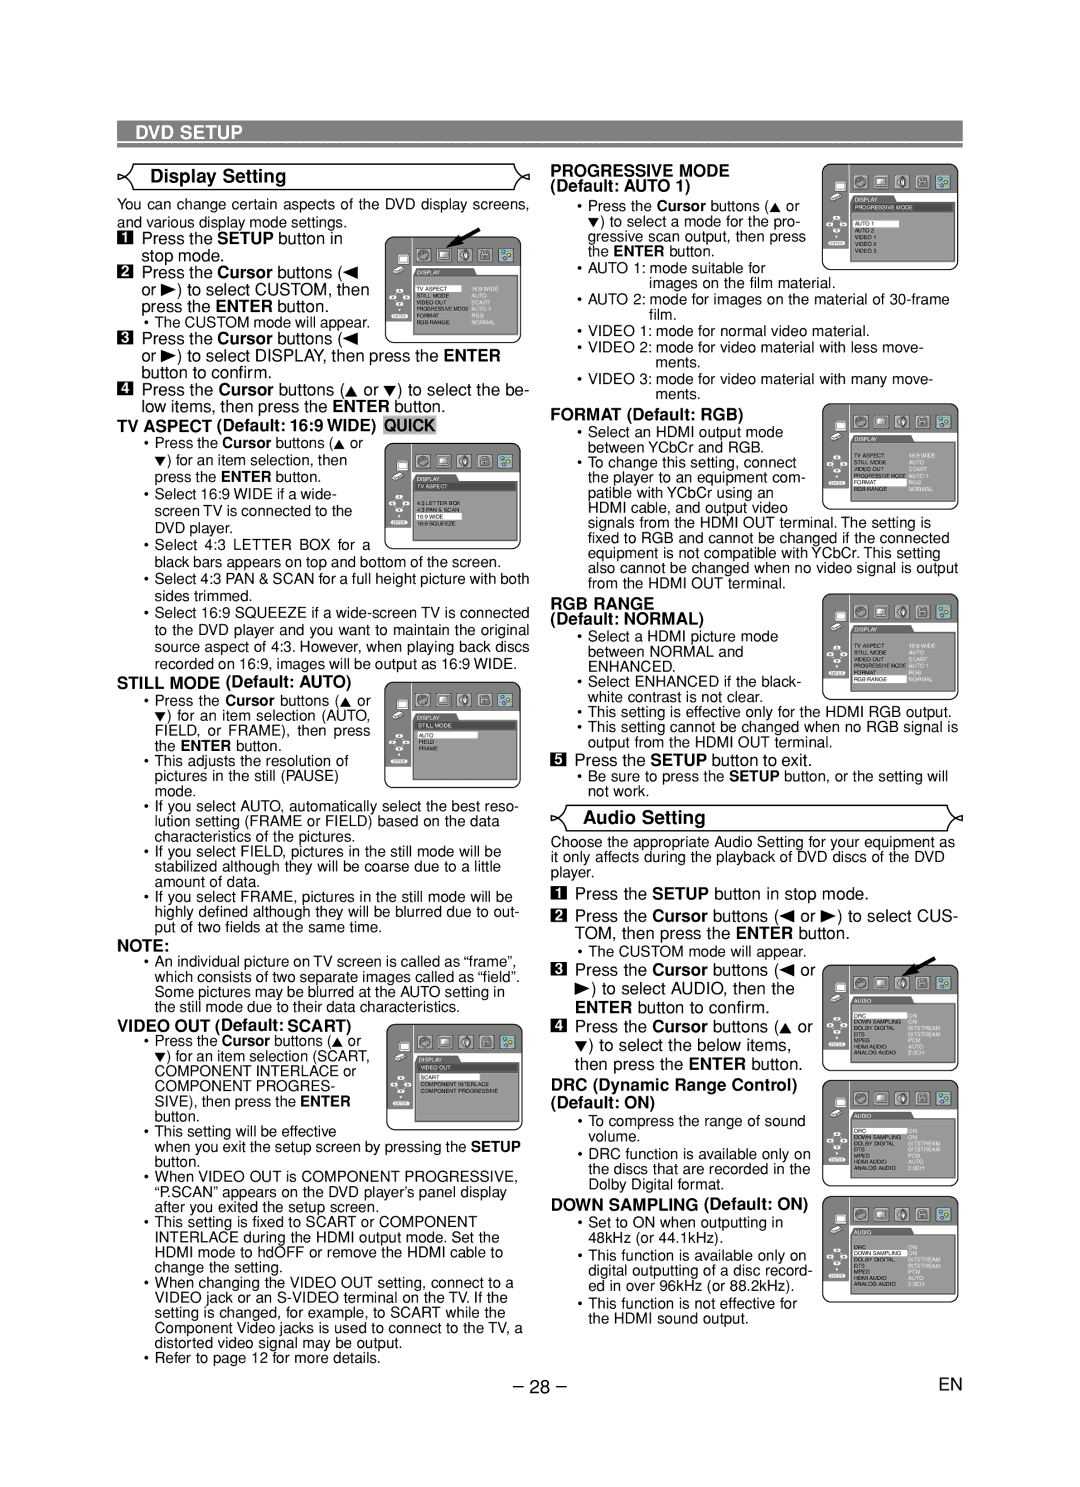
Marantz DV6600 manual Display Setting, Audio Setting, Progressive Mode

Models: DV6600

1 36
Download 36 pages 30.75 Kb
Page 28
Image 28
DISPLAY VIDEO OUT
SCART
COMPONENT INTERLACE COMPONENT PROGRESSIVE
DISPLAY STILL MODE
AUTO
FIELD
FRAME
TV ASPECT 16:9 WIDE
STILL MODE AUTO
VIDEO OUTSCART PROGRESSIVE MODE AUTO 1
FORMATRGB
RGB RANGE NORMAL
DISPLAY
TV ASPECT 16:9 WIDE
STILL MODE AUTO
VIDEO OUTSCART PROGRESSIVE MODE AUTO 1
FORMATRGB
RGB RANGE NORMAL

DVD SETUP

Display Setting

PROGRESSIVE MODE


(Default: AUTO 1)

You can change certain aspects of the DVD display screens, and various display mode settings.

1

Press the SETUP button in


stop mode.


2

Press the Cursor buttons (s

DISPLAY


or B) to select CUSTOM, then

STILL MODE

AUTO


press the ENTER button.

TV ASPECT

16:9 WIDE


VIDEO OUT

SCART


PROGRESSIVE MODE AUTO 1


• The CUSTOM mode will appear.

FORMAT

RGB


RGB RANGE

NORMAL

3Press the Cursor buttons (s

or B) to select DISPLAY, then press the ENTER button to confirm.

4Press the Cursor buttons (K or L) to select the be- low items, then press the ENTER button.

TV ASPECT (Default: 16:9 WIDE) QUICK

Press the Cursor buttons (K or

L) for an item selection, then

press the ENTER button.

DISPLAY

• Select 16:9 WIDE if a wide-

TV ASPECT

4:3 LETTER BOX

screen TV is connected to the

16:9 WIDE


4:3 PAN & SCAN

DVD player.

16:9 SQUEEZE


Select 4:3 LETTER BOX for a

black bars appears on top and bottom of the screen.

Select 4:3 PAN & SCAN for a full height picture with both sides trimmed.

Select 16:9 SQUEEZE if a wide-screen TV is connected to the DVD player and you want to maintain the original source aspect of 4:3. However, when playing back discs recorded on 16:9, images will be output as 16:9 WIDE.

STILL MODE (Default: AUTO)

• Press the Cursor buttons (K or L) for an item selection (AUTO, FIELD, or FRAME), then press the ENTER button.

• This adjusts the resolution of pictures in the still (PAUSE) mode.

If you select AUTO, automatically select the best reso- lution setting (FRAME or FIELD) based on the data characteristics of the pictures.

If you select FIELD, pictures in the still mode will be stabilized although they will be coarse due to a little amount of data.

If you select FRAME, pictures in the still mode will be highly defined although they will be blurred due to out- put of two fields at the same time.

• Press the Cursor buttons (K or

DISPLAY

PROGRESSIVE MODE

L) to select a mode for the pro-


AUTO 1

gressive scan output, then press

AUTO 2

VIDEO 1

the ENTER button.

VIDEO 2

VIDEO 3


AUTO 1: mode suitable for

images on the film material.

AUTO 2: mode for images on the material of 30-frame film.

VIDEO 1: mode for normal video material.

VIDEO 2: mode for video material with less move- ments.

VIDEO 3: mode for video material with many move- ments.

FORMAT (Default: RGB)

• Select an HDMI output mode between YCbCr and RGB.

• To change this setting, connect the player to an equipment com- patible with YCbCr using an HDMI cable, and output video

signals from the HDMI OUT terminal. The setting is fixed to RGB and cannot be changed if the connected equipment is not compatible with YCbCr. This setting also cannot be changed when no video signal is output from the HDMI OUT terminal.

RGB RANGE (Default: NORMAL)

• Select a HDMI picture mode

DISPLAY


between NORMAL and

ENHANCED.

• Select ENHANCED if the black- white contrast is not clear.

This setting is effective only for the HDMI RGB output.

This setting cannot be changed when no RGB signal is output from the HDMI OUT terminal.

5Press the SETUP button to exit.

Be sure to press the SETUP button, or the setting will not work.

Audio Setting

Choose the appropriate Audio Setting for your equipment as it only affects during the playback of DVD discs of the DVD player.

1Press the SETUP button in stop mode.

2Press the Cursor buttons (s or B) to select CUS- TOM, then press the ENTER button.

NOTE:

An individual picture on TV screen is called as “frame”, which consists of two separate images called as “field”. Some pictures may be blurred at the AUTO setting in the still mode due to their data characteristics.

VIDEO OUT (Default: SCART)

• Press the Cursor buttons (K or L) for an item selection (SCART, COMPONENT INTERLACE or

COMPONENT PROGRES- SIVE), then press the ENTER button.

• This setting will be effective

when you exit the setup screen by pressing the SETUP

button.

• When VIDEO OUT is COMPONENT PROGRESSIVE,

“P.SCAN” appears on the DVD player’s panel display

The CUSTOM mode will appear.

3 Press the Cursor buttons (s or

B) to select AUDIO, then the ENTER button to confirm.

4 Press the Cursor buttons (K or L) to select the below items, then press the ENTER button.

DRC (Dynamic Range Control) (Default: ON)

To compress the range of sound volume.

DRC function is available only on the discs that are recorded in the Dolby Digital format.

AUDIO

DRC

ON

DOWN SAMPLING

ON

DOLBY DIGITAL

BITSTREAM

DTS

BITSTREAM

MPEG

PCM

HDMI AUDIO

AUTO

ANALOG AUDIO

2.0CH


AUDIO


DRC

ON

DOWN SAMPLING

ON

DOLBY DIGITAL

BITSTREAM

DTS

BITSTREAM

MPEG

PCM

HDMI AUDIO

AUTO

ANALOG AUDIO

2.0CH


after you exited the setup screen.

• This setting is fixed to SCART or COMPONENT

INTERLACE during the HDMI output mode. Set the

HDMI mode to hdOFF or remove the HDMI cable to

change the setting.

• When changing the VIDEO OUT setting, connect to a

VIDEO jack or an S-VIDEO terminal on the TV. If the

setting is changed, for example, to SCART while the

Component Video jacks is used to connect to the TV, a

distorted video signal may be output.

• Refer to page 12 for more details.

DOWN SAMPLING (Default: ON)

• Set to ON when outputting in

48kHz (or 44.1kHz).

AUDIO


DRC

ON

• This function is available only on

DOLBY DIGITAL

BITSTREAM


DOWN SAMPLING

ON

digital outputting of a disc record-

DTS

BITSTREAM

MPEG

PCM

ed in over 96kHz (or 88.2kHz).

HDMI AUDIO

AUTO

ANALOG AUDIO

2.0CH

• This function is not effective for


the HDMI sound output.


– 28 –

EN

Page 28
Image 28
Marantz DV6600 manual Display Setting, Audio Setting, Progressive Mode

DV6600 specifications

The Marantz DV6600 is a highly regarded universal DVD player, known for its versatility and high-quality performance across various audio and video formats. Launched as part of Marantz's commitment to delivering superior home entertainment experiences, the DV6600 stands out for both its build quality and its advanced features.

One of the most notable characteristics of the DV6600 is its ability to playback a wide range of disc formats. It supports DVD-Video, DVD-Audio, Video CD, Super VCD, and standard CD formats, making it an excellent choice for users with diverse media collections. This universality extends to its capability to read various file formats, including MP3, WMA, and JPEG, allowing users to enjoy their digital music and photo collections with ease.

The DV6600 employs high-quality video processing technologies to ensure striking picture clarity and detail. Its advanced video circuitry upscales standard-definition DVDs to near high-definition quality, enhancing the visual experience considerably. This upscaling function is particularly appreciated by users who seek to maximize the performance of their high-definition displays.

In terms of audio, the DV6600 excels with its support for multiple audio formats, including Dolby Digital, DTS, and PCM. This versatility ensures compatibility with a range of audio systems. Furthermore, the player is equipped with high-grade digital-to-analog converters (DACs) that significantly enhance sound quality, delivering a clean and accurate audio output that audiophiles will appreciate.

Marantz has also designed the DV6600 with user convenience in mind. The front panel features an intuitive layout, making navigation through menus simple and straightforward. The remote control is ergonomically designed for ease of use, allowing users to access various functions without hassle.

Additionally, the DV6600 offers various connection options, including HDMI, component video, composite video, and optical audio outputs. This range of connectivity ensures compatibility with a wide array of televisions and home theater systems, making installation and integration into existing setups a breeze.

Overall, the Marantz DV6600 is a reliable and feature-rich universal DVD player that provides excellent performance and versatility. Its combination of multiple format support, advanced video and audio technologies, and user-friendly design makes it a valuable addition to any home entertainment system. Whether you are watching your favorite films or listening to music, the DV6600 promises a captivating experience that meets the demands of both casual viewers and serious audiophiles alike.