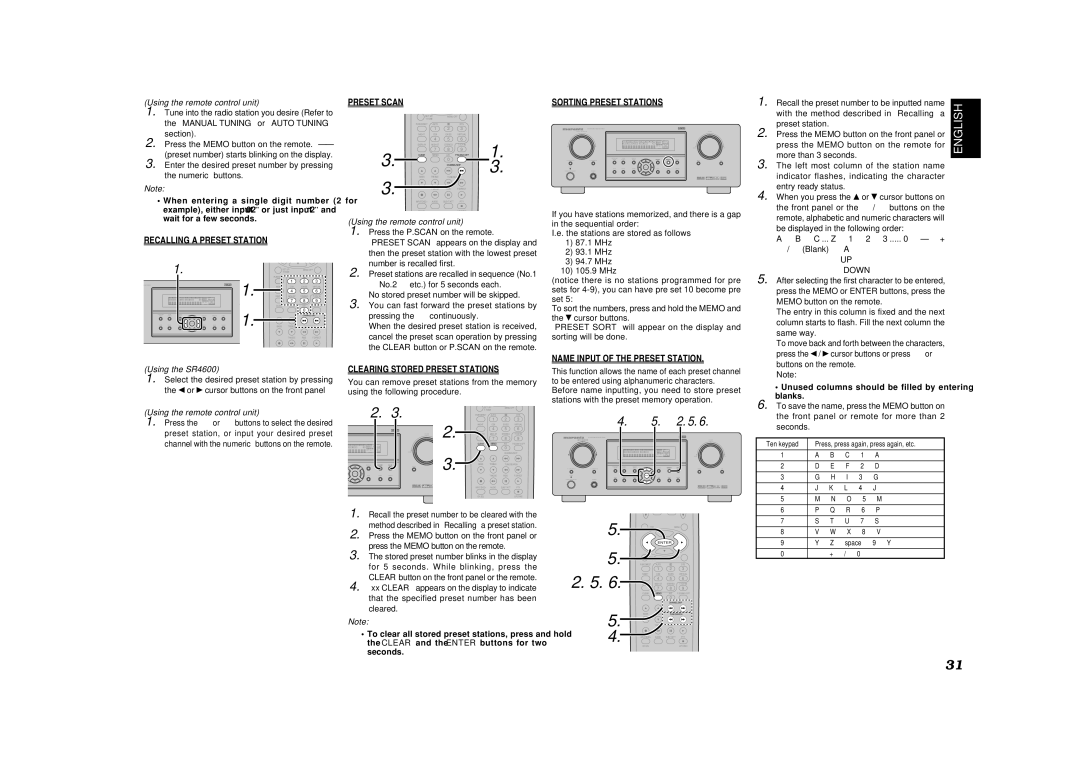
(Using the remote control unit)

1. Tune into the radio station you desire (Refer to the “MANUAL TUNING” or “AUTO TUNING” section).

2. Press the MEMO button on the remote. “ (preset number) starts blinking on the display.

3. Enter the desired preset number by pressing the numeric buttons.

Note:

When entering a single digit number (2 for example), either input “02” or just input “2” and wait for a few seconds.

RECALLING A PRESET STATION


1.

SET UP/

MENU OFF


T.TONE


PURE DIRECT

AUTO


DTS


1.


1

2

3

EIVER SR4600

NIGHT

CSII

EX/ES

VIRTUAL


4

5

6


DISPLAY

MCH-ST

STEREO

7.1CH IN


7

8

9


CLEAR

MEMO

A/D

P.SCAN/V-OFF


1.


0


CHANNEL/SKIP


BASS

TREBLE

TUNE/SEARCH


T-MODE

RDS

F.DIRECT

PRESET SCAN


SET UP/

MENU OFF


T.TONE


PURE DIRECT

AUTO


DTS


1

2

3


NIGHT

CSII

EX/ES

VIRTUAL


4

5

6

1.


DISPLAY

MCH-ST

STEREO

7.1CH IN


7

0

9

3.

CLEAR

MEMO

A/D

P.SCAN/V-OFF

3.


CHANNEL/SKIP

3.

BASS

TREBLE

TUNE/SEARCH


T-MODE

RDS

F.DIRECT


INPUT/DISC+

AUDIO

SUB-T/ATT

PTY


CH SEL


LIP SYNC


(Using the remote control unit)

1. Press the P.SCAN on the remote.

PRESET SCAN” appears on the display and then the preset station with the lowest preset number is recalled first.

2. Preset stations are recalled in sequence (No.1

No.2 etc.) for 5 seconds each.

No stored preset number will be skipped.

3. You can fast forward the preset stations by pressing the ¢ continuously.

When the desired preset station is received, cancel the preset scan operation by pressing the CLEAR button or P.SCAN on the remote.

SORTING PRESET STATIONS

AV SURROUND RECEIVER SR4600

If you have stations memorized, and there is a gap in the sequential order:

I.e. the stations are stored as follows

1)87.1 MHz

2)93.1 MHz

3)94.7 MHz

10)105.9 MHz

(notice there is no stations programmed for pre sets for 4-9), you can have pre set 10 become pre set 5:

To sort the numbers, press and hold the MEMO and thecursor buttons.

PRESET SORT” will appear on the display and sorting will be done.

1.

Recall the preset number to be inputted name


with the method described in “Recalling” a

2.

preset station.

Press the MEMO button on the front panel or


press the MEMO button on the remote for

3.

more than 3 seconds.

The left most column of the station name


indicator flashes, indicating the character

4.

entry ready status.

When you press the or cursor buttons on

the front panel or the 5 / 6 buttons on the remote, alphabetic and numeric characters will be displayed in the following order:

A B C ... Z 1 2 3 ..... 0 +

/ (Blank) A

UP

DOWN

5. After selecting the first character to be entered,

press the MEMO or ENTER buttons, press the

MEMO button on the remote.

The entry in this column is fixed and the next

column starts to flash. Fill the next column the

same way.

To move back and forth between the characters,

press the / cursor buttons or press 4or ¢

ENGLISH

(Using the SR4600)

1. Select the desired preset station by pressing theorcursor buttons on the front panel

(Using the remote control unit)

1. Press the 4or ¢ buttons to select the desired preset station, or input your desired preset channel with the numeric buttons on the remote.

CLEARING STORED PRESET STATIONS

You can remove preset stations from the memory using the following procedure.

2.

3.


SET UP/

MENU OFF

3


1

2


T.TONE


PURE DIRECT

AUTO


DTS


2.

NIGHT

CSII

EX/ES

VIRTUAL


7

8

9


4

5

6


DISPLAY

MCH-ST

STEREO

7.1CH IN

SURROUND

CLEAR

MEMO

A/D

P.SCAN/V-OFF

DIGITAL


0


AAC


CHANNEL/SKIP

3.

BASS

TREBLE

TUNE/SEARCH


T-MODE

RDS

F.DIRECT

NAME INPUT OF THE PRESET STATION.

This function allows the name of each preset channel to be entered using alphanumeric characters. Before name inputting, you need to store preset stations with the preset memory operation.

4.5. 2. 5. 6.

AV SURROUND RECEIVER SR4600

buttons on the remote.

Note:

• Unused columns should be filled by entering

blanks.

6. To save the name, press the MEMO button on

the front panel or remote for more than 2

seconds.

Ten keypad

Press, press again, press again, etc.

1

A B C 1 A


2

D E F 2 D


3

G H I 3 G

INPUT/DISC+

AUDIO

SUB-T/ATT

PTY

CH.SEL

LIP.SYNC

4

J K L 4 J


5

M N O 5 M

1. Recall the preset number to be cleared with the method described in “Recalling” a preset station.

2. Press the MEMO button on the front panel or press the MEMO button on the remote.

3. The stored preset number blinks in the display for 5 seconds. While blinking, press the CLEAR button on the front panel or the remote.

4. xx CLEAR” appears on the display to indicate that the specified preset number has been cleared.

Note:

To clear all stored preset stations, press and hold the CLEAR and the ENTER buttons for two seconds.

5.

OSD


MENU


ENTER


5.

SET UP/

MENU OFF

T.TONE


PURE DIRECT

AUTO


DTS


1

2

3

2. 5. 6.

NIGHT

CSII

EX/ES

VIRTUAL


7

8

9


4

5

6


DISPLAY

MCH-ST

STEREO

7.1CH IN


CLEAR

MEMO

A/D

P.SCAN/V-OFF


0


CHANNEL/SKIP

5.

BASS

TREBLE

TUNE/SEARCH


T-MODE RDS F.DIRECT

4.

INPUT/DISC+

AUDIO

SUB-T/ATT

PTY


CH.SEL


LIP.SYNC

6

P Q R 6 P


7

S T U 7 S


8

V W X 8 V


9

Y Z space 9 Y

0

+ / 0

31

Page 34
Image 34
Marantz SR4600 manual Recalling a Preset Station, Preset Scan, Sorting Preset Stations, Clearing Stored Preset Stations

SR4600 specifications

The Marantz SR4600 is an AV receiver that combines an array of advanced technologies and high-quality audio capabilities, making it a popular choice for both home theater enthusiasts and casual listeners. With its sleek design and robust build, the SR4600 not only complements modern interiors but also delivers a superior audiovisual experience.

One of the defining features of the SR4600 is its multi-channel amplification. This receiver is equipped to process and amplify audio from various sources, providing rich and immersive sound across multiple channels. With 6.1 channel capability and a total output of 90 watts per channel, it effectively delivers powerful sound reproduction, whether you’re enjoying a blockbuster movie or listening to your favorite music.

The SR4600 supports various surround sound formats, including Dolby Digital and DTS, which enhances the spatial quality of audio, allowing users to feel as if they are in the midst of the action. Furthermore, the receiver features Marantz's proprietary circuitry for high-resolution audio, ensuring that sound fidelity remains uncompromised, even at higher volume levels.

Connectivity is a standout feature of the Marantz SR4600. It comes with multiple HDMI inputs, allowing seamless integration with an array of high-definition devices such as Blu-ray players, gaming consoles, and streaming devices. The SR4600 also supports component and composite video inputs, making it versatile for legacy equipment. Additionally, the receiver includes digital audio inputs for quick connection with a variety of audio sources.

User-friendly features such as an intuitive on-screen display and an easy-to-navigate remote control make setup and operation straightforward, even for those who might not be technologically savvy. Moreover, the Marantz SR4600 incorporates a range of sound processing modes, allowing users to tailor their audio experience based on their preferences or the type of content they are enjoying.

Finally, build quality is essential in the Marantz ethos. The SR4600 is crafted with high-grade materials, ensuring longevity and reliability. Its attractive front panel features chrome accents and easily accessible buttons, merging aesthetics with functionality.

In summary, the Marantz SR4600 AV receiver is a powerful and versatile option for anyone looking to elevate their home audio and video experience. With its advanced sound technologies, rich connectivity options, and user-friendly interface, it remains a cherished component for audio and home theater setups.