INSTALLATION
15.8"
20.4"
518mm
latch mounting holes, and insert them into the right door latch mounting holes (where the door latch as- sembly was originally mounted).
400mm
3" |
|
|
|
|
|
|
76mm |
|
|
|
|
| 5 Pan |
E - Electrical Connection |
|
| ||||
|
| 23.2" | ||||
CW - Cold Water |
|
|
| 2" | 589mm | |
D - Drain Connection | 51mm | 3 Pan | ||||
|
|
|
|
|
| 16.7" |
|
|
|
|
|
| 424mm |
D | CW | E | 1" |
|
| 4" |
|
|
| 25mm | 102mm | ||
|
|
|
|
| ||
| 24" |
|
|
| 3" |
|
| 610mm |
| 76mm | 2" | ||
|
|
|
|
|
| |
|
|
|
|
|
| 51mm |
|
|
|
| 1.5" |
| |
|
|
| 38mm |
| ||
D |
|
|
|
|
| 30" |
|
|
|
|
| 762mm | |
|
|
|
|
| .5" |
|
|
|
|
|
| 13mm |
|
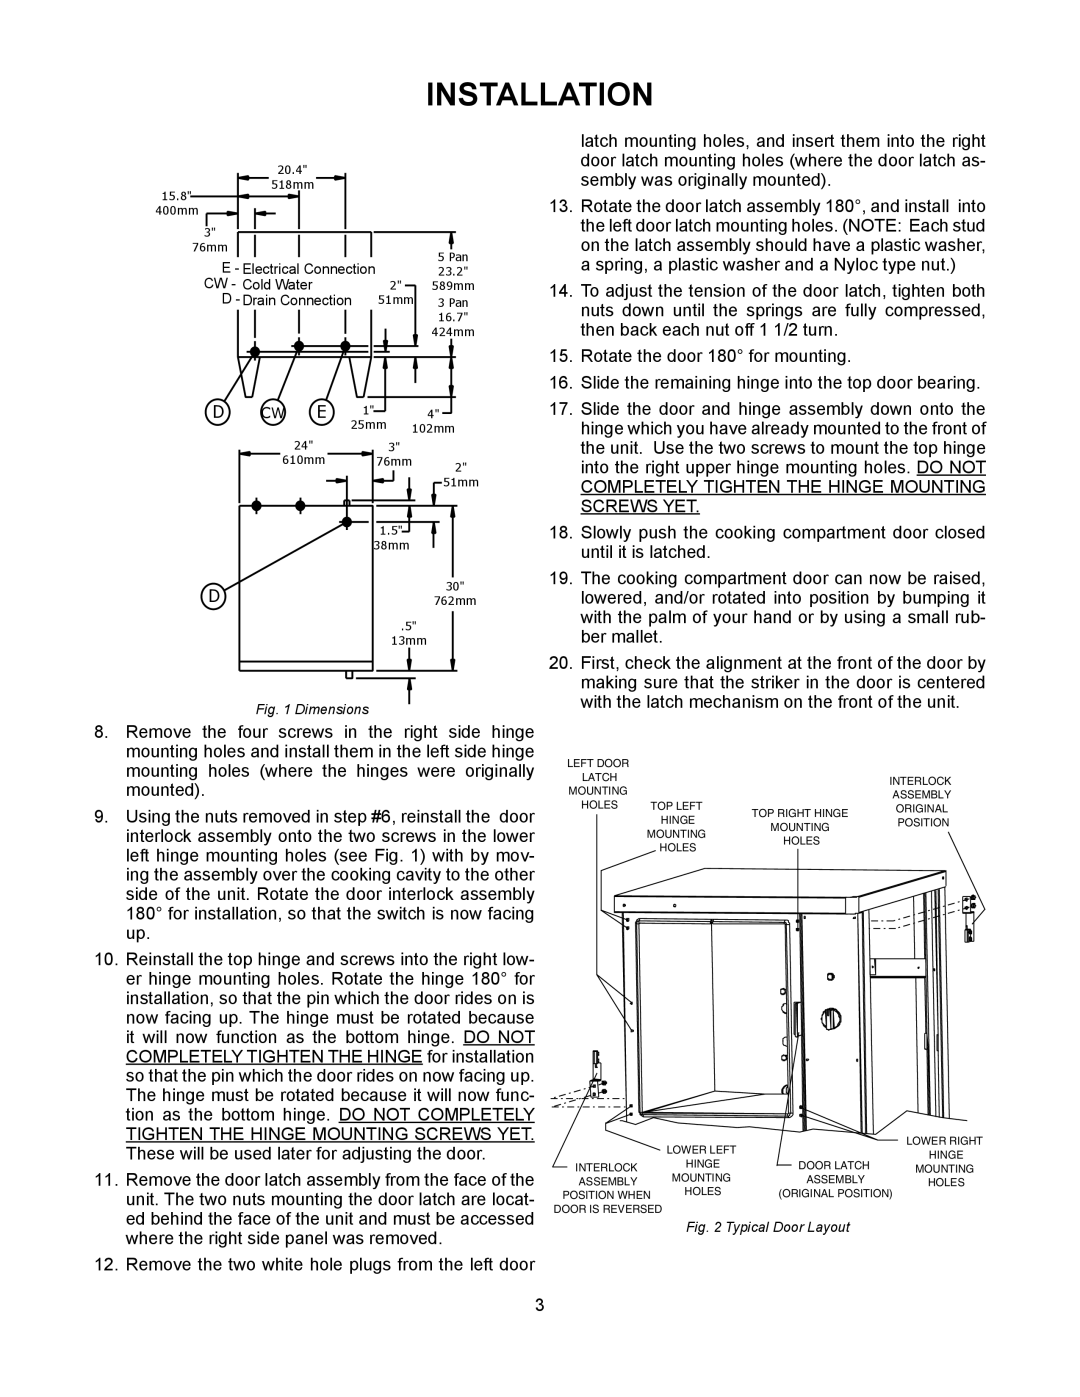
Fig. 1 Dimensions
8.Remove the four screws in the right side hinge mounting holes and install them in the left side hinge mounting holes (where the hinges were originally mounted).
9.Using the nuts removed in step #6, reinstall the door interlock assembly onto the two screws in the lower left hinge mounting holes (see Fig. 1) with by mov- ing the assembly over the cooking cavity to the other side of the unit. Rotate the door interlock assembly 180° for installation, so that the switch is now facing up.
10.Reinstall the top hinge and screws into the right low- er hinge mounting holes. Rotate the hinge 180° for installation, so that the pin which the door rides on is now facing up. The hinge must be rotated because it will now function as the bottom hinge. DO NOT COMPLETELY TIGHTEN THE HINGE for installation so that the pin which the door rides on now facing up. The hinge must be rotated because it will now func- tion as the bottom hinge. DO NOT COMPLETELY TIGHTEN THE HINGE MOUNTING SCREWS YET. These will be used later for adjusting the door.
11.Remove the door latch assembly from the face of the unit. The two nuts mounting the door latch are locat- ed behind the face of the unit and must be accessed where the right side panel was removed.
12.Remove the two white hole plugs from the left door
13. | Rotate the door latch assembly 180°, and install into |
| the left door latch mounting holes. (NOTE: Each stud |
| on the latch assembly should have a plastic washer, |
| a spring, a plastic washer and a Nyloc type nut.) |
14. | To adjust the tension of the door latch, tighten both |
| nuts down until the springs are fully compressed, |
| then back each nut off 1 1/2 turn. |
15. | Rotate the door 180° for mounting. |
16. | Slide the remaining hinge into the top door bearing. |
17. | Slide the door and hinge assembly down onto the |
| hinge which you have already mounted to the front of |
| the unit. Use the two screws to mount the top hinge |
| into the right upper hinge mounting holes. DO NOT |
| COMPLETELY TIGHTEN THE HINGE MOUNTING |
| SCREWS YET. |
18. | Slowly push the cooking compartment door closed |
| until it is latched. |
19. | The cooking compartment door can now be raised, |
| lowered, and/or rotated into position by bumping it |
| with the palm of your hand or by using a small rub- |
| ber mallet. |
20. | First, check the alignment at the front of the door by |
| making sure that the striker in the door is centered |
| with the latch mechanism on the front of the unit. |
LEFT DOOR |
|
|
|
| ||
LATCH |
|
|
| INTERLOCK | ||
MOUNTING |
|
|
| |||
|
|
| ASSEMBLY | |||
HOLES | TOP LEFT |
|
| |||
TOP RIGHT HINGE | ORIGINAL | |||||
|
|
| HINGE | POSITION | ||
|
|
| MOUNTING | |||
|
|
| MOUNTING |
| ||
|
|
| HOLES |
| ||
|
|
| HOLES |
| ||
|
|
|
|
|
| |
|
|
|
|
|
|
|
|
|
|
|
|
|
|
|
|
|
|
|
|
|
|
|
|
|
|
|
|
|
| LOWER LEFT |
|
|
| LOWER RIGHT |
|
|
|
|
| ||
|
|
|
|
| HINGE | |
| INTERLOCK | HINGE |
| DOOR LATCH | ||
|
| MOUNTING | ||||
|
| |||||
| ||||||
| ASSEMBLY | MOUNTING |
| ASSEMBLY | HOLES | |
POSITION WHEN | HOLES | (ORIGINAL POSITION) |
| |||
DOOR IS REVERSED |
|
|
|
|
| |
Fig. 2 Typical Door Layout
3