|
|
|
|
|
|
|
| CHAP. 5 Set Up | |
|
|
|
|
|
|
| |||
|
|
|
|
|
|
|
| ||
|
|
|
|
|
|
| |||
|
| CAMERA ACTIVE SETUP |
|
| MOTION CONFIGURATION |
| |||
| CH | STATUS | LIVE | REC |
| CHANNEL | 01 |
| |
|
|
|
|
| |||||
| SENSITIVITY GRADE | 01 |
| ||||||
01 | ACTIVE | ON | ON |
|
| ||||
| MOTION DISPLAY TYPE | OFF |
| ||||||
02 | ACTIVE | ON | ON |
|
| ||||
|
|
|
| ||||||
03 | LOSS | OFF | OFF |
| RECORD DURATION | 05 SEC |
| ||
04 | ACTIVE | ON | OFF |
|
| ||||
|
|
|
| ||||||
05 | ACTIVE | ON | ON |
|
|
|
| ||
06 | ACTIVE | ON | ON |
|
|
|
| ||
07 | ACTIVE | ON | ON |
|
|
|
| ||
08 | ACTIVE | ON | ON |
|
|
|
| ||
|
|
|
|
|
|
|
|
|
|
SELECT : ▲▼ ◀▶, & [ENTER]
SELECT ▲▼, CHANGE VALUE : + -
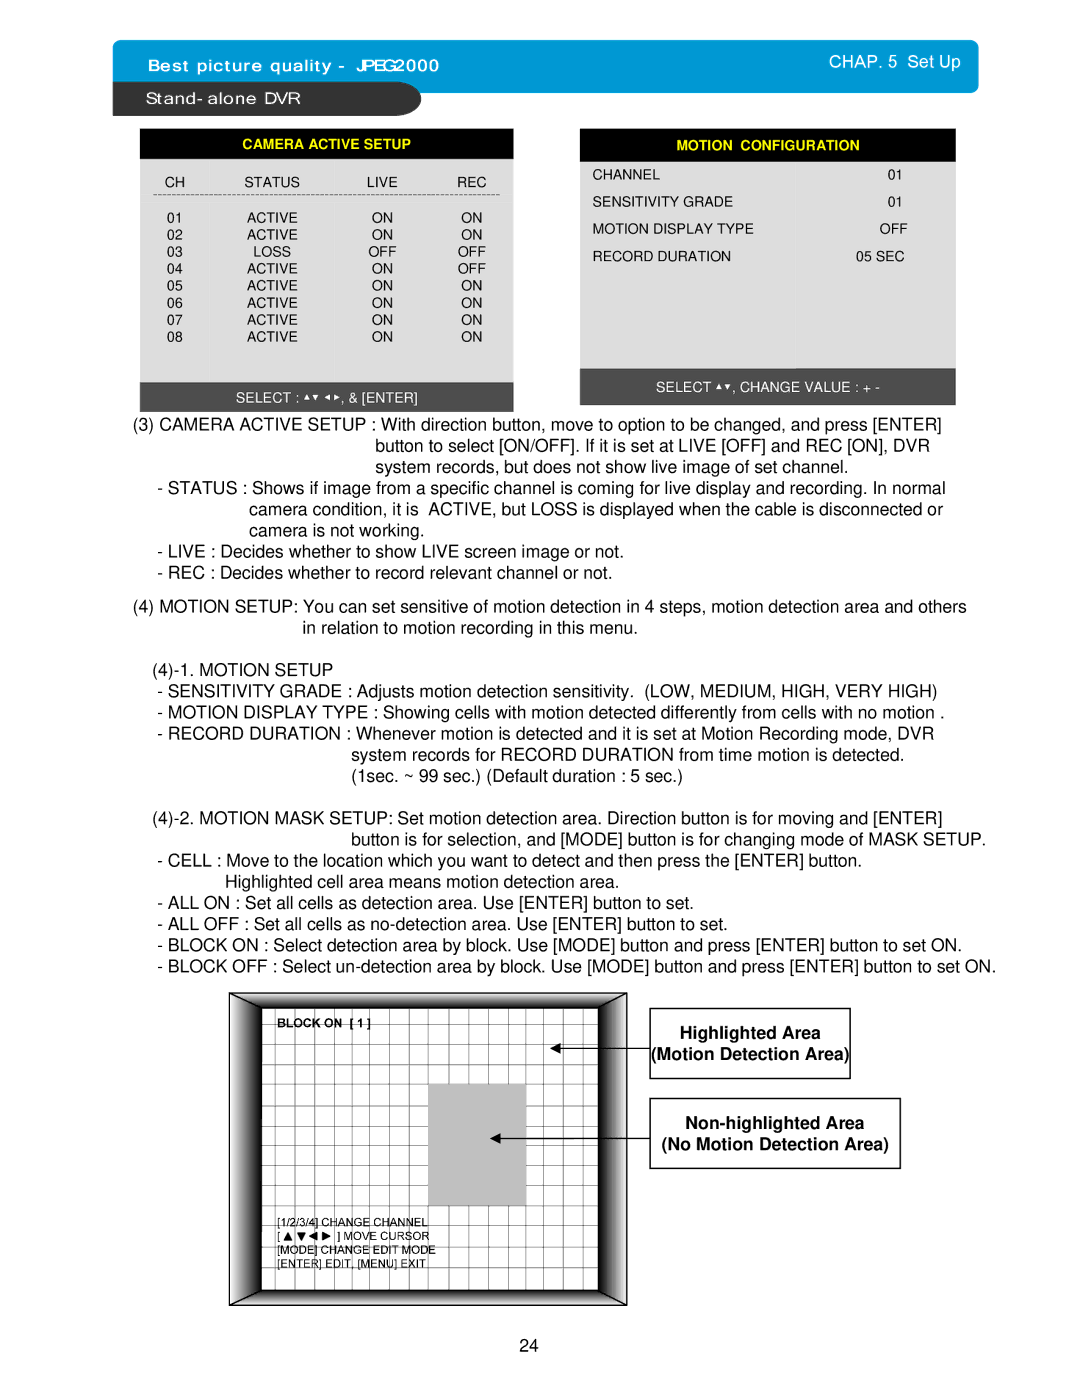
(3)CAMERA ACTIVE SETUP : With direction button, move to option to be changed, and press [ENTER] button to select [ON/OFF]. If it is set at LIVE [OFF] and REC [ON], DVR system records, but does not show live image of set channel.
-STATUS : Shows if image from a specific channel is coming for live display and recording. In normal camera condition, it is ACTIVE, but LOSS is displayed when the cable is disconnected or camera is not working.
-LIVE : Decides whether to show LIVE screen image or not.
-REC : Decides whether to record relevant channel or not.
(4)MOTION SETUP: You can set sensitive of motion detection in 4 steps, motion detection area and others in relation to motion recording in this menu.
(4)-1. MOTION SETUP
-SENSITIVITY GRADE : Adjusts motion detection sensitivity. (LOW, MEDIUM, HIGH, VERY HIGH)
-MOTION DISPLAY TYPE : Showing cells with motion detected differently from cells with no motion .
-RECORD DURATION : Whenever motion is detected and it is set at Motion Recording mode, DVR system records for RECORD DURATION from time motion is detected. (1sec. ~ 99 sec.) (Default duration : 5 sec.)
-CELL : Move to the location which you want to detect and then press the [ENTER] button. Highlighted cell area means motion detection area.
-ALL ON : Set all cells as detection area. Use [ENTER] button to set.
-ALL OFF : Set all cells as
-BLOCK ON : Select detection area by block. Use [MODE] button and press [ENTER] button to set ON.
-BLOCK OFF : Select
Highlighted Area |
(Motion Detection Area) |
|
(No Motion Detection Area) |
24 |
