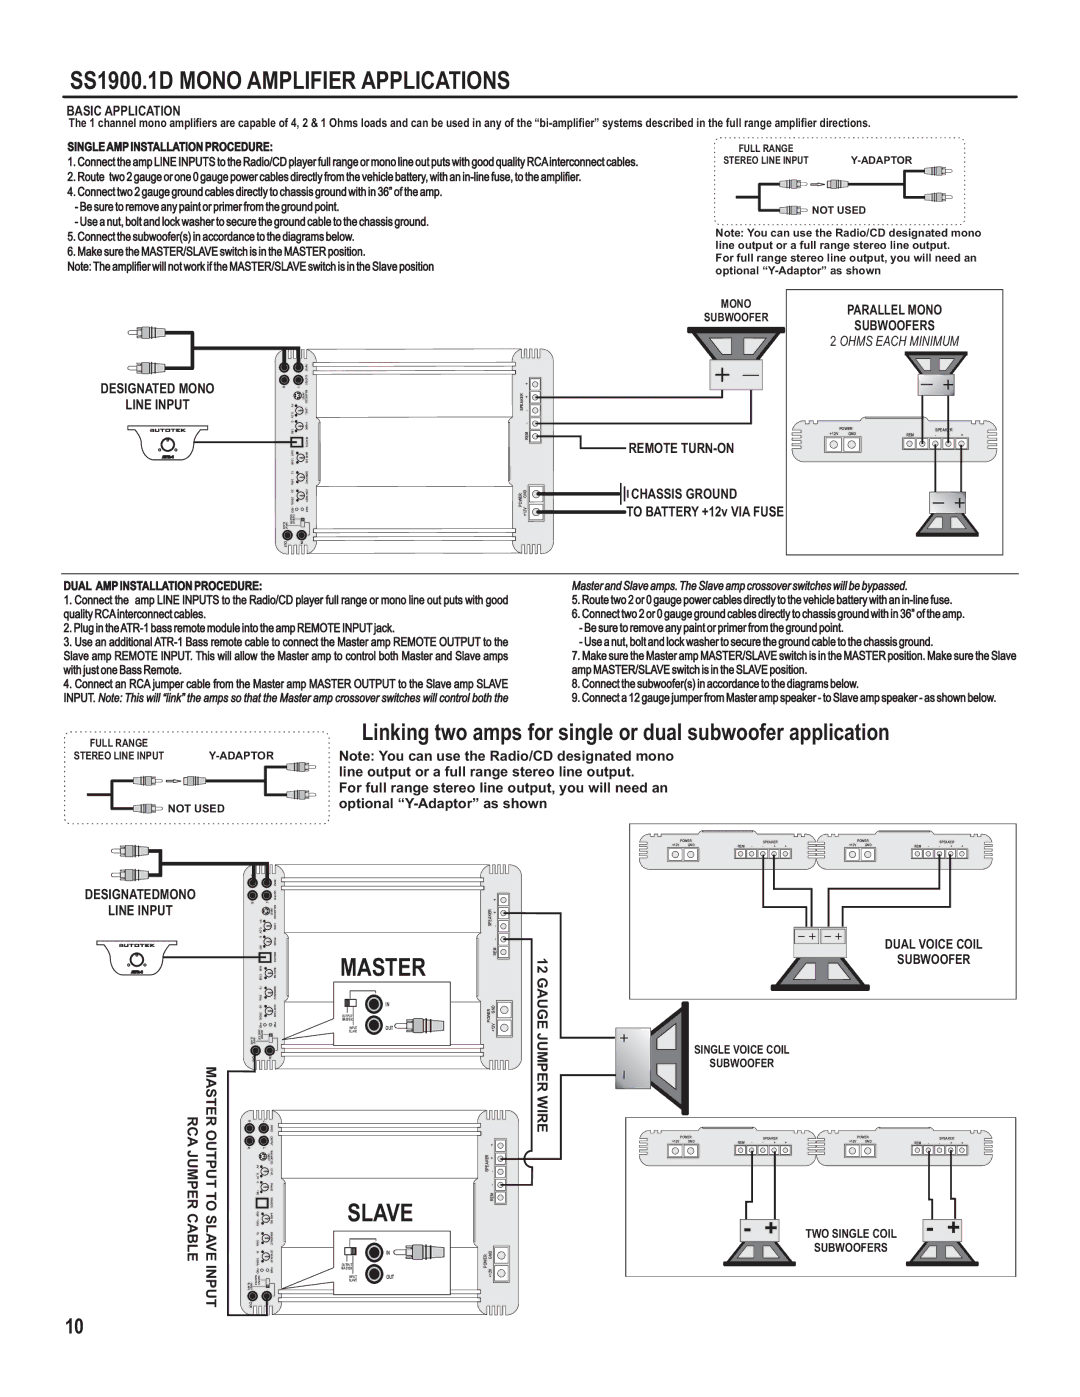
SS1900.1D MONO AMPLIFIER APPLICATIONS
BASIC APPLICATION
The 1 channel mono amplifiers are capable of 4, 2 & 1 Ohms loads and can be used in any of the
SINGLE AMP INSTALLATION PROCEDURE:
1.Connect the amp LINE INPUTS to the Radio/CD player full range or mono line out puts with good quality RCA interconnect cables.
2.Route two 2 gauge or one 0 gauge power cables directly from the vehicle battery, with an
4.Connect two 2 gauge ground cables directly to chassis ground with in 36” of the amp.
-Be sure to remove any paint or primer from the ground point.
-Use a nut, bolt and lock washer to secure the ground cable to the chassis ground.
5.Connect the subwoofer(s) in accordance to the diagrams below.
6.Make sure the MASTER/SLAVE switch is in the MASTER position.
Note: The amplifier will not work if the MASTER/SLAVE switch is in the Slave position
FULL RANGE |
|
STEREO LINE INPUT |
![]()
![]() NOT USED
NOT USED
Note: You can use the Radio/CD designated mono line output or a full range stereo line output.
For full range stereo line output, you will need an optional
DESIGNATED MONO
LINE INPUT
autotek
0dB 18dB
ATR-1
R |
|
| |
|
| INP | |
|
| UT | |
|
| OU | |
R | L | TPUT | |
BANLA C | |||
| INPUT | ||
9V |
| ED | |
| LEVEL | ||
0. |
| ||
2V |
|
| |
0 |
| P | |
|
| HA |
1SE
|
| REMEOT |
| 0dB | BAS |
| 12dB | EQS |
| 15 | BSSU |
| 35Hz | OCNI |
| 35 | LOW |
| 250 | SPAS |
| Hz |
|
| PRO | PRW |
SLAVE INPUT | MASTE OUTPU R T |
|
OUT | IN |
|
| MONO |
|
| SUBWOOFER |
| + |
|
RE | + |
|
KAEP S | - |
|
| - |
|
| MER | REMOTE |
|
| |
RE | DNG | CHASSIS GROUND |
WO |
| |
P | V21+ | TO BATTERY +12v VIA FUSE |
| ||
|
|
PARALLEL MONO
SUBWOOFERS
2 OHMS EACH MINIMUM
| POWER |
|
|
| SPEAKER |
| ||
+12V |
| GND |
| REM - | - | + | + | |
|
|
|
|
|
|
|
|
|
|
|
|
|
|
|
|
|
|
|
|
|
|
|
|
|
|
|
|
|
|
|
|
|
|
|
|
DUAL AMP INSTALLATION PROCEDURE:
1.Connect the amp LINE INPUTS to the Radio/CD player full range or mono line out puts with good quality RCA interconnect cables.
2.Plug in the
3.Use an additional
4.Connect an RCA jumper cable from the Master amp MASTER OUTPUT to the Slave amp SLAVE INPUT. Note: This will “link” the amps so that the Master amp crossover switches will control both the
Master and Slave amps. The Slave amp crossover switches will be bypassed.
5.Route two 2 or 0 gauge power cables directly to the vehicle battery with an
6.Connect two 2 or 0 gauge ground cables directly to chassis ground with in 36” of the amp.
-Be sure to remove any paint or primer from the ground point.
-Use a nut, bolt and lock washer to secure the ground cable to the chassis ground.
7.Make sure the Master amp MASTER/SLAVE switch is in the MASTER position. Make sure the Slave amp MASTER/SLAVE switch is in the SLAVE position.
8.Connect the subwoofer(s) in accordance to the diagrams below.
9.Connect a 12 gauge jumper from Master amp speaker - to Slave amp speaker - as shown below.
FULL RANGE |
|
STEREO LINE INPUT |
![]()
![]() NOT USED
NOT USED
Linking two amps for single or dual subwoofer application
Note: You can use the Radio/CD designated mono line output or a full range stereo line output.
For full range stereo line output, you will need an optional
| POWER |
|
|
| SPEAKER |
|
|
| POWER |
|
|
| SPEAKER |
| ||
+12V | GND |
| REM - | - | + | + |
| +12V | GND |
| REM - | - | + | + | ||
|
|
|
|
|
|
|
|
|
|
|
|
|
|
|
|
|
|
|
|
|
|
|
|
|
|
|
|
|
|
|
|
|
|
|
| R |
|
|
|
|
DESIGNATEDMONO |
|
|
|
|
| INPUT |
|
|
|
|
| OUTPUT BALANCED | |
LINE INPUT |
| R | 9V | L | INPUT | |
|
|
|
|
| LEVEL | |
|
|
| 0. |
|
| |
|
|
| 2V |
|
|
|
autotek |
|
| 0 180 |
|
| PHASE |
|
|
|
|
|
| REMOTE |
0dB 18dB |
|
| 0dB 12dB |
|
| BASS EQ |
|
|
|
| |||
|
|
|
|
| ||
|
|
| 15 35Hz |
|
| SUBSONIC |
|
|
| 35 |
|
| LOW |
|
|
| 250Hz |
|
| PASS |
|
|
| PRO |
|
| PWR |
|
| INPUT SLAVE | OUTPUT MASTER |
|
|
|
|
|
|
|
| IN |
|
RCA | MASTER | R |
| L | INPUTOUTPUT |
|
MASTER
IN
OUTPUT
MASTER
INPUT | OUT |
SLAVE |
|
12 GAUGE JUMPER WIRE
SINGLE VOICE COIL
SUBWOOFER
| POWER |
| SPEAKER |
| |
+12V | GND | REM - | - | + | + |
DUAL VOICE COIL
SUBWOOFER
| POWER |
| SPEAKER |
| |
+12V | GND | REM - | - | + | + |
JUMPER | OUTPUT TO | R | 9V 0.2V 0 180 | L | INPUT | BALANCED LEVEL PHASE REMOTE |
CABLE | SLAVE |
| 0dB 12dB 15 35Hz 35 250Hz |
|
| BASS EQ SUBSONIC LOW PASS |
| INPUT |
| PRO |
|
| PWR |
| INPUT SLAVE | OUTPUT MASTER |
|
| ||
| OUT |
|
|
SLAVE
IN
OUTPUT
MASTER
INPUT | OUT |
SLAVE |
|
| + |
SPEAKER | - + |
| - |
| REM |
POWER | GND |
| +12V |
| + |
SPEAKER | - + |
| - |
| REM |
POWER | GND |
| +12V |
- | + | TWO SINGLE COIL | - | + |
|
| SUBWOOFERS |
|
|
10