Electrical requirements

Electrical Shock Hazard

l Electrical ground is required on this appliance.

*Do Not ground to a gas pipe.

*Do Not have a fuse in the neutral or grounding circuit. A fuse in the neutral or grounding circuit could result in an electrical shock.

*Check with a qualified electrician if you are in doubt as to whether the appliance is properly grounded.

Failure to follow these instructions could result in serious injury or death.

If codes permit and a separate grounding

wire is used, it is recommended that a qualified electrician determine that the grounding path is adequate.

IMPORTANT:

Save Installation Instructions for the local electrical inspector’s use.

A . This appliance must be connected to the proper electrical voltage and frequency as specified on the serial/rating plate located behind the oven door (double oven models - upper oven) on the front frame. Models rated at 7.0 kw on 240 volts (5.3 kw on 208 volts) or more require a separate 40- ampere circuit. Fuse both sides of the line. A time-delay fuse or circuit breaker is recommended.

B. OVEN MUST BE CONNECTED WITH COPPER WIRE ONLY.

C . Wire sizes and connections must conform to the requirements of the National Electrical Code, ANSI/NFPA

70 - latest edition*, and all local codes and ordinances. Wire sizes and connections must conform with the rating of the appliance.

Copies of the standards listed may be obtained from:

l National Fire Protection Association Batterymarch Park

Quincy, Massachusetts 02269

Dn This appliance should be connected directly to the fused disconnect (or circuit breaker box) through flexible, armored or non-metallic sheathed, copper cable (with grounding wire). The flexible armored cable from the appliance should be connected directly to the junction box.

Electrical connection

Electrical Shock Hazard

*Electrical ground is required on this appliance.

*Do Not connect to the electrical supply until appliance is permanently grounded.

l Disconnect power to the junction box before making the electrical connection.

*This appliance must be connected to a grounded, metallic, permanent wiring system, or a grounding connector should be connected to the grounding terminal or wire lead on the appliance.

Failure to do so could result in a fire, personal injury or electrical shock.

L

This appliance is manufactured with white (neutral) power supply wire and a

cabinet-connected green grounding wire twisted together.

Connect the appliance cable to the junction box through the U.L.-listed conduit connector. Complete electrical connection according to local codes and ordinances.

A. Where local codes

permit...

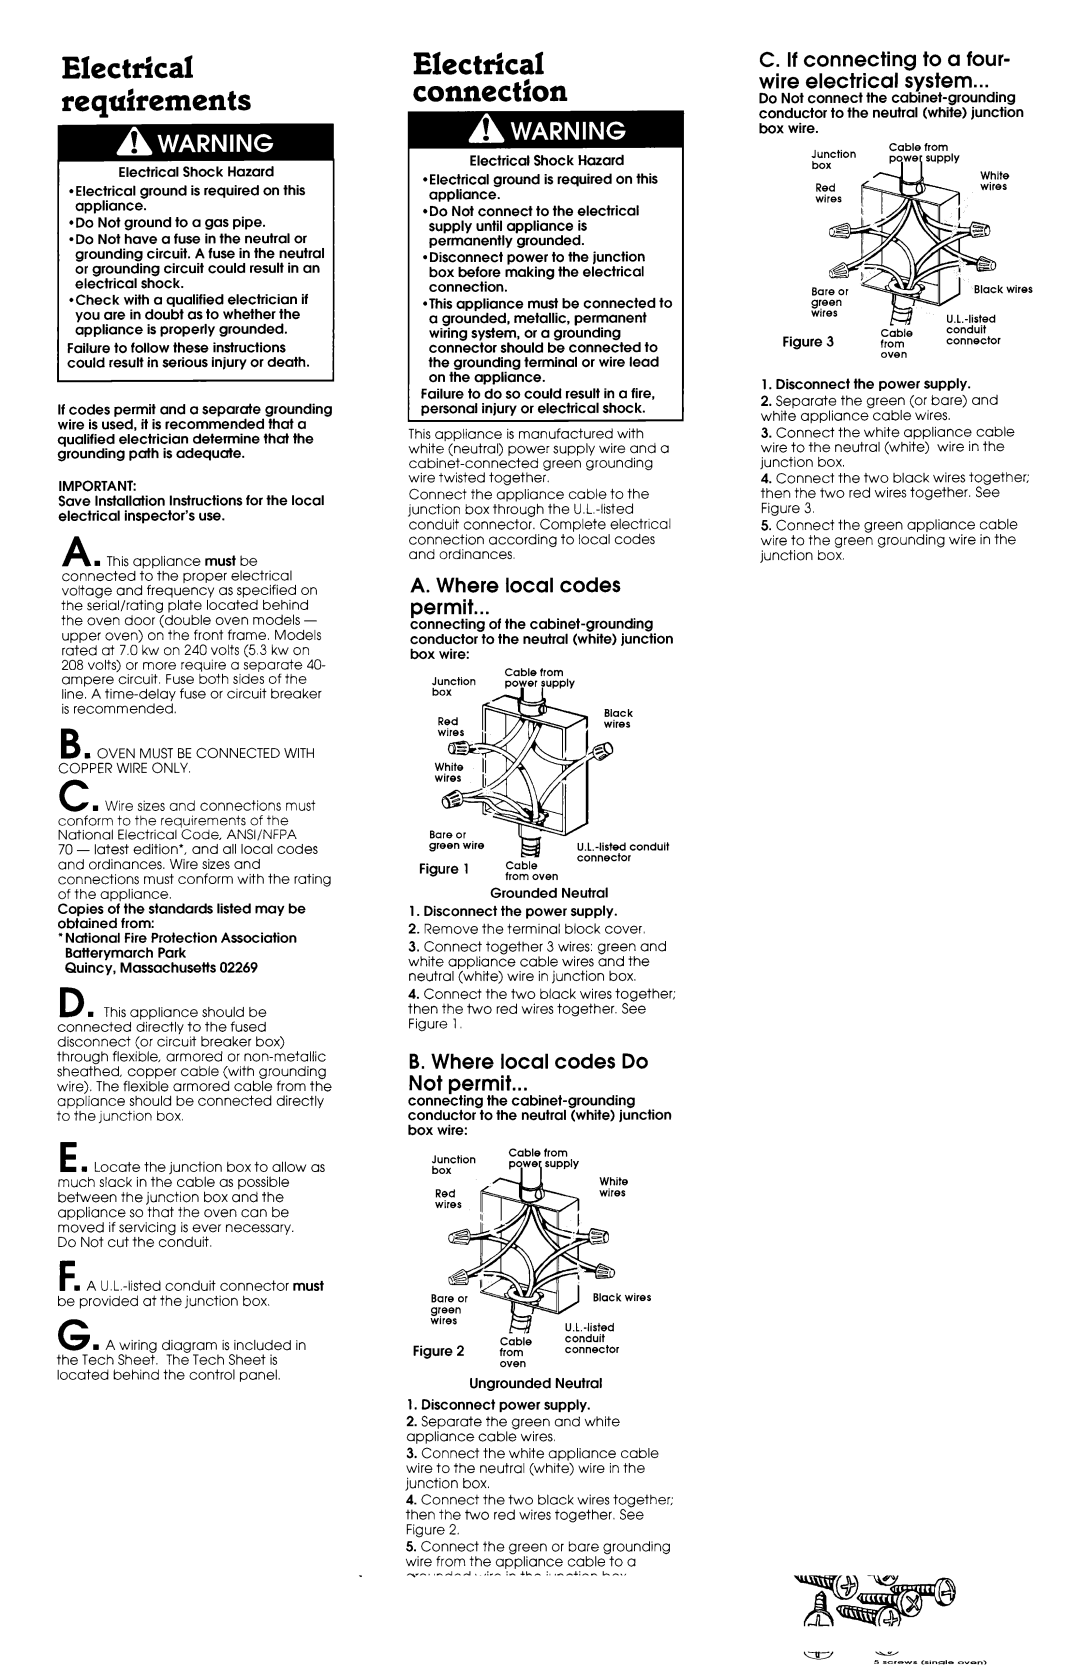
connecting of the cabinet-grounding conductor to the neutral (white) junction box wire:

Cable from

U.L.-listed conduit

connector

Figure 1 Cable from oven

Grounded Neutral

1.Disconnect the power supply.

2.Remove the terminal block cover,

3.Connect together 3 wires: green and white appliance cable wires and the neutral (white) wire in junction box.

4.Connect the two black wires together; then the two red wires together. See Figure 1,

B. Where local codes Do

Not permit...

connecting the cabinet-grounding conductor to the neutral (white) junction box wire:

C. If connecting to a four-

wire electrical system...

Do Not connect the cabinet-grounding conductor to the neutral (white) junction box wire.

Cable from

Junction pyy supply box

White wires

U.L.-listed

C;rbi;, conduit

Figure 3 from connector oven

1.Disconnect the power supply.

2.Separate the green (or bare) and white appliance cable wires.

3.Connect the white appliance cable wire to the neutral (white) wire in the junction box.

4.Connect the two black wires together; then the two red wires together. See Figure 3.

5.Connect the green appliance cable wire to the green grounding wire in the junction box.

En Locate the junction box to allow as much slack in the cable as possible between the junction box and the appliance so that the oven can be moved if servicing is ever necessary.

Do Not cut the conduit.

Junction box

Red wires

Cable from

F . A U.L.-listed conduit connector must be provided at the junction box,

G n A wiring diagram is included in the Tech Sheet. The Tech Sheet is located behind the control panel.

Bare

or


riles

green


wires


isted


Figure

2

cabi;

conduit

connector

from


oven


Ungrounded

Neutral

1.Disconnect power supply.

2.Separate the green and white appliance cable wires.

3.Connect the white appliance cable wire to the neutral (white) wire in the junction box.

4.Connect the two black wires together; then the two red wires together. See Figure 2.

5.Connect the green or bare grounding wire from the appliance cable to a grounded wire in the junction box.

Panel C

Page 4
Image 4
Maytag 3183636 installation instructions Electrical requirements

3183636 specifications

The Maytag 3183636 is a highly acclaimed component specifically designed for various Maytag appliances, particularly in the realm of laundry solutions. Known for its durability and reliability, this part plays a critical role in ensuring optimal performance and user satisfaction.

One of the standout features of the Maytag 3183636 is its robust construction. It is engineered to withstand the rigors of daily use, providing users with peace of mind that they can depend on their appliance to function seamlessly over the long term. Made from high-quality materials, the part is resistant to wear and tear, making it a smart investment for those looking to maintain the longevity of their washing machines or dryers.

In terms of compatibility, the Maytag 3183636 is designed to fit several models, making it a versatile option for consumers. This compatibility means that users do not have to worry about whether this part will function with their particular appliance, as it is suitable for a wide range of Maytag units. This adaptability is a significant advantage in households that value efficiency and convenience.

One notable technological advancement is its integration with the manufacturer's commitment to energy efficiency and eco-friendly designs. The Maytag 3183636 supports these initiatives by enabling appliances to operate more efficiently, thus reducing energy consumption. This not only contributes to lower utility bills but also aligns with contemporary environmental standards.

Another characteristic of the Maytag 3183636 is its ease of installation. Designed with the user in mind, it features a straightforward design that allows for quick and hassle-free replacement. This feature is especially beneficial for homeowners who prefer to conduct their own repairs rather than hire a professional. The clear instructions that accompany the product further simplify the installation process, giving users confidence in their ability to manage appliance maintenance.

Overall, the Maytag 3183636 represents a blend of innovation, durability, and user-friendliness. With its well-thought-out features and technologies, it not only enhances the performance of Maytag appliances but also embodies the brand's commitment to quality and customer satisfaction. Whether you are in need of a replacement part or looking to ensure the continued efficiency of your laundry appliances, the Maytag 3183636 stands out as an excellent choice for consumers.