Laveuse Automatique Avec
W10092684A
Table of Contents
Índice
Washer Safety
Your safety and the safety of others are very important
Important Safety Instructions
Parts supplied
You will need
Location Requirements
Alternate Parts
If You Have You Will Need to Buy
Standpipe drain system-wall or floor views a & B
Drain System
Electrical Requirements
Floor drain system view D
Before You Start
Installation Instructions
Remove Shipping Base and Packing Ring
Remove drain hose from washer cabinet
Connect Drain Hose
To keep drain water from going back into the washer
Connect the inlet hoses to the water faucets
Connect the Inlet Hoses
Floor drain
Clear the water lines
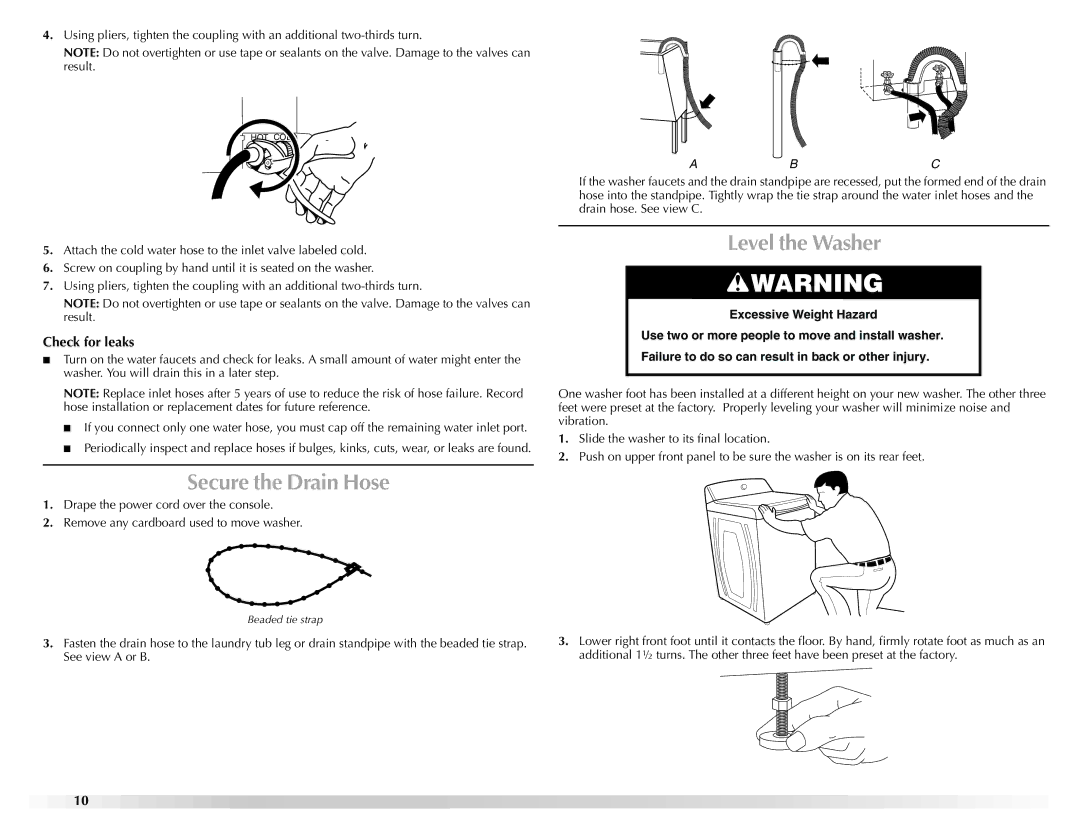
Level the Washer
Secure the Drain Hose
Check for leaks
Complete Installation
Features
Benefits and Features
Benefits
Washer USE
Starting Your Washer
Stopping the Washer
Pausing or Restarting the Washer
Changing Cycles, Modifiers and Options
Status Lights
Cycles
Modifiers
Extra Rinse
Options
Stain Cycle
Pre Soak
Operating Controls
Laundry Tips
Normal Sounds
Water Inlet Hoses
Cleaning Your Washer
Washer Care
Vacation, Storage and Moving Care
Washer and Components
Troubleshooting
Reinstalling the washer
Washer displaying code messages
Dispenser operation
Washer Operation
Washer leaks
Washer won’t fill, rinse or agitate washer stops
Clothing Care
Stains, gray whites, dingy colors
Load is wrinkled, twisted or tangled
Garments damaged
U.S.A
Assistance or Service
If you need replacement parts
Canada
Maytag Corporation Major Appliance Warranty
ONE Year Limited Warranty
Seguridad DE LA Lavadora
Su seguridad y la seguridad de los demás es muy importante
Requisitos DE Instalación
Piezas y herramientas
Usted necesitará
Requisitos de ubicación
Piezas suministradas
Piezas alternativas
Sistema de desagüe por el lavadero vista C
Sistema de desagüe
Requisitos eléctricos
Sistema de desagüe por el piso vista D
Antes de comenzar
Instrucciones DE Instalación
Quite la base y el anillo de embalaje
Conecte la manguera de desagüe
Quite la manguera de desagüe del gabinete de la lavadora
Conexión de las mangueras de entrada
Nivelación de la lavadora
Fijación de la manguera de desagüe
Revise si hay fugas
Complete la instalación
Beneficios
Características
USO DE LA Lavadora
Puesta en marcha de la lavadora
Agregado de prendas
Cómo detener la lavadora
Para reanudar la marcha de la lavadora
Luces de estado
Cambio de ciclos, modificadores y opciones
Ciclos
Informal/Planchado permanente Wrinkle Control
Blancos Whites
Intenso Super Wash
Prendas de colores/de mezclilla Colors/Jeans
Modificadores
Opciones
Controles de funcionamiento
Consejos DE Lavandería
Sonidos normales
Mangueras de entrada de agua
Cuidado DE LA Lavadora
Cómo limpiar su lavadora
Las mudanzas
Para transportar la lavadora
Solución DE Problemas
Lavadora y componentes
Para volver a instalar la lavadora
La lavadora pierde agua
Ruidosos, vibrantes, desequilibrados
Funcionamiento del depósito
Funcionamiento de la lavadora
El ciclo no puso en marcha la opción de Limpieza intensa
Cuidado de la ropa
Exceso de espuma
Ropa demasiado mojada
Manchas, ropa blanca percudida, colores opacos
La ropa está arrugada, enroscada o enredada
Prendas dañadas
En Canadá
Ayuda O Servicio Técnico
En los EE.UU
Si necesita piezas de repuesto
Garantía Limitada DE UN AÑO
Sécurité DE LA Laveuse
Votre sécurité et celle des autres est très importante
Exigences Dinstallation
Outillage et pièces
Autres pièces
Exigences demplacement
Pièces fournies
Il vous faudra
Système de vidange avec évier de buanderie vue C
Système de vidange
Spécifications électriques
Système de vidange au plancher vue D
Avant de commencer
Instructions Dinstallation
Retrait de la base dexpédition et de lanneau Demballage
Raccordement du tuyau de vidange
Raccordement des tuyaux dalimentation
Réglage de laplomb de la laveuse
Immobilisation du tuyau de vidange
Recherche de fuites
Achever linstallation
Avantages
Avantages ET Caractéristiques
Caractéristiques
Utilisation DE LA Laveuse
Mise en marche de la laveuse
Add a Garment ajouter un vêtement
Pause ou remise en marche de la laveuse
Arrêt de la laveuse
Pour remettre la laveuse en marche
Témoins lumineux
Programmes
Wrinkle Control tout-aller/pressage permanent
Super Wash service intense
Whites blancs
Colors/Jeans couleurs/articles foncés
Modificateurs
Fonctionnement des commandes
Conseils DE Lessivage
Sons normaux
Tuyaux darrivée deau
Entretien DE LA Laveuse
Nettoyage de votre laveuse
Entreposage ou un déménagement
La laveuse et ses composants
Réinstallation de la laveuse
Dépannage
La laveuse affiche des messages codés
La laveuse fuit
Fonctionnement du distributeur
Fonctionnement de la laveuse
Charge trop mouillée
Soin des vêtements
Température de lavage/rinçage Excès de mousse
Résidus ou charpie sur le linge
Taches, blancs grisâtres, couleurs défraîchies
La charge est froissée, entortillée ou enchevêtrée
Endommagement des vêtements
Aux États-Unis
Assistance OU Service
Au Canada
Garantie DES Gros Appareils Ménagers Maytag Corporation
W10092684A