1

6


2


5


4


3


1.

БОЛТЫ С КВАДРАТНЫМИ

1.

VARŽTAI SU KVADRATINIAIS POGALVIAIS

1.

КРЕПЕЖНИ БОЛТОВЕ


ГОЛОВКАМИ

2.

IŠĖMA

2.

ПРОРЕЗ

2.

УСТАНОВОЧНОЕ ОТВЕРСТИЕ

3.

FIKSAVIMO VERŽLĖS SU UŽKARPOMIS

3.

КОНТРАГАЙКИ С ФЛАНЕЦ

3.

КОНТРГАЙКИ С ФЛАНЦАМИ

4.

APATINIS IŠMETIMO VAMZDIS

4.

ДОЛЕН РЪКАВ

4.

НИЖНИЙ ВЫБРАСЫВАЮЩИЙ

5.

STIPRINAMOJI PLOKŠTĖ

5.

УСИЛВАЩА ПЛАСТИНА

5.

ЖЕЛОБ

6.

SUMONTUOTA

6.

ИНСТАЛИРАНА

УСИЛИВАЮЩАЯ ПЛАСТИНА

1.

BULTSKRŪVES AR PUSSFĒRISKU


6.

УСТАНОВКА


GALVIŅU UN ČETRSTŪRAINU


1.

ÜMARPEAGA POLDID


1.

ŞURUBURI DE FIXARE


PAPLAŠINĀJUMU

2.

PILU

2.

SPRAUGA

2.

ORIFICIU

3.

KRAEGA KONTRAMUTRID

3.

PRETUZGRIEŽŅI AR ATLOKU

3.

CONTRAPIULIŢE CU FLANŞĂ

4.

ALUMINE KALDRENN

4.

NOLAIŽAMĀ CAURULE

4.

JGHEAB DE COBORÂRE

5.

TUGEVDUSPLAAT

5.

PASTIPRINĀŠANAS PLĀKSNE

5.

PLACĂ DE SUSŢINERE

6.

PAIGALDATUD

6.

UZSTĀDĪTĀ STĀVOKLĪ

6.

MONTAT

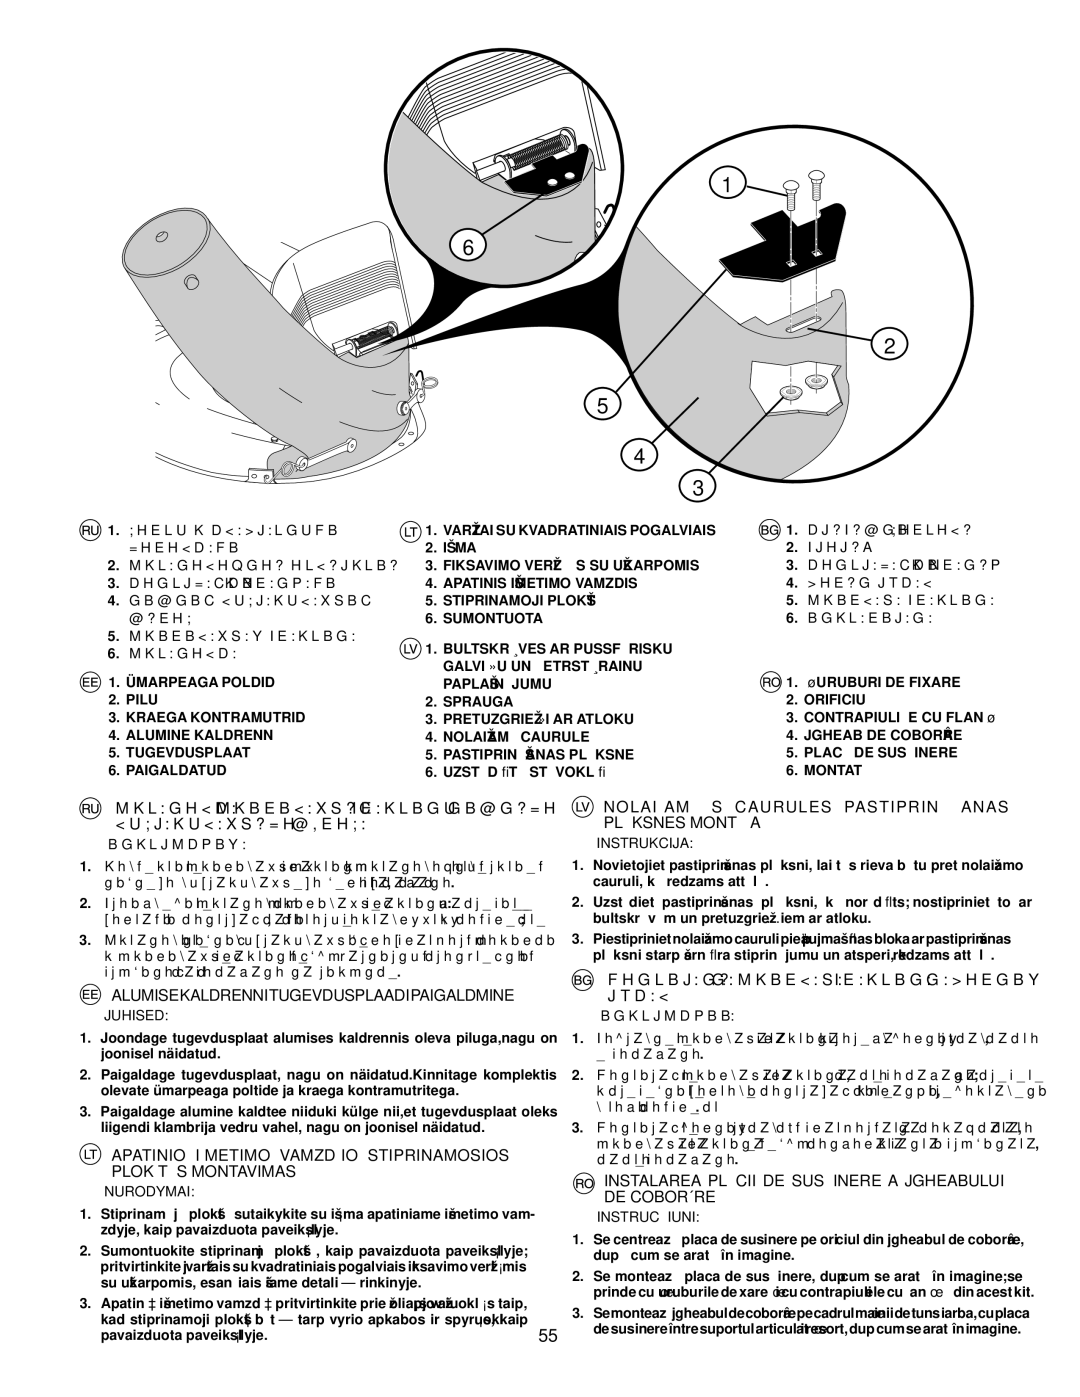
УСТАНОВКА УСИЛИВАЮЩЕЙ ПЛАСТИНЫ НИЖНЕГО ВЫБРАСЫВАЮЩЕГО ЖЁЛОБА

ИНСТРУКЦИЯ :

1.Совместите усиливающую пластину с установочным отверстием нижнего выбрасывающего желоба, как показано.

2.Произведите установку усиливающей пластины: закрепите ее болтами и контргайками, которые поставляются в комплекте;

3.Установите нижний выбрасывающий желоб платформу косилки с усиливающей пластиной между шарнирным кронштейном и пружиной как показано на рисунке.

ALUMISEKALDRENNITUGEVDUSPLAADIPAIGALDMINE

JUHISED:

1.Joondage tugevdusplaat alumises kaldrennis oleva piluga,nagu on joonisel näidatud.

2.Paigaldage tugevdusplaat, nagu on näidatud.Kinnitage komplektis olevate ümarpeaga poltide ja kraega kontramutritega.

3.Paigaldage alumine kaldtee niiduki külge nii,et tugevdusplaat oleks liigendi klambrija vedru vahel, nagu on joonisel näidatud.

APATINIO IŠMETIMO VAMZDŽIO STIPRINAMOSIOS PLOKŠTĖS MONTAVIMAS

NURODYMAI:

1.Stiprinamąją plokštę sutaikykite su išėma apatiniame išmetimo vam- zdyje, kaip pavaizduota paveikslėlyje.

2.Sumontuokite stiprinamąją plokštę, kaip pavaizduota paveikslėlyje;

pritvirtinkite ją varžtais su kvadratiniais pogalviais ir ksavimo veržlėmis su užkarpomis, esančiais šiame detalių rinkinyje.

3.Apatinį išmetimo vamzdį pritvirtinkite prie žoliapjovės važiuoklės taip, kad stiprinamoji plokštė būtų tarp vyrio apkabos ir spyruoklės, kaip pavaizduota paveikslėlyje.

NOLAIŽAMĀS CAURULES PASTIPRINĀŠANAS PLĀKSNES MONTĀŽA

INSTRUKCIJA:

1.Novietojiet pastiprināšanas plāksni, lai tās rieva būtu pret nolaižamo cauruli, kā redzams attēlā.

2.Uzstādiet pastiprināšanas plāksni, kā norādīts; nostipriniet to ar bultskrūvēm un pretuzgriežņiem ar atloku.

3.Piestiprinietnolaižamocaurulipiepļaujmašīnasblokaarpastiprināšanas plāksni starp šarnīra stiprinājumu un atsperi, kā redzams attēlā.

МОНТИРАНЕ НА УСИЛВАЩА ПЛАСТИНА НА ДОЛНИЯ РЪКАВ

ИНСТРУКЦИИ:

1.Подравнете усилващата пластина с прореза в долния ръкав, както е показано.

2.Монтирайте усилващата пластина, както е показано; закрепете с крепежните болтове и контрагайките с фланци, предоставени в този комплект.

3.Монтирайте долния ръкав към платформата на косачката, като усилващата пластина е между конзолата с панта и пружината, както е показано.

INSTALAREA PLĂCII DE SUSŢINERE A JGHEABULUI DE COBORÂRE

INSTRUCŢIUNI:

1.Se centrează placa de susţinere pe ori ciul din jgheabul de coborâre, după cum se arată în imagine.

2.Se montează placa de susţinere, după cum se arată în imagine; se

prinde cu şuruburile de xare şi cu contrapiuliţele cu anşă din acest kit.

3.Semonteazăjgheabuldecoborârepecadrulmaşiniidetunsiarba,cuplaca

55 desusţinereîntresuportularticulatşiresort,dupăcumsearatăînimagine.

Page 55
Image 55
McCulloch 96071001001 Alumisekaldrennitugevdusplaadipaigaldmine, Nolaižamās Caurules Pastiprināšanas Plāksnes Montāža

96071001001, CET42 specifications

The McCulloch CET42,96071001001 is a highly versatile and efficient electric lawn mower designed for residential use, embodying the brand's commitment to power, performance, and user-friendly features. This model is engineered for homeowners seeking a reliable solution for maintaining their lawns and gardens while prioritizing ease of use and eco-friendliness.

One of the main features of the McCulloch CET42 is its powerful electric motor, which ensures consistent and efficient cutting performance. Operating at 420 volts, this mower delivers sufficient torque to tackle various types of grass and terrain, making it suitable for small to medium-sized lawns. The electric motor not only provides significant power but also contributes to reduced noise levels compared to traditional gas mowers, allowing for a more pleasant mowing experience.

The design of the McCulloch CET42 emphasizes user convenience and comfort. It features an adjustable cutting deck with multiple height settings, allowing users to customize the grass length according to their preferences and lawn requirements. The lightweight, compact design makes it easy to maneuver around obstacles, ensuring a well-manicured lawn without the hassle of heavy equipment.

Another notable characteristic of the CET42 is its innovative battery technology. The mower is designed with long-lasting batteries that deliver impressive runtime, enabling users to complete their mowing tasks without frequent interruptions. The quick-charging ability of the batteries ensures that the mower is ready for use in minimal time, enhancing its overall practicality.

In addition to its cutting capabilities, the McCulloch CET42 boasts a grass collection system that efficiently collects clippings, keeping the lawn tidy and minimizing post-mowing clean-up. The mower's ergonomic handle provides a comfortable grip, reducing fatigue during extended mowing sessions.

Safety features are also a priority with the CET42, which includes a safety key and automatic shut-off functionalities to prevent accidents. Overall, the McCulloch CET42,96071001001 electric mower combines advanced technology, user-friendly design, and eco-conscious operation, making it an excellent choice for homeowners looking to achieve a beautiful lawn with minimal effort.