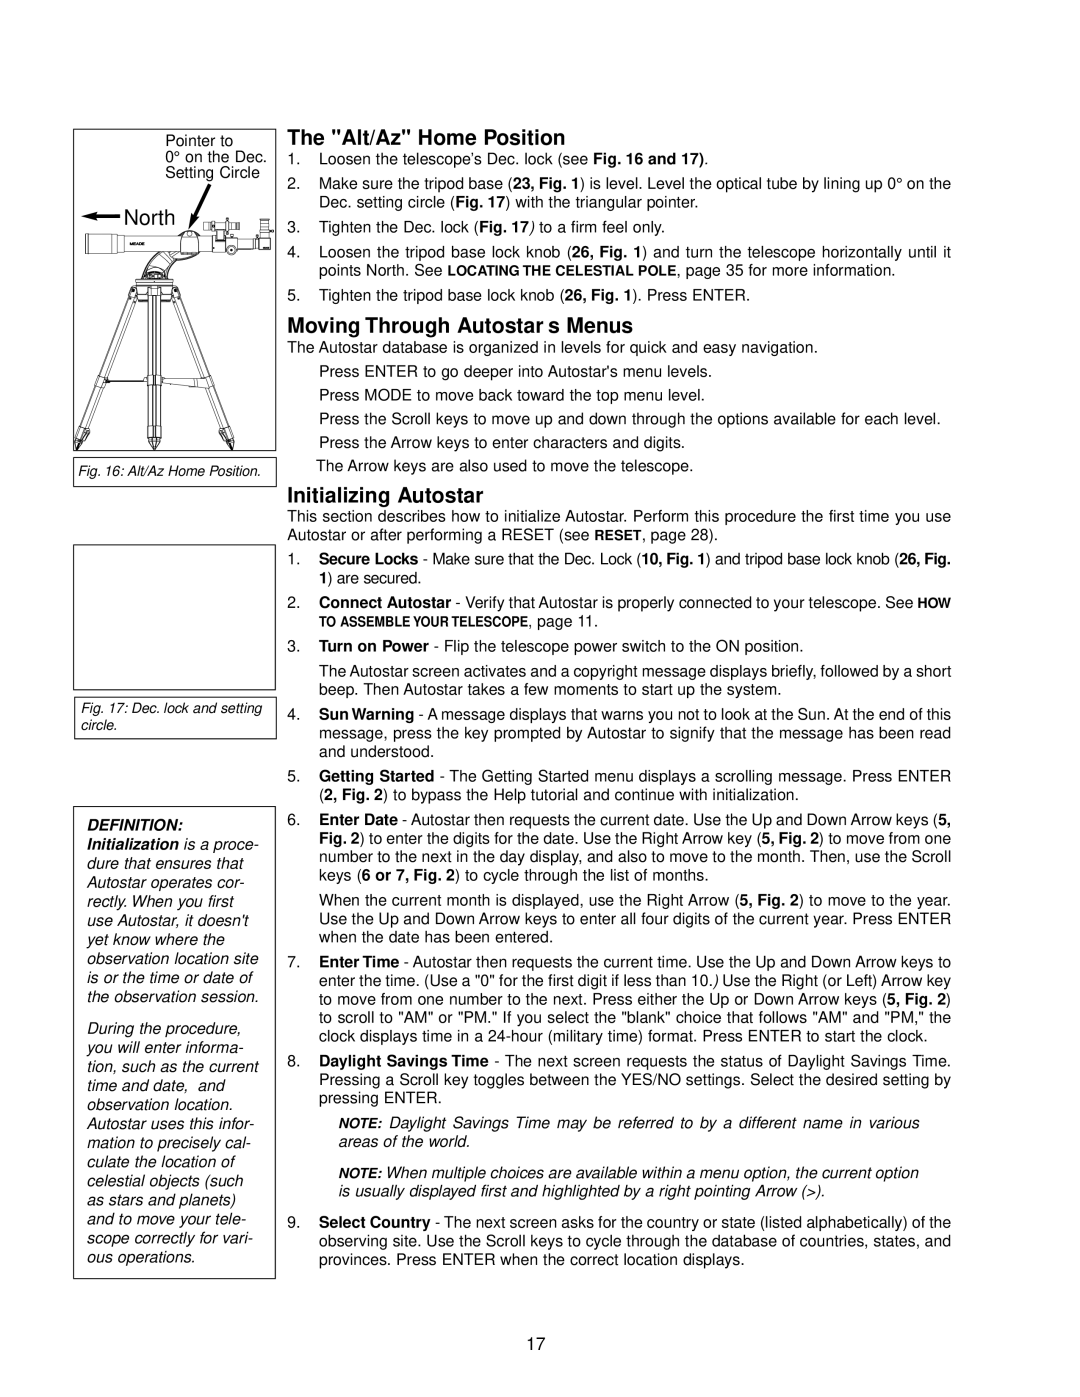
Pointer to

0° on the Dec. Setting Circle

North

Fig. 16: Alt/Az Home Position.

Fig. 17: Dec. lock and setting circle.

DEFINITION: Initialization is a proce- dure that ensures that Autostar operates cor- rectly. When you first use Autostar, it doesn't yet know where the observation location site is or the time or date of the observation session.

During the procedure, you will enter informa- tion, such as the current time and date, and observation location. Autostar uses this infor- mation to precisely cal- culate the location of celestial objects (such as stars and planets) and to move your tele- scope correctly for vari- ous operations.

The "Alt/Az" Home Position

1.Loosen the telescope’s Dec. lock (see Fig. 16 and 17).

2.Make sure the tripod base (23, Fig. 1) is level. Level the optical tube by lining up 0° on the Dec. setting circle (Fig. 17) with the triangular pointer.

3.Tighten the Dec. lock (Fig. 17) to a firm feel only.

4.Loosen the tripod base lock knob (26, Fig. 1) and turn the telescope horizontally until it points North. See LOCATING THE CELESTIAL POLE, page 35 for more information.

5.Tighten the tripod base lock knob (26, Fig. 1). Press ENTER.

Moving Through Autostar’s Menus

The Autostar database is organized in levels for quick and easy navigation.

Press ENTER to go deeper into Autostar's menu levels.

Press MODE to move back toward the top menu level.

Press the Scroll keys to move up and down through the options available for each level.

Press the Arrow keys to enter characters and digits.

The Arrow keys are also used to move the telescope.

Initializing Autostar

This section describes how to initialize Autostar. Perform this procedure the first time you use Autostar or after performing a RESET (see RESET, page 28).

1.Secure Locks - Make sure that the Dec. Lock (10, Fig. 1) and tripod base lock knob (26, Fig. 1) are secured.

2.Connect Autostar - Verify that Autostar is properly connected to your telescope. See HOW TO ASSEMBLE YOUR TELESCOPE, page 11.

3.Turn on Power - Flip the telescope power switch to the ON position.

The Autostar screen activates and a copyright message displays briefly, followed by a short beep. Then Autostar takes a few moments to start up the system.

4.Sun Warning - A message displays that warns you not to look at the Sun. At the end of this message, press the key prompted by Autostar to signify that the message has been read and understood.

5.Getting Started - The Getting Started menu displays a scrolling message. Press ENTER (2, Fig. 2) to bypass the Help tutorial and continue with initialization.

6.Enter Date - Autostar then requests the current date. Use the Up and Down Arrow keys (5, Fig. 2) to enter the digits for the date. Use the Right Arrow key (5, Fig. 2) to move from one number to the next in the day display, and also to move to the month. Then, use the Scroll keys (6 or 7, Fig. 2) to cycle through the list of months.

When the current month is displayed, use the Right Arrow (5, Fig. 2) to move to the year. Use the Up and Down Arrow keys to enter all four digits of the current year. Press ENTER when the date has been entered.

7.Enter Time - Autostar then requests the current time. Use the Up and Down Arrow keys to enter the time. (Use a "0" for the first digit if less than 10.) Use the Right (or Left) Arrow key to move from one number to the next. Press either the Up or Down Arrow keys (5, Fig. 2) to scroll to "AM" or "PM." If you select the "blank" choice that follows "AM" and "PM," the clock displays time in a 24-hour (military time) format. Press ENTER to start the clock.

8.Daylight Savings Time - The next screen requests the status of Daylight Savings Time. Pressing a Scroll key toggles between the YES/NO settings. Select the desired setting by pressing ENTER.

NOTE: Daylight Savings Time may be referred to by a different name in various areas of the world.

NOTE: When multiple choices are available within a menu option, the current option is usually displayed first and highlighted by a right pointing Arrow (>).

9.Select Country - The next screen asks for the country or state (listed alphabetically) of the observing site. Use the Scroll keys to cycle through the database of countries, states, and provinces. Press ENTER when the correct location displays.

17

Page 17
Image 17
Meade DS-2000 instruction manual Alt/Az Home Position, Moving Through Autostar’s Menus, Initializing Autostar

DS-2000 specifications

The Meade DS-2000 is a versatile and user-friendly telescope that caters to both beginners and seasoned astronomers alike. Known for its exceptional performance and ease of use, the DS-2000 series has become a popular choice among amateur stargazers. This telescope features a robust design coupled with advanced technologies that enhance the overall observing experience.

One of the standout features of the Meade DS-2000 is its sturdy mount, which provides stability during observations. This stability is crucial for clearer and more detailed views of celestial objects, as it minimizes vibrations and shakes that can occur while tracking objects across the night sky. The telescope typically comes with an adjustable aluminum tripod to further enhance stability and can handle varying weights and instruments.

The DS-2000 series utilizes an electronically controlled altazimuth mount, allowing users to easily navigate the sky with its automatic tracking capabilities. This intuitive design ensures that even novice astronomers can locate and follow astronomical objects with minimal effort. The built-in computer control allows users to access a database of thousands of celestial bodies, making it easy to select targets for viewing.

In terms of optics, the Meade DS-2000 features high-quality glass optics with multi-coated lenses. This ensures superior light transmission and contrast, resulting in bright, clear images of the Moon, planets, and deep-sky objects. The telescope typically offers a range of apertures, making it suitable for various observing preferences and conditions.

Furthermore, the Meade DS-2000 is often equipped with a 9mm or 25mm eyepiece, enabling users to achieve magnifications adequate for observing different types of celestial phenomena. The addition of a built-in red-dot finder makes it easier to aim and locate objects in the night sky.

Portability is another significant characteristic of the DS-2000 series. Its lightweight design allows astronomers to transport it easily to different observing locations, making spontaneous stargazing adventures possible, whether in the backyard or at a dark-sky site.

In summary, the Meade DS-2000 combines solid construction, user-friendly features, and advanced technology, making it an excellent choice for anyone interested in exploring the night sky. With its impressive optics, reliable tracking capabilities, and enhanced portability, the DS-2000 series provides an enjoyable and rewarding astronomical experience.