3

2

1

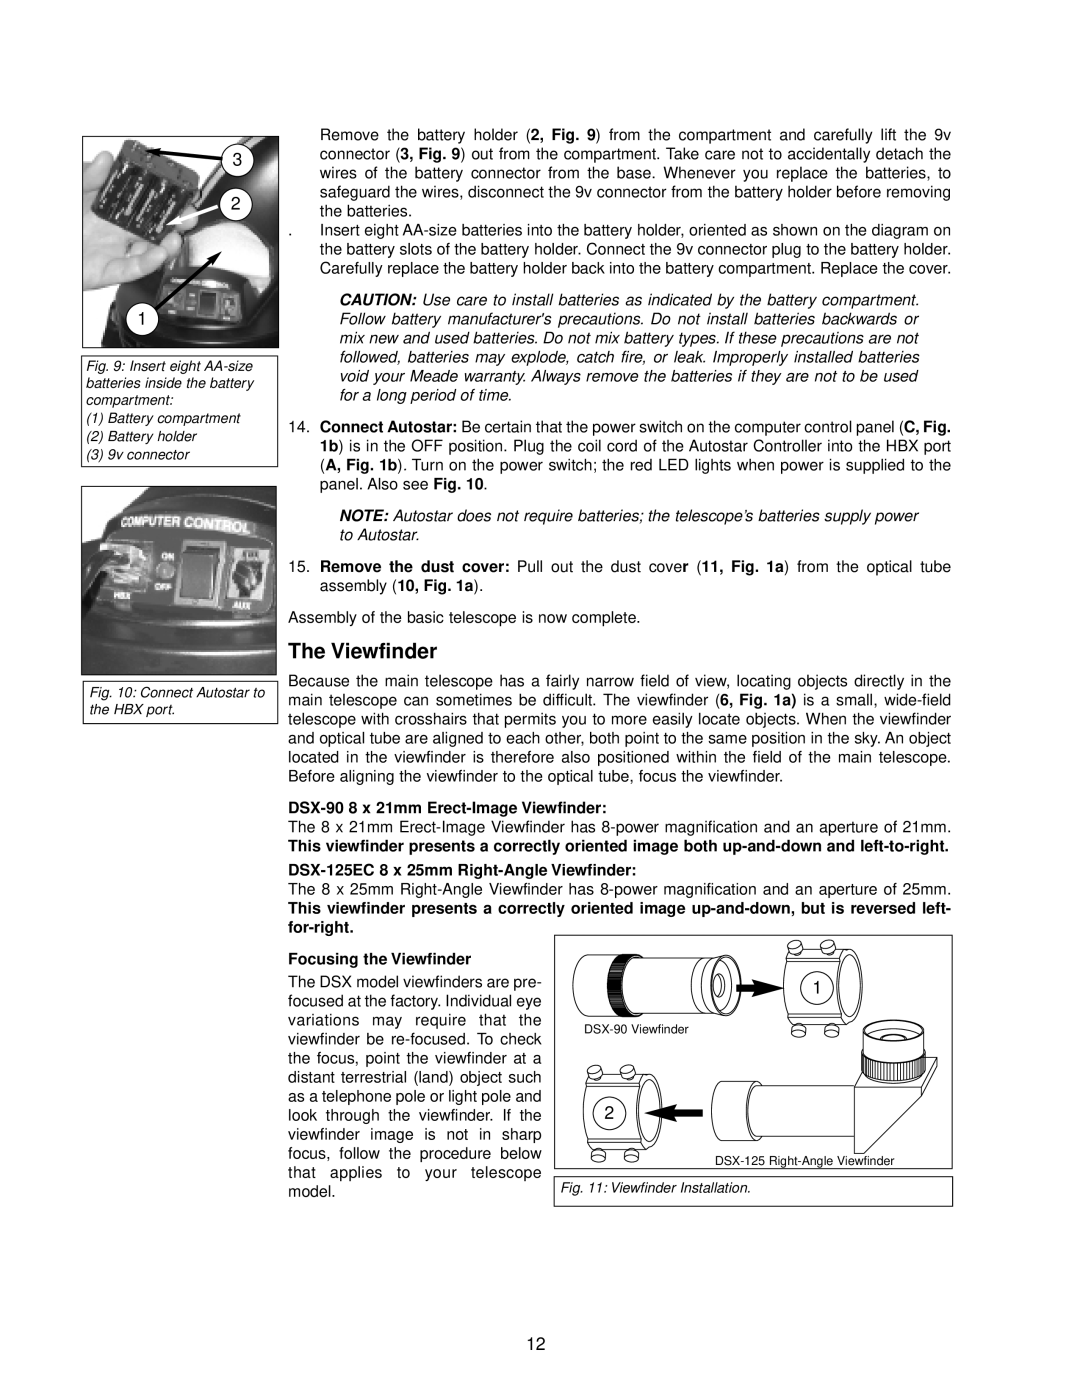
Fig. 9: Insert eight AA-size batteries inside the battery compartment:

(1)Battery compartment

(2)Battery holder

(3)9v connector

Fig. 10: Connect Autostar to the HBX port.

Remove the battery holder (2, Fig. 9) from the compartment and carefully lift the 9v connector (3, Fig. 9) out from the compartment. Take care not to accidentally detach the wires of the battery connector from the base. Whenever you replace the batteries, to safeguard the wires, disconnect the 9v connector from the battery holder before removing the batteries.

. Insert eight AA-size batteries into the battery holder, oriented as shown on the diagram on the battery slots of the battery holder. Connect the 9v connector plug to the battery holder. Carefully replace the battery holder back into the battery compartment. Replace the cover.

CAUTION: Use care to install batteries as indicated by the battery compartment. Follow battery manufacturer's precautions. Do not install batteries backwards or mix new and used batteries. Do not mix battery types. If these precautions are not followed, batteries may explode, catch fire, or leak. Improperly installed batteries void your Meade warranty. Always remove the batteries if they are not to be used for a long period of time.

14.Connect Autostar: Be certain that the power switch on the computer control panel (C, Fig. 1b) is in the OFF position. Plug the coil cord of the Autostar Controller into the HBX port (A, Fig. 1b). Turn on the power switch; the red LED lights when power is supplied to the panel. Also see Fig. 10.

NOTE: Autostar does not require batteries; the telescope’s batteries supply power to Autostar.

15.Remove the dust cover: Pull out the dust cover (11, Fig. 1a) from the optical tube assembly (10, Fig. 1a).

Assembly of the basic telescope is now complete.

The Viewfinder

Because the main telescope has a fairly narrow field of view, locating objects directly in the main telescope can sometimes be difficult. The viewfinder (6, Fig. 1a) is a small, wide-field telescope with crosshairs that permits you to more easily locate objects. When the viewfinder and optical tube are aligned to each other, both point to the same position in the sky. An object located in the viewfinder is therefore also positioned within the field of the main telescope. Before aligning the viewfinder to the optical tube, focus the viewfinder.

DSX-90 8 x 21mm Erect-Image Viewfinder:

The 8 x 21mm Erect-Image Viewfinder has 8-power magnification and an aperture of 21mm.

This viewfinder presents a correctly oriented image both up-and-down and left-to-right.

DSX-125EC 8 x 25mm Right-Angle Viewfinder:

The 8 x 25mm Right-Angle Viewfinder has 8-power magnification and an aperture of 25mm.

This viewfinder presents a correctly oriented image up-and-down, but is reversed left- for-right.

Focusing the Viewfinder

The DSX model viewfinders are pre- focused at the factory. Individual eye variations may require that the viewfinder be re-focused. To check the focus, point the viewfinder at a distant terrestrial (land) object such as a telephone pole or light pole and look through the viewfinder. If the viewfinder image is not in sharp focus, follow the procedure below that applies to your telescope model.

1

DSX-90 Viewfinder

2

DSX-125 Right-Angle Viewfinder

Fig. 11: Viewfinder Installation.

12

Page 12
Image 12
Meade DSX Series instruction manual DSX-90 8 x 21mm Erect-Image Viewfinder, Focusing the Viewfinder

DSX Series specifications

The Meade DSX Series telescopes are designed to offer enthusiasts and newcomers an engaging astronomical experience. Combining user-friendly features with advanced technology, this series makes stargazing both accessible and enjoyable.

One of the standout characteristics of the DSX Series is its portable design. Lightweight and compact, these telescopes can be easily transported to various observation sites. This mobility is essential for amateur astronomers who wish to explore the night sky away from light pollution. The telescopes can be set up quickly, making them a great option for impromptu stargazing sessions.

The DSX Series features a computerized mount, integrating the latest GoTo technology. With this advanced system, users can effortlessly locate and track celestial objects. Simply input a desired target, and the telescope's automated system will move to point directly at it. This feature significantly enhances the stargazing experience, eliminating the often tedious task of manually finding stars, planets, and other phenomena.

The optical quality of the Meade DSX telescopes is another key highlight. Sporting high-quality glass optics, they deliver clear and bright images of celestial objects. The series includes various models designed for different levels of observation, from the casual stargazer to those interested in deep-sky observation. Each model provides excellent light-gathering capabilities, allowing users to see beyond the obvious, uncovering the beauty of distant galaxies, nebulas, and star clusters.

In addition to its impressive optical system, the DSX Series also features a straightforward intuitive control panel. This user-centered design assists beginners in navigating settings and options with ease. Moreover, the included software helps data recording and object identification, further enriching the learning experience.

Finally, Meade's commitment to durability and quality ensures that the DSX Series is built to last. With robust materials and thoughtful engineering, these telescopes can withstand outdoor conditions, providing reliable functionality for years to come.

In summary, the Meade DSX Series stands out with its portable design, advanced GoTo technology, high-quality optics, user-friendly controls, and durable construction, making it an excellent choice for anyone looking to explore the wonders of the universe. Whether you are an experienced astronomer or just starting your celestial journey, the DSX Series offers an outstanding platform for exploration and discovery.