Installing Caulk or Adhesive Tube
Always check tubes for punctures or damage before installing. Do not use a damaged or frozen tube.
1.Push the control switch to the Rack Release position. Remove the battery pack.
2.Cut nozzle of tube at an angle and size per manufacturer's recommendation to suit the job (unless the nozzle is
3.Break the inner seal of the tube. If the inner seal is not broken, the caulk material may be forced out the rear end of the tube and damage the tool.
NOTE: Before using a partially filled tube, re- move any hardened material with a long nail or piece of wire.
4.Pull the rod handle back to allow the tube to fit inside the carriage.
![]() WARNING To reduce the risk of injury, keep hands out of the piston area of the tool. Fingers can be pinched between carriage and the piston.
WARNING To reduce the risk of injury, keep hands out of the piston area of the tool. Fingers can be pinched between carriage and the piston.
5.Insert tube into the carriage.
6.Push the rod handle forward until the piston is against the tube.
7.Push the control switch to the Forward position.
8.To remove the tube, push the control switch to the Rack Release position and pull the rod handle back. Lift the tube out of the carriage.
Installing Sausage Type Pack
Always check sausage packs for punctures or damage before installing. Do not use a damaged or frozen pack.
1.Push the control switch to the Rack Release position. Remove the battery pack.
2.Pull the rod handle back to allow the pack to fit inside the barrel
3.Insert pack into barrel.
4.Cut off end of sausage pack per manufacturer's recommendation.
NOTE: Before using a partially filled pack, re- move any hardened material.
5.Insert nozzle supplied with the sausage pack into the nozzle cap and screw onto the barrel
6.Cut nozzle at an angle and size per manufac- turer's recommendation to suit the job (unless the nozzle is
7.Push the rod handle forward until the piston is against the pack.
8.Push the control switch to the Forward position.
OPERATION
![]() WARNING Always remove battery pack before changing or removing acces- sories. Only use accessories specifically recommended for this tool. Others may be hazardous.
WARNING Always remove battery pack before changing or removing acces- sories. Only use accessories specifically recommended for this tool. Others may be hazardous.
![]() WARNING To reduce the risk of in- jury, keep hands away from all moving parts. Always wear safety goggles or glasses with side shields.
WARNING To reduce the risk of in- jury, keep hands away from all moving parts. Always wear safety goggles or glasses with side shields.
Fuel Gauge
To determine the amount of charge left in the bat- tery, pull the trigger. The Fuel Gauge will light up for
To signal the end of charge, 1 light on the fuel gauge will flash for
The caulk gun features an automatic
End of travel
When a tube is emptied, the motor will automatically reverse to release pressure, then shut off. Release the trigger and change the tube.
Overload
When an overload occurs, the tool will reach the maximum drive force and continue to hold this maximum force until the user releases the trigger. If material is not dispensing, make sure that:
•Nozzle tip is cut
•Inner seal in the caulk tube is broken
•Hardened material is removed from the nozzle
•Caulk tube is not damaged or frozen
•Rod is free of caulk/adhesive materials
Starting and Stopping and Controlling Speed
1.Pull trigger to dispense material.
2.Increase or decrease pressure on the trigger to dispense the material. Adjust the speed dial to select the maximum speed for proper bead width and material flow rate ("1" for slowest, "6" for fastest). The trigger pressure, selected speed, material type, temperature and nozzle diameter will all affect the flow rate. When using a tube or pack with a smaller nozzle diameter use a slower speed or the material may be forced around the rear tube seat.
NOTE: Operating the gun at high speeds may damage the dispensing tube or pack for some materials. For best results, gradually increase speed settings.
3.Release trigger to stop dispensing material. NOTE: The piston will stop automatically when it has reached the end of the tube.
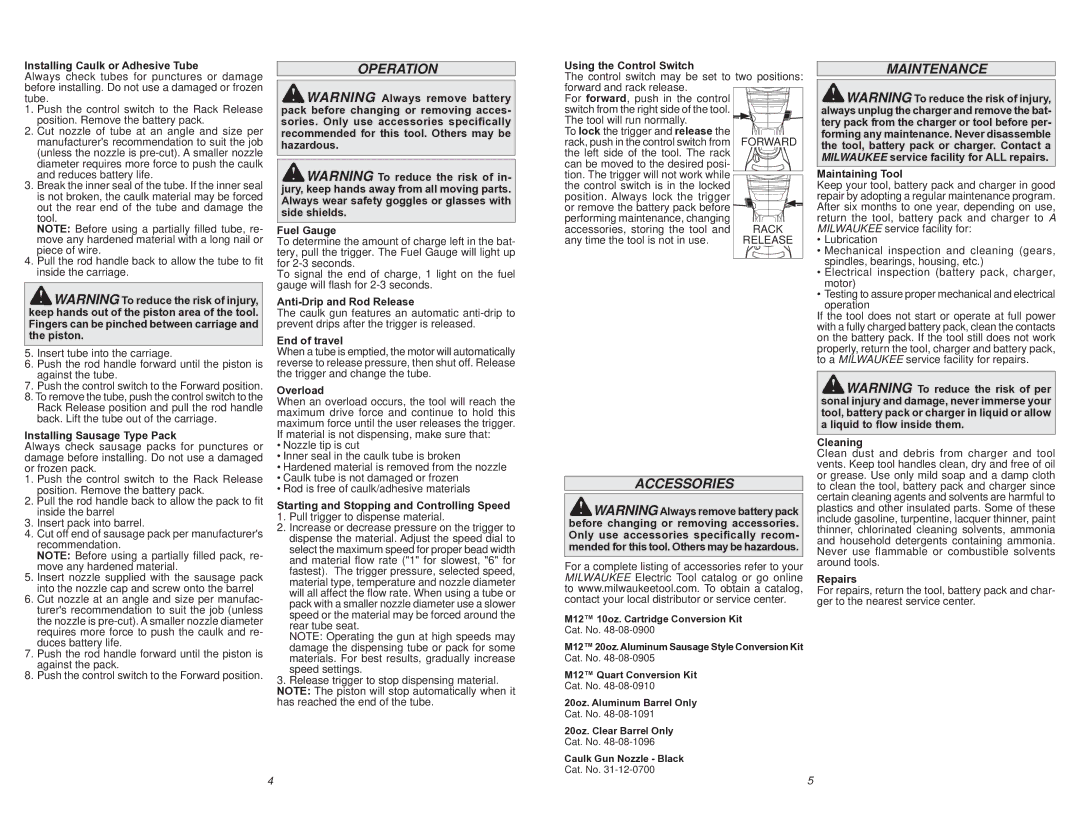
Using the Control Switch
The control switch may be set to two positions: forward and rack release. ![]() For forward, push in the control
For forward, push in the control ![]()
![]()
![]()
![]() switch from the right side of the tool.
switch from the right side of the tool. ![]()
![]()
![]()
![]()
![]()
![]()
![]()
![]() The tool will run normally.
The tool will run normally. ![]()
![]()
![]()
![]()
![]()
![]()
![]() To lock the trigger and release the
To lock the trigger and release the ![]()
![]()
![]()
![]()
![]()
![]()
![]()
![]() rack, push in the control switch from
rack, push in the control switch from ![]()
![]()
![]()
![]()
![]()
![]()
![]()
![]()
![]()
![]()
![]() the left side of the tool. The rack
the left side of the tool. The rack ![]()
![]()
![]()
![]()
![]()
![]()
![]()
![]()
![]()
![]()
![]()
![]() can be moved to the desired posi-
can be moved to the desired posi- ![]()
![]()
![]()
![]()
![]()
![]()
![]()
![]()
![]()
![]()
![]() tion. The trigger will not work while
tion. The trigger will not work while ![]() the control switch is in the locked
the control switch is in the locked ![]()
![]()
![]()
![]()
![]() position. Always lock the trigger
position. Always lock the trigger ![]()
![]()
![]()
![]()
![]()
![]()
![]()
![]()
![]() or remove the battery pack before
or remove the battery pack before ![]()
![]()
![]()
![]()
![]()
![]()
![]()
![]() performing maintenance, changing
performing maintenance, changing ![]()
![]()
![]()
![]()
![]()
![]()
![]()
![]() accessories, storing the tool and
accessories, storing the tool and ![]()
![]()
![]()
![]()
![]()
![]()
![]()
![]()
![]() any time the tool is not in use.
any time the tool is not in use. ![]()
![]()
![]()
![]()
![]()
![]()
![]()
![]()
![]()
![]()
![]()
ACCESSORIES
![]() WARNING Always remove battery pack before changing or removing accessories. Only use accessories specifically recom- mended for this tool. Others may be hazardous.
WARNING Always remove battery pack before changing or removing accessories. Only use accessories specifically recom- mended for this tool. Others may be hazardous.
For a complete listing of accessories refer to your MILWAUKEE Electric Tool catalog or go online to www.milwaukeetool.com. To obtain a catalog, contact your local distributor or service center.
M12™ 10oz. Cartridge Conversion Kit
Cat. No.
M12™ 20oz. Aluminum Sausage Style Conversion Kit
Cat. No.
M12™ Quart Conversion Kit
Cat. No.
20oz. Aluminum Barrel Only
Cat. No.
20oz. Clear Barrel Only
Cat. No.
Caulk Gun Nozzle - Black
Cat. No.
MAINTENANCE
![]() WARNING To reduce the risk of injury, always unplug the charger and remove the bat- tery pack from the charger or tool before per- forming any maintenance. Never disassemble the tool, battery pack or charger. Contact a MILWAUKEE service facility for ALL repairs.
WARNING To reduce the risk of injury, always unplug the charger and remove the bat- tery pack from the charger or tool before per- forming any maintenance. Never disassemble the tool, battery pack or charger. Contact a MILWAUKEE service facility for ALL repairs.
Maintaining Tool
Keep your tool, battery pack and charger in good repair by adopting a regular maintenance program. After six months to one year, depending on use, return the tool, battery pack and charger to A MILWAUKEE service facility for:
•Lubrication
•Mechanical inspection and cleaning (gears, spindles, bearings, housing, etc.)
•Electrical inspection (battery pack, charger, motor)
•Testing to assure proper mechanical and electrical operation
If the tool does not start or operate at full power with a fully charged battery pack, clean the contacts on the battery pack. If the tool still does not work properly, return the tool, charger and battery pack, to a MILWAUKEE service facility for repairs.
![]() WARNING To reduce the risk of per sonal injury and damage, never immerse your tool, battery pack or charger in liquid or allow a liquid to flow inside them.
WARNING To reduce the risk of per sonal injury and damage, never immerse your tool, battery pack or charger in liquid or allow a liquid to flow inside them.
Cleaning
Clean dust and debris from charger and tool vents. Keep tool handles clean, dry and free of oil or grease. Use only mild soap and a damp cloth to clean the tool, battery pack and charger since certain cleaning agents and solvents are harmful to plastics and other insulated parts. Some of these include gasoline, turpentine, lacquer thinner, paint thinner, chlorinated cleaning solvents, ammonia and household detergents containing ammonia. Never use flammable or combustible solvents around tools.
Repairs
For repairs, return the tool, battery pack and char- ger to the nearest service center.
4 | 5 |