APPLICATIONS
Typical Application
ACCESSORIESMAINTENANCE
![]() WARNING Always support overhang- ing stock on both sides of the blade to prevent
WARNING Always support overhang- ing stock on both sides of the blade to prevent
Clamping the Stock
With the mounting bracket locked in the upright position, place the stock on the work surface and against the vertical vice supports.
Support overhanging stock on both sides of the blade to prevent tipping of the table and to control the
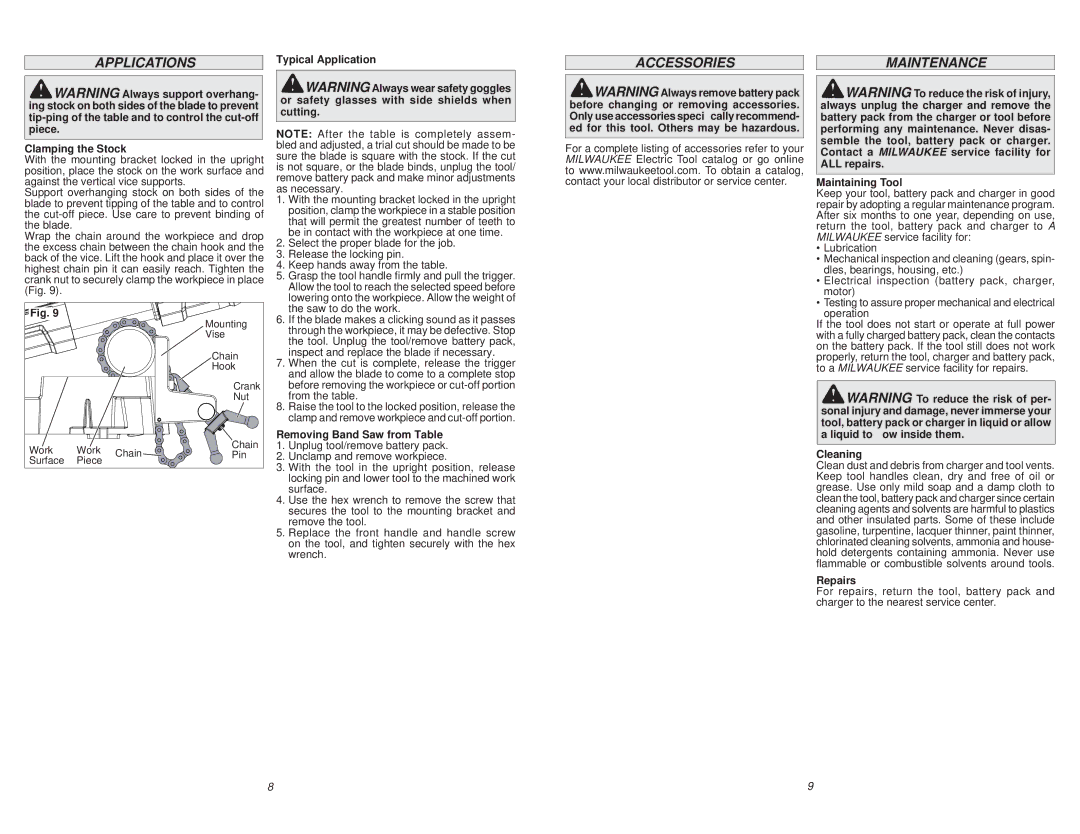
Wrap the chain around the workpiece and drop the excess chain between the chain hook and the back of the vice. Lift the hook and place it over the highest chain pin it can easily reach. Tighten the crank nut to securely clamp the workpiece in place (Fig.![]() 9).
9).![]()
Fig. 9 |
|
| Mounting |
|
|
| |
|
|
| Vise |
|
|
| Chain |
|
|
| Hook |
|
|
| Crank |
|
|
| Nut |
Work | Work | Chain | Chain |
Pin | |||
Surface | Piece |
|
|
![]() WARNING Always wear safety goggles or safety glasses with side shields when cutting.
WARNING Always wear safety goggles or safety glasses with side shields when cutting.
NOTE: After the table is completely assem- bled and adjusted, a trial cut should be made to be sure the blade is square with the stock. If the cut is not square, or the blade binds, unplug the tool/ remove battery pack and make minor adjustments as necessary.
1.With the mounting bracket locked in the upright position, clamp the workpiece in a stable position that will permit the greatest number of teeth to be in contact with the workpiece at one time.
2.Select the proper blade for the job.
3.Release the locking pin.
4.Keep hands away from the table.
5.Grasp the tool handle firmly and pull the trigger. Allow the tool to reach the selected speed before lowering onto the workpiece. Allow the weight of the saw to do the work.
6.If the blade makes a clicking sound as it passes through the workpiece, it may be defective. Stop the tool. Unplug the tool/remove battery pack, inspect and replace the blade if necessary.
7.When the cut is complete, release the trigger and allow the blade to come to a complete stop before removing the workpiece or
8.Raise the tool to the locked position, release the clamp and remove workpiece and
Removing Band Saw from Table
1.Unplug tool/remove battery pack.
2.Unclamp and remove workpiece.
3.With the tool in the upright position, release locking pin and lower tool to the machined work surface.
4.Use the hex wrench to remove the screw that secures the tool to the mounting bracket and remove the tool.
5.Replace the front handle and handle screw on the tool, and tighten securely with the hex wrench.
![]() WARNING Always remove battery pack before changing or removing accessories. Only use accessories specifically recommend- ed for this tool. Others may be hazardous.
WARNING Always remove battery pack before changing or removing accessories. Only use accessories specifically recommend- ed for this tool. Others may be hazardous.
For a complete listing of accessories refer to your MILWAUKEE Electric Tool catalog or go online to www.milwaukeetool.com. To obtain a catalog, contact your local distributor or service center.
![]() WARNING To reduce the risk of injury, always unplug the charger and remove the battery pack from the charger or tool before performing any maintenance. Never disas- semble the tool, battery pack or charger. Contact a MILWAUKEE service facility for ALL repairs.
WARNING To reduce the risk of injury, always unplug the charger and remove the battery pack from the charger or tool before performing any maintenance. Never disas- semble the tool, battery pack or charger. Contact a MILWAUKEE service facility for ALL repairs.
Maintaining Tool
Keep your tool, battery pack and charger in good repair by adopting a regular maintenance program. After six months to one year, depending on use, return the tool, battery pack and charger to A MILWAUKEE service facility for:
•Lubrication
•Mechanical inspection and cleaning (gears, spin- dles, bearings, housing, etc.)
•Electrical inspection (battery pack, charger, motor)
•Testing to assure proper mechanical and electrical operation
If the tool does not start or operate at full power with a fully charged battery pack, clean the contacts on the battery pack. If the tool still does not work properly, return the tool, charger and battery pack, to a MILWAUKEE service facility for repairs.
![]() WARNING To reduce the risk of per- sonal injury and damage, never immerse your tool, battery pack or charger in liquid or allow a liquid to flow inside them.
WARNING To reduce the risk of per- sonal injury and damage, never immerse your tool, battery pack or charger in liquid or allow a liquid to flow inside them.
Cleaning
Clean dust and debris from charger and tool vents. Keep tool handles clean, dry and free of oil or grease. Use only mild soap and a damp cloth to clean the tool, battery pack and charger since certain cleaning agents and solvents are harmful to plastics and other insulated parts. Some of these include gasoline, turpentine, lacquer thinner, paint thinner, chlorinated cleaning solvents, ammonia and house- hold detergents containing ammonia. Never use flammable or combustible solvents around tools.
Repairs
For repairs, return the tool, battery pack and charger to the nearest service center.
8 | 9 |