EXTENSION CORDS
TOOL ASSEMBLY
Grounded tools require a three wire exten- sion cord. Double insulated tools can use either a two or three wire extension cord. As the distance from the supply outlet increases, you must use a heavier gauge extension cord. Using extension cords with inadequately sized wire causes a serious drop in voltage, resulting in loss of power and possible tool damage. Refer to the table shown to determine the required minimum wire size.
The smaller the gauge number of the wire, the greater the capacity of the cord. For ex- ample, a 14 gauge cord can carry a higher current than a 16 gauge cord. When using more than one extension cord to make up the total length, be sure each cord contains at least the minimum wire size required. If you are using one extension cord for more than one tool, add the nameplate amperes and use the sum to determine the required minimum wire size.
Guidelines for Using Extension Cords
•If you are using an extension cord out- doors, be sure it is marked with the suffix
•Be sure your extension cord is prop- erly wired and in good electrical condition. Always replace a damaged extension cord or have it repaired by a qualified person before using it.
•Protect your extension cords from sharp objects, excessive heat and
damp or wet areas.
Recommended Minimum Wire Gauge
for Extension Cords*
Nameplate | Extension Cord Length | |||||
Amperes | 25' | 50' | 75' | 100' | 150' | |
|
|
|
|
|
| |
0 - 2.0 | 18 | 18 | 18 | 18 | 16 | |
2.1 | - 3.4 | 18 | 18 | 18 | 16 | 14 |
3.5 | - 5.0 | 18 | 18 | 16 | 14 | 12 |
5.1 | - 7.0 | 18 | 16 | 14 | 12 | 12 |
7.1 - 12.0 | 16 | 14 | 12 | 10 |
| |
12.1 | - 16.0 | 14 | 12 | 10 |
|
|
16.1 | - 20.0 | 12 | 10 |
|
|
|
|
|
|
|
|
|
|
*Based on limiting the line voltage drop to five volts at 150% of the rated amperes.
WARNING
To reduce the risk of injury, always unplug tool before attaching or removing accessories or making adjustments. Use only specifically recommended accessories. Others may be hazardous.
Removing and Replacing Quik-Lok® Cords (Cat. No. 6523-21)
MILWAUKEE's exclusive
Fig. 1
1.To remove the
2.To replace the
Selecting a Blade
Use MILWAUKEE Sawzall® Blades for best performance. When selecting a blade, choose the right type and length.
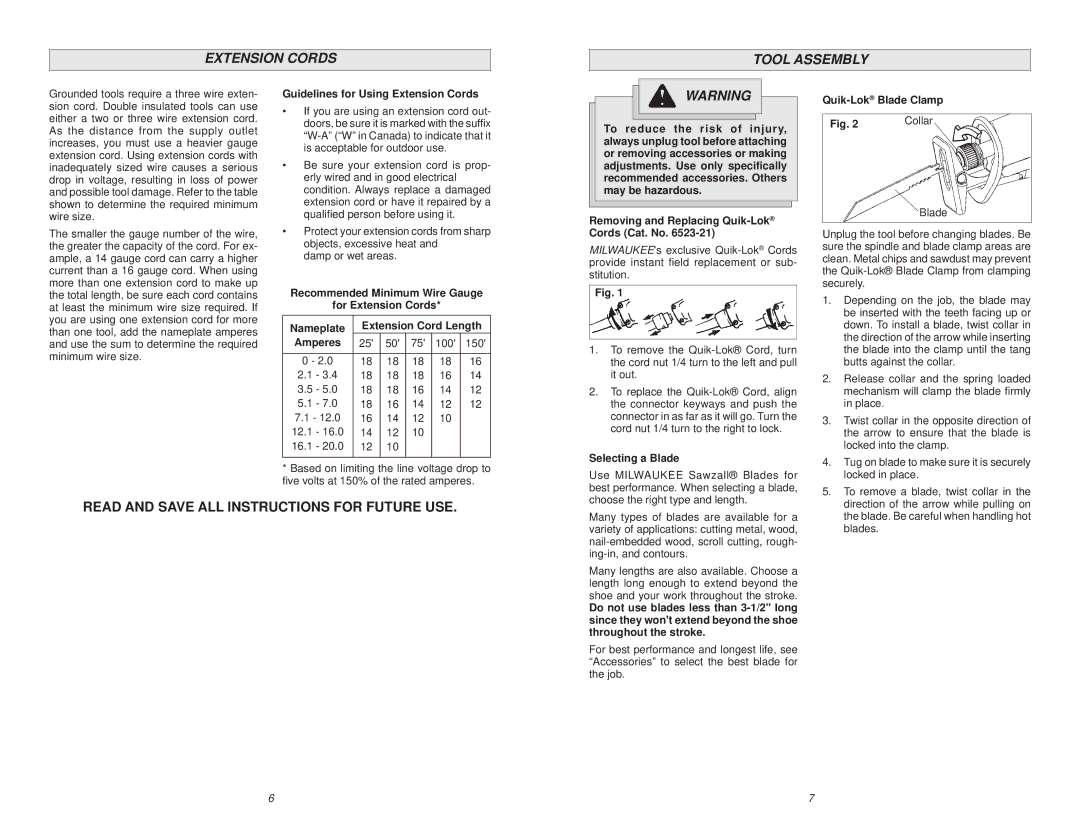
Quik-Lok® Blade Clamp
Fig. 2 | Collar |
Blade
Unplug the tool before changing blades. Be sure the spindle and blade clamp areas are clean. Metal chips and sawdust may prevent the
1. | Depending on the job, the blade may |
| be inserted with the teeth facing up or |
| down. To install a blade, twist collar in |
| the direction of the arrow while inserting |
| the blade into the clamp until the tang |
| butts against the collar. |
2. | Release collar and the spring loaded |
| mechanism will clamp the blade firmly |
| in place. |
3. | Twist collar in the opposite direction of |
| the arrow to ensure that the blade is |
| locked into the clamp. |
4. | Tug on blade to make sure it is securely |
| locked in place. |
5. | To remove a blade, twist collar in the |
READ AND SAVE ALL INSTRUCTIONS FOR FUTURE USE.
Many types of blades are available for a variety of applications: cutting metal, wood,
Many lengths are also available. Choose a length long enough to extend beyond the shoe and your work throughout the stroke.
Do not use blades less than
For best performance and longest life, see “Accessories” to select the best blade for the job.
direction of the arrow while pulling on |
the blade. Be careful when handling hot |
blades. |
6 | 7 |