Names of the Remote Control Parts/Preparing the Remote Control

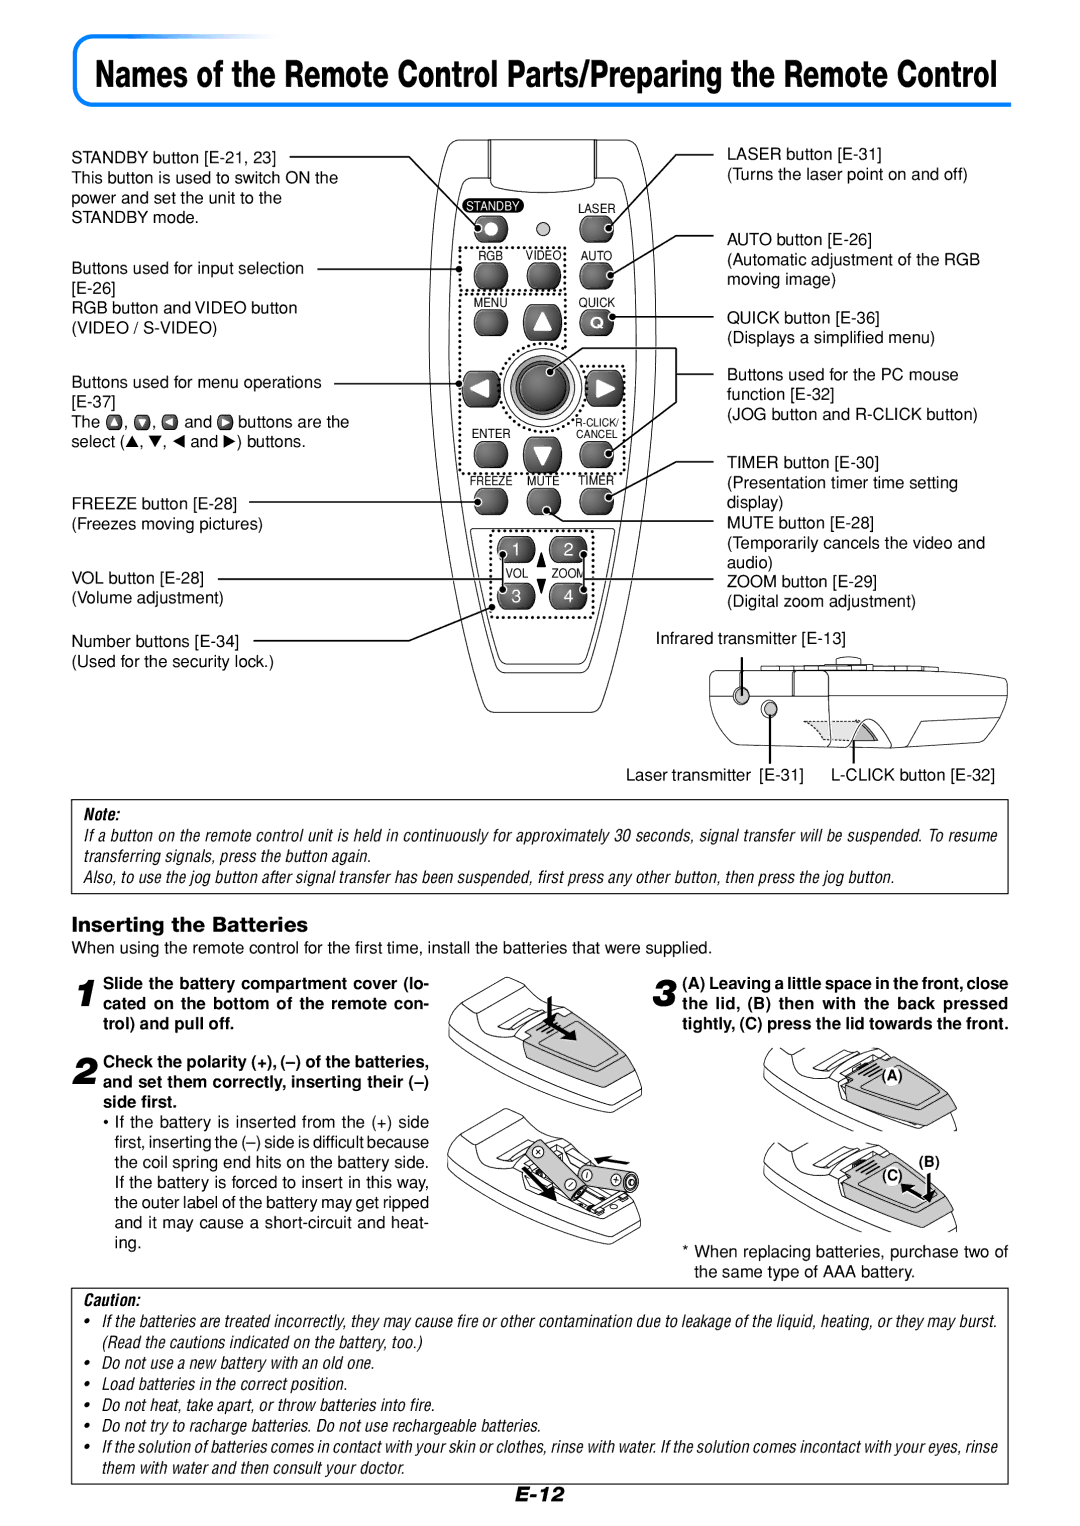
STANDBY button [E-21, 23]

This button is used to switch ON the power and set the unit to the STANDBY mode.

Buttons used for input selection [E-26]

RGB button and VIDEO button (VIDEO / S-VIDEO)

Buttons used for menu operations [E-37]

The , , and buttons are the select (￿, ￿, ￿ and ￿) buttons.

FREEZE button [E-28] (Freezes moving pictures)

VOL button [E-28] (Volume adjustment)

STANDBYLASER

RGB VIDEO AUTO

MENUQUICK

Q

R-CLICK/

ENTERCANCEL

FREEZE MUTE TIMER

1

2

VOL ZOOM

3

4

LASER button [E-31]

(Turns the laser point on and off)

AUTO button [E-26]

(Automatic adjustment of the RGB moving image)

QUICK button [E-36] (Displays a simplified menu)

Buttons used for the PC mouse function [E-32]

(JOG button and R-CLICK button)

TIMER button [E-30] (Presentation timer time setting display)

MUTE button [E-28]

(Temporarily cancels the video and audio)

ZOOM button [E-29] (Digital zoom adjustment)

Number buttons [E-34] (Used for the security lock.)

Infrared transmitter [E-13]

Laser transmitter [E-31] L-CLICK button [E-32]

Note:

If a button on the remote control unit is held in continuously for approximately 30 seconds, signal transfer will be suspended. To resume transferring signals, press the button again.

Also, to use the jog button after signal transfer has been suspended, first press any other button, then press the jog button.

Inserting the Batteries

When using the remote control for the first time, install the batteries that were supplied.

1 Slide the battery compartment cover (lo- cated on the bottom of the remote con- trol) and pull off.

2 Check the polarity (+), (–) of the batteries, and set them correctly, inserting their (–) side first.

If the battery is inserted from the (+) side first, inserting the (–) side is difficult because the coil spring end hits on the battery side. If the battery is forced to insert in this way, the outer label of the battery may get ripped and it may cause a short-circuit and heat- ing.

3 (A) Leaving a little space in the front, close the lid, (B) then with the back pressed tightly, (C) press the lid towards the front.

(A)

(B)

(C)

*When replacing batteries, purchase two of the same type of AAA battery.

Caution:

If the batteries are treated incorrectly, they may cause fire or other contamination due to leakage of the liquid, heating, or they may burst. (Read the cautions indicated on the battery, too.)

Do not use a new battery with an old one.

Load batteries in the correct position.

Do not heat, take apart, or throw batteries into fire.

Do not try to racharge batteries. Do not use rechargeable batteries.

If the solution of batteries comes in contact with your skin or clothes, rinse with water. If the solution comes incontact with your eyes, rinse them with water and then consult your doctor.

E-12

Page 13
Image 13
Mitsubishi Electronics DATA PROJECTOR user manual Inserting the Batteries

DATA PROJECTOR specifications

Mitsubishi Electronics has been a prominent player in the realm of projector technology, consistently providing high-quality data projectors designed to meet the demands of both professional and educational environments. Their data projectors are known for their exceptional brightness, clarity, and advanced features, making them a significant choice for presentations, meetings, and lectures.

One of the standout features of Mitsubishi data projectors is their high brightness capability. With luminous output reaching up to 5,000 ANSI lumens, these projectors ensure presentations remain clear and visible in various lighting conditions. This is especially crucial for large venues or rooms with significant ambient light. The powerful brightness is paired with high contrast ratios, delivering sharp and detailed images that bring content to life.

Mitsubishi projectors incorporate advanced LCD and DLP technologies, ensuring vibrant colors and excellent image quality. The use of 3LCD technology in some models provides a wider color gamut, resulting in more accurate color reproduction. This is beneficial for presentations that involve graphics and media, where color fidelity is essential to convey the right message.

Portability is another key characteristic of Mitsubishi data projectors. Many models are designed to be lightweight and compact, allowing for easy transportation between different venues. Features such as quick startup and shutdown times enhance usability, making it convenient for users who require quick setup and takedown during events.

In terms of connectivity, Mitsubishi projectors offer versatile options, including HDMI, VGA, and USB ports. This diverse range of inputs ensures compatibility with various devices such as laptops, tablets, and smartphones. Some models even support wireless connectivity, allowing for seamless presentations without the hassle of cables.

Mitsubishi Electronics also emphasizes user-friendly interfaces in their data projectors. Often equipped with intuitive control panels and remote controls, these projectors allow users to easily adjust settings and switch between input sources. Additionally, features like automatic keystone correction help maintain image quality by ensuring the projected output remains straight and properly aligned.

Durability and energy efficiency are further notable attributes of Mitsubishi data projectors. Many models are designed with long-lasting lamp life, reducing the need for frequent replacements, which not only saves costs but also contributes to a lower environmental impact.

In conclusion, Mitsubishi Electronics’ data projectors blend advanced technology with user-friendly features to cater to varying presentation needs. Their projectors are engineered for brightness, excellent image quality, and convenience, making them an ideal choice for anyone looking for reliable projection solutions in professional and educational settings.