DX-TL910U Quick Reference Guide
This Quick Reference Guide is designed to help you get quickly acquainted with your Mitsubishi
Manual.
Features:
Easy to Use | Duplex Operation | Per Camera Settings. |
60PPS | 5 Quality Grades | Covert Camera |
Copy to CFC or VHS | Password Protection | Network Support via DX- |
PC25 or Web Browser |
|
|
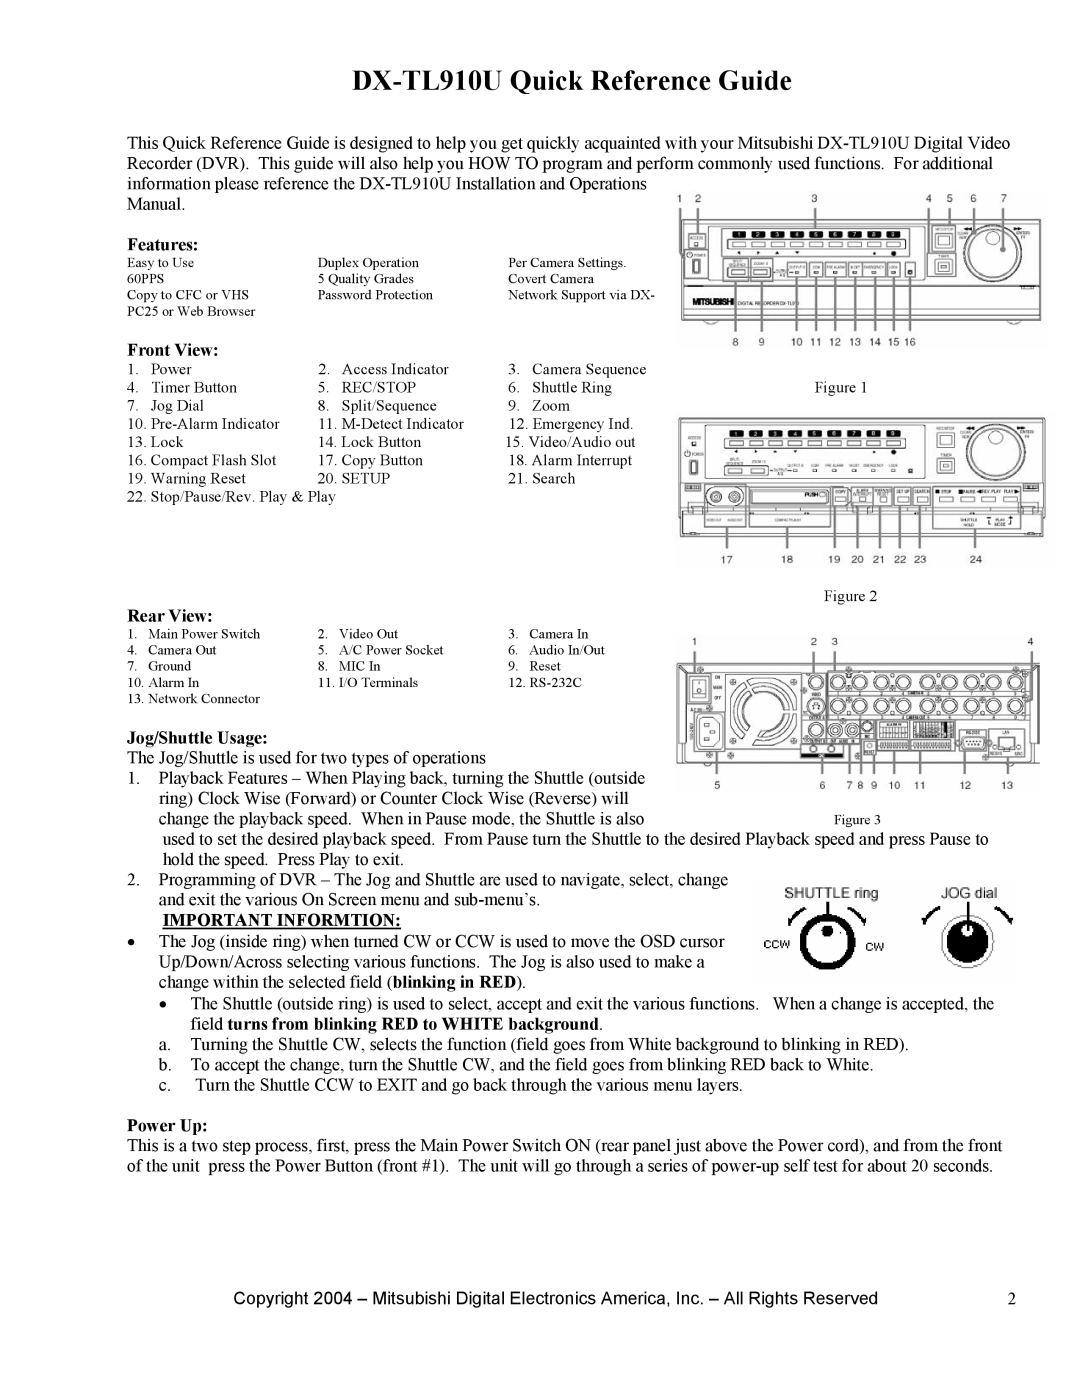
Front View:
1. | Power | 2. | Access Indicator | 3. | Camera Sequence |
|
4. | Timer Button | 5. | REC/STOP | 6. | Shuttle Ring | Figure 1 |
7. | Jog Dial | 8. | Split/Sequence | 9. | Zoom |
|
10. | 11. | 12. Emergency Ind. |
| |||
13. | Lock | 14. Lock Button | 15. Video/Audio out |
| ||
16. | Compact Flash Slot | 17. | Copy Button | 18. Alarm Interrupt |
| |
19. | Warning Reset | 20. SETUP | 21. Search |
| ||
22. | Stop/Pause/Rev. Play & Play |
|
|
|
| |
Figure 2
Rear View:
1. | Main Power Switch | 2. | Video Out | 3. | Camera In |
4. | Camera Out | 5. | A/C Power Socket | 6. | Audio In/Out |
7. | Ground | 8. | MIC In | 9. | Reset |
10. | Alarm In | 11. | I/O Terminals | 12. | |
13. | Network Connector |
|
|
|
|
Jog/Shuttle Usage:
The Jog/Shuttle is used for two types of operations
1.Playback Features – When Playing back, turning the Shuttle (outside ring) Clock Wise (Forward) or Counter Clock Wise (Reverse) will
change the playback speed. When in Pause mode, the Shuttle is alsoFigure 3
used to set the desired playback speed. From Pause turn the Shuttle to the desired Playback speed and press Pause to hold the speed. Press Play to exit.
2.Programming of DVR – The Jog and Shuttle are used to navigate, select, change and exit the various On Screen menu and
IMPORTANT INFORMTION:
•The Jog (inside ring) when turned CW or CCW is used to move the OSD cursor Up/Down/Across selecting various functions. The Jog is also used to make a change within the selected field (blinking in RED).
• The Shuttle (outside ring) is used to select, accept and exit the various functions. When a change is accepted, the
field turns from blinking RED to WHITE background.
a.Turning the Shuttle CW, selects the function (field goes from White background to blinking in RED).
b.To accept the change, turn the Shuttle CW, and the field goes from blinking RED back to White.
c.Turn the Shuttle CCW to EXIT and go back through the various menu layers.
Power Up:
This is a two step process, first, press the Main Power Switch ON (rear panel just above the Power cord), and from the front of the unit press the Power Button (front #1). The unit will go through a series of
Copyright 2004 – Mitsubishi Digital Electronics America, Inc. – All Rights Reserved | 2 |