Menu operation (continued)

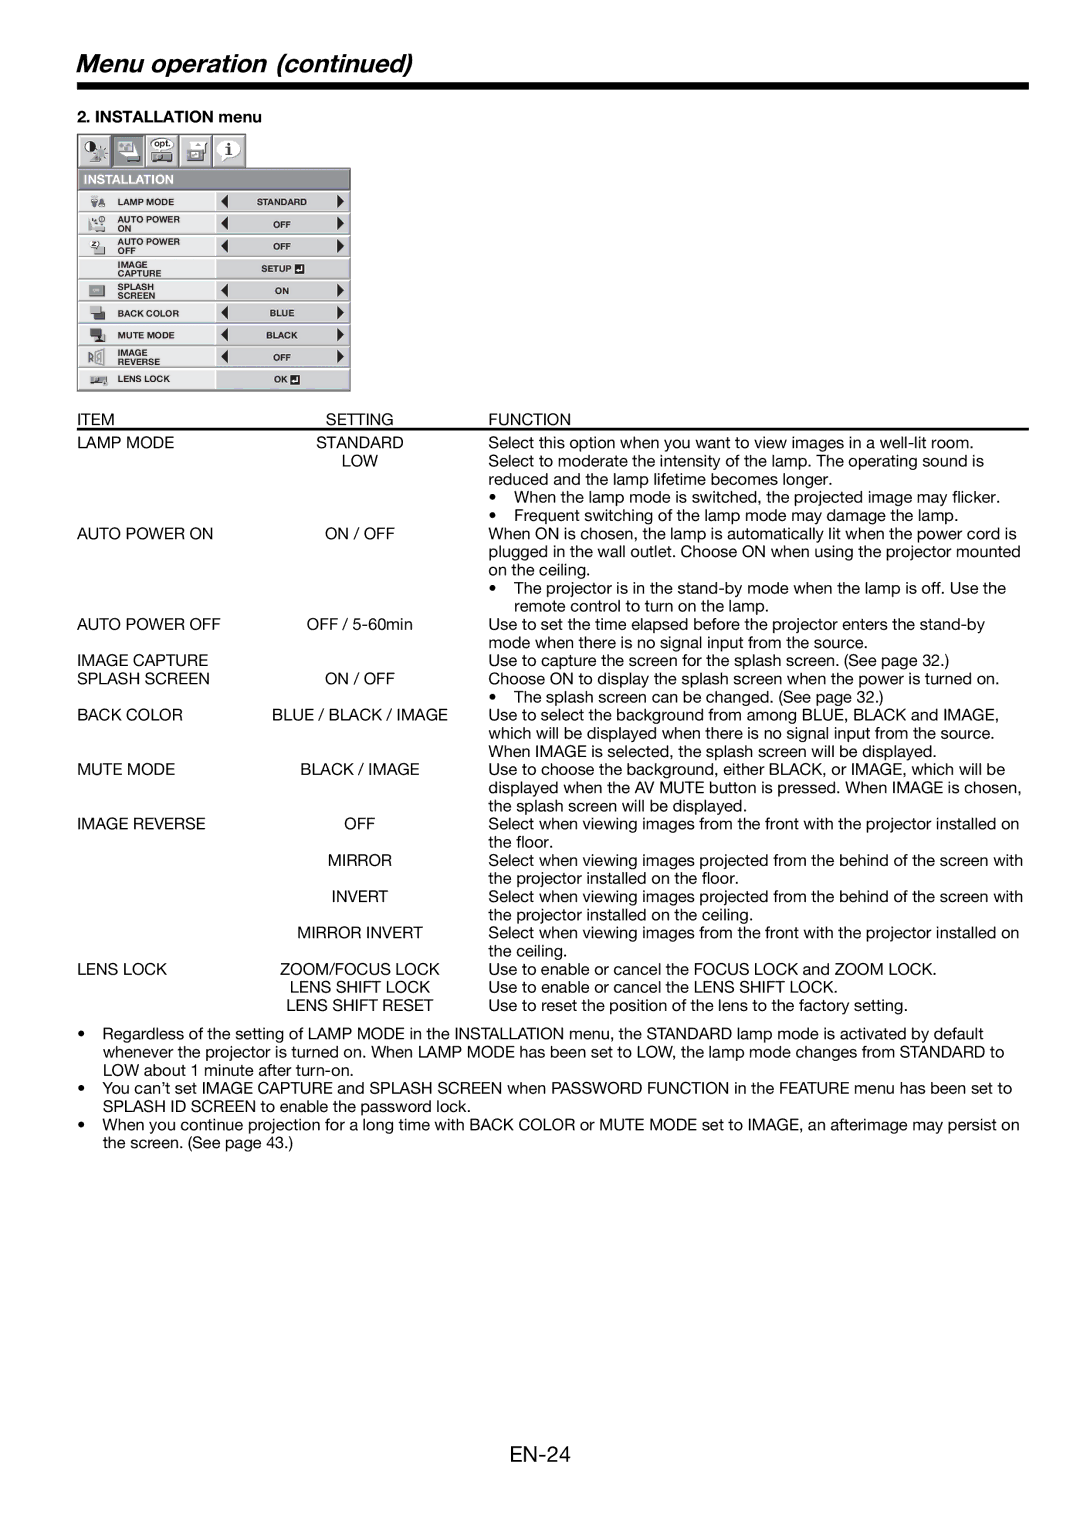
2. INSTALLATION menu


opt.


INSTALLATION


LAMP MODE

STANDARD


AUTO POWER

OFF


ON


AUTO POWER

OFF


OFF


IMAGE

SETUP


CAPTURE


ON

SPLASH

ON


SCREEN


BACK COLOR

BLUE


MUTE MODE

BLACK


IMAGE

OFF


REVERSE


LENS LOCK

OK

ITEM

SETTING

FUNCTION

LAMP MODE

STANDARD

Select this option when you want to view images in a well-lit room.


LOW

Select to moderate the intensity of the lamp. The operating sound is


reduced and the lamp lifetime becomes longer.


• When the lamp mode is switched, the projected image may flicker.


• Frequent switching of the lamp mode may damage the lamp.

AUTO POWER ON

ON / OFF

When ON is chosen, the lamp is automatically lit when the power cord is


plugged in the wall outlet. Choose ON when using the projector mounted


on the ceiling.

The projector is in the stand-by mode when the lamp is off. Use the remote control to turn on the lamp.

AUTO POWER OFF

OFF / 5-60min

Use to set the time elapsed before the projector enters the stand-by


mode when there is no signal input from the source.

IMAGE CAPTURE


Use to capture the screen for the splash screen. (See page 32.)

SPLASH SCREEN

ON / OFF

Choose ON to display the splash screen when the power is turned on.

The splash screen can be changed. (See page 32.)

BACK COLOR

BLUE / BLACK / IMAGE

Use to select the background from among BLUE, BLACK and IMAGE,


which will be displayed when there is no signal input from the source.


When IMAGE is selected, the splash screen will be displayed.

MUTE MODE

BLACK / IMAGE

Use to choose the background, either BLACK, or IMAGE, which will be


displayed when the AV MUTE button is pressed. When IMAGE is chosen,


the splash screen will be displayed.

IMAGE REVERSE

OFF

Select when viewing images from the front with the projector installed on


the floor.


MIRROR

Select when viewing images projected from the behind of the screen with


the projector installed on the floor.


INVERT

Select when viewing images projected from the behind of the screen with


the projector installed on the ceiling.


MIRROR INVERT

Select when viewing images from the front with the projector installed on


the ceiling.

LENS LOCK

ZOOM/FOCUS LOCK

Use to enable or cancel the FOCUS LOCK and ZOOM LOCK.


LENS SHIFT LOCK

Use to enable or cancel the LENS SHIFT LOCK.


LENS SHIFT RESET

Use to reset the position of the lens to the factory setting.

Regardless of the setting of LAMP MODE in the INSTALLATION menu, the STANDARD lamp mode is activated by default whenever the projector is turned on. When LAMP MODE has been set to LOW, the lamp mode changes from STANDARD to LOW about 1 minute after turn-on.

You can’t set IMAGE CAPTURE and SPLASH SCREEN when PASSWORD FUNCTION in the FEATURE menu has been set to SPLASH ID SCREEN to enable the password lock.

When you continue projection for a long time with BACK COLOR or MUTE MODE set to IMAGE, an afterimage may persist on the screen. (See page 43.)

EN-24

Page 24
Image 24
Mitsubishi Electronics FL7000 user manual Installation menu, Low

FL7000 specifications

Mitsubishi Electronics has once again showcased its commitment to innovation with the launch of the FL7000 series, a cutting-edge display technology aimed at enhancing visual experiences across various sectors including retail, corporate, and entertainment. The FL7000 series is engineered to deliver stunning image quality, versatility, and advanced features that facilitate seamless integration and usability.

One of the standout characteristics of the FL7000 series is its impressive resolution. With 4K Ultra HD capabilities, it provides crystal-clear images with rich detail, making it an ideal choice for presentations, advertisements, and visual displays. The high brightness levels ensure that images remain vibrant even in well-lit environments, which is crucial for retail and public spaces.

The FL7000 series includes advanced image processing technologies that enhance color accuracy and contrast. With a wide color gamut, it can reproduce a broader spectrum of colors, allowing images to appear more lifelike. The incorporation of HDR (High Dynamic Range) technology further elevates the viewing experience by providing deeper blacks and brighter whites, which is essential for dynamic visual content.

Flexibility and ease of use are other key features of the FL7000 series. The displays are designed for easy installation and integration into existing setups, whether as part of a corporate conference room, a digital signage solution, or a creative installation. The modular design allows for configurations that can adapt to various space constraints and customer needs.

Mitsubishi also emphasizes connectivity in the FL7000 series. The displays come equipped with multiple input options, including HDMI, DisplayPort, and USB interfaces, enabling compatibility with a wide range of media sources. This versatility empowers users to easily switch between different content, making it suitable for dynamic environments.

Additionally, the FL7000 series features an intuitive user interface that simplifies operation and management. Users can configure settings, schedule content, and even manage multiple displays through an integrated software solution, streamlining workflows and enhancing productivity.

In conclusion, the Mitsubishi Electronics FL7000 series sets a new benchmark for display technology, combining high-resolution imaging, advanced processing capabilities, and flexible installation options. Whether used for business, educational purposes, or retail applications, the FL7000 series is poised to transform the way visual information is presented and consumed. With its robust features and technological advancements, it represents a significant advancement in the realm of display solutions.