| Model number | 216 | 217 | 218 | 219 | 220 | 221 | 222 | 223 | 224 | 225 | 226 | 227 | 228 | 229 | 230 | 231 | 232 | 233 | 234 | 235 | 236 | 237 | 238 | 239 | 240 | 241 | 242 | 243 | 244 | 245 | 246 | 247 | 248 | 249 | 250 | 251 | 252 | 253 | 254 | 255 | 256 |
1.Fan speed | 14 speeds |
|
|
|
|
|
|
|
|
|
|
|
|
|
|
|
|
|
|
|
|
|
|
|
|
|
|
|
|
|
|
|
|
|
|
|
|
|
|
|
|
|
| 23 speeds |
|
|
|
|
|
|
|
|
|
|
|
|
|
|
|
|
|
|
|
|
|
|
|
|
|
|
|
|
|
|
|
|
|
|
|
|
|
|
|
|
|
| 32 speeds |
|
|
|
|
|
|
|
|
|
|
|
|
|
|
|
|
|
|
|
|
|
|
|
|
|
|
|
|
|
|
|
|
|
|
|
|
|
|
|
|
|
| 4Fixed speed |
|
|
|
|
|
|
|
|
|
|
|
|
|
|
|
|
|
|
|
|
|
|
|
|
|
|
|
|
|
|
|
|
|
|
|
|
|
|
|
|
|
2.Louver swing | 1Disabled |
|
|
|
|
|
|
|
|
|
|
|
|
|
|
|
|
|
|
|
|
|
|
|
|
|
|
|
|
|
|
|
|
|
|
|
|
|
|
|
|
|
(horizontal air | 2Enabled |
|
|
|
|
|
|
|
|
|
|
|
|
|
|
|
|
|
|
|
|
|
|
|
|
|
|
|
|
|
|
|
|
|
|
|
|
|
|
|
|
|
direction control) |
|
|
|
|
|
|
|
|
|
|
|
|
|
|
|
|
|
|
|
|
|
|
|
|
|
|
|
|
|
|
|
|
|
|
|
|
|
|
|
|
| |
3.Vane | 1Adjustable vane/Auto swing enabled |
|
|
|
|
|
|
|
|
|
|
|
|
|
|
|
|
|
|
|
|
|
|
|
|
|
|
|
|
|
|
|
|
|
|
|
|
|
|
|
|
|
(vertical air | 2Adjustable vane/Auto swing disabled |
|
|
|
|
|
|
|
|
|
|
|
|
|
|
|
|
|
|
|
|
|
|
|
|
|
|
|
|
|
|
|
|
|
|
|
|
|
|
|
|
|
direction control) | 3Fixed |
|
|
|
|
|
|
|
|
|
|
|
|
|
|
|
|
|
|
|
|
|
|
|
|
|
|
|
|
|
|
|
|
|
|
|
|
|
|
|
|
|
| 4Undefined (Fixed) |
|
|
|
|
|
|
|
|
|
|
|
|
|
|
|
|
|
|
|
|
|
|
|
|
|
|
|
|
|
|
|
|
|
|
|
|
|
|
|
|
|
4.Operation | 1Cool/Dry/Auto/Fan/Heat |
|
|
|
|
|
|
|
|
|
|
|
|
|
|
|
|
|
|
|
|
|
|
|
|
|
|
|
|
|
|
|
|
|
|
|
|
|
|
|
|
|
mode | 2Cool/Dry/Fan |
|
|
|
|
|
|
|
|
|
|
|
|
|
|
|
|
|
|
|
|
|
|
|
|
|
|
|
|
|
|
|
|
|
|
|
|
|
|
|
|
|
|
|
|
|
|
|
|
|
|
|
|
|
|
|
|
|
|
|
|
|
|
|
|
|
|
|
|
|
|
|
|
|
|
|
|
|
|
|
|
|
|
| |
| 3Cool/Dry/Auto/Heat |
|
|
|
|
|
|
|
|
|
|
|
|
|
|
|
|
|
|
|
|
|
|
|
|
|
|
|
|
|
|
|
|
|
|
|
|
|
|
|
|
|
| 4Cool/Dry/Auto/Fan/Combustion Heat/Heat |
|
|
|
|
|
|
|
|
|
|
|
|
|
|
|
|
|
|
|
|
|
|
|
|
|
|
|
|
|
|
|
|
|
|
|
|
|
|
|
|
|
| 5Cool/Fan |
|
|
|
|
|
|
|
|
|
|
|
|
|
|
|
|
|
|
|
|
|
|
|
|
|
|
|
|
|
|
|
|
|
|
|
|
|
|
|
|
|
| 6Cool/Auto/Fan/Heat |
|
|
|
|
|
|
|
|
|
|
|
|
|
|
|
|
|
|
|
|
|
|
|
|
|
|
|
|
|
|
|
|
|
|
|
|
|
|
|
|
|
| 7Cool/Fan/Heat |
|
|
|
|
|
|
|
|
|
|
|
|
|
|
|
|
|
|
|
|
|
|
|
|
|
|
|
|
|
|
|
|
|
|
|
|
|
|
|
|
|
| 8Cool/Dry/Fan/Heat |
|
|
|
|
|
|
|
|
|
|
|
|
|
|
|
|
|
|
|
|
|
|
|
|
|
|
|
|
|
|
|
|
|
|
|
|
|
|
|
|
|
●Step 3
1.Refer to the applicable technical document to confirm the functions that are available to a given indoor unit, and manually make individual settings one by one without referring to the table of unit models.
2.Make the settings for individually set items as necessary.
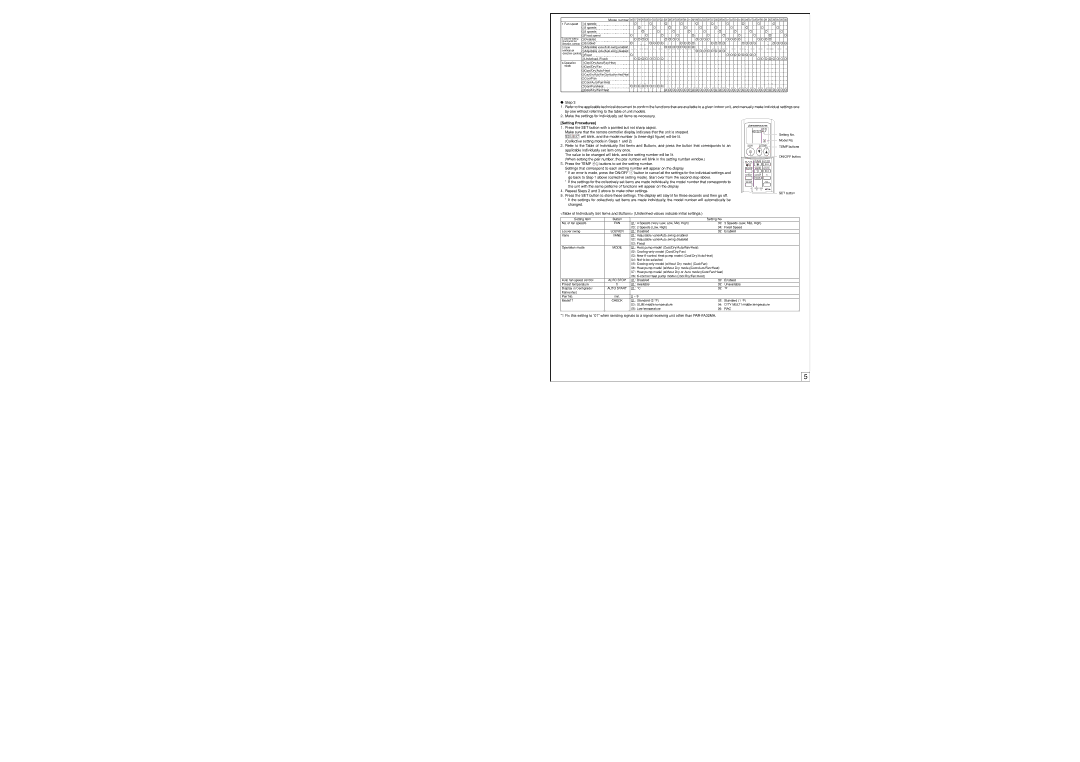
[Setting Procedures]
1.Press the SET button with a pointed but not sharp object.
Make sure that the remote controller display indicates that the unit is stopped. MODEL SELECT will blink, and the model number (a
2.Refer to the Table of Individually Set Items and Buttons, and press the button that corresponds to an applicable individually set item only once.
The value to be changed will blink, and the setting number will be lit.
(When setting the pair number, the pair number will blink in the setting number window.)
3.Press the TEMP ![]()
![]() buttons to set the setting number.
buttons to set the setting number.
Settings that correspond to each setting number will appear on the display.
* If an error is made, press the ON/OFF ![]() button to cancel all the settings for the individual settings and go back to Step 1 above (collective setting mode). Start over from the second step above.
button to cancel all the settings for the individual settings and go back to Step 1 above (collective setting mode). Start over from the second step above.
*If the settings for the collectively set items are made individually, the model number that corresponds to the unit with the same patterns of functions will appear on the display.
4.Repeat Steps 2 and 3 above to make other settings.
5.Press the SET button to store these settings. The display will stay lit for three seconds and then go off.
*If the settings for collectively set items are made individually, the model number will automatically be changed.
MODEL SELECT
ON/OFF ![]() TEMP
TEMP
FAN AUTO STOP
MODE VANE AUTO START
CHECK | LOUVER | h |
TEST RUN |
| min |
SET | RESET CLOCK |
|
| AAA |
|
Setting No.
Model No. TEMP buttons
ON/OFF button
SET button
<Table of Individually Set Items and Buttons> (Underlined values indicate initial settings.)
Setting Item | Button | Setting No. | |
No. of fan speeds | FAN | 01: 4 Speeds (Very Low, Low, Mid, High) | 02: 3 Speeds (Low, Mid, High) |
|
| 03: 2 Speeds (Low, High) | 04: Fixed Speed |
Louver swing | LOUVER | 01: Disabled | 02: Enabled |
Vane | VANE | 01: Adjustable vane/Auto swing enabled |
|
|
| 02: Adjustable vane/Auto swing disabled |
|
|
| 03: Fixed |
|
Operation mode | MODE | 01: Heat pump model (Cool/Dry/Auto/Fan/Heat) |
|
|
| 02: |
|
|
| 03: New |
|
|
| 04: Not to be selected |
|
|
| 05: |
|
|
| 06: Heat pump model (without Dry mode)(Cool/Auto/Fan/Heat) | |
|
| 07: Heat pump model (without Dry or Auto mode)(Cool/Fan/Heat) | |
|
| 08: |
|
Auto fan speed control | AUTO STOP | 01: Disabled | 02: Enabled |
Preset temperature | h | 01: Available | 02: Unavailable |
Display in Centigrade/ | AUTO START | 01: °C | 02: °F |
Fahrenheit |
|
|
|
Pair No. | min. | 0 ~ 9 |
|
Model*1 | CHECK | 01: Standard (2 °F) | 02: Standard (1 °F) |
|
| 03: SLIM middle temperature | 04: CITY MULTI middle temperature |
|
| 05: Low temperature | 06: RAC |
|
|
|
|
*1 Fix this setting to “01” when sending signals to a signal receiving unit other than
5