5. NetCommand IR Control

57

Initial NetCommand Setup

To perform this procedure, you need:

The remote controls for both the TV and the device you want to control.

An IR emitter cable available from Mitsubishi.

Note: To set up an A/V receiver, see “Setting Up A/V Receiver Control,” page 62.

1.Connect and position the IR emitters for the devices you wish to control. See “IR Emitter Place- ment” on the opposite page.

2.Set the TV’s remote control to TV mode and power on the TV.

3.Open the NetCommand Learn screen as follows:

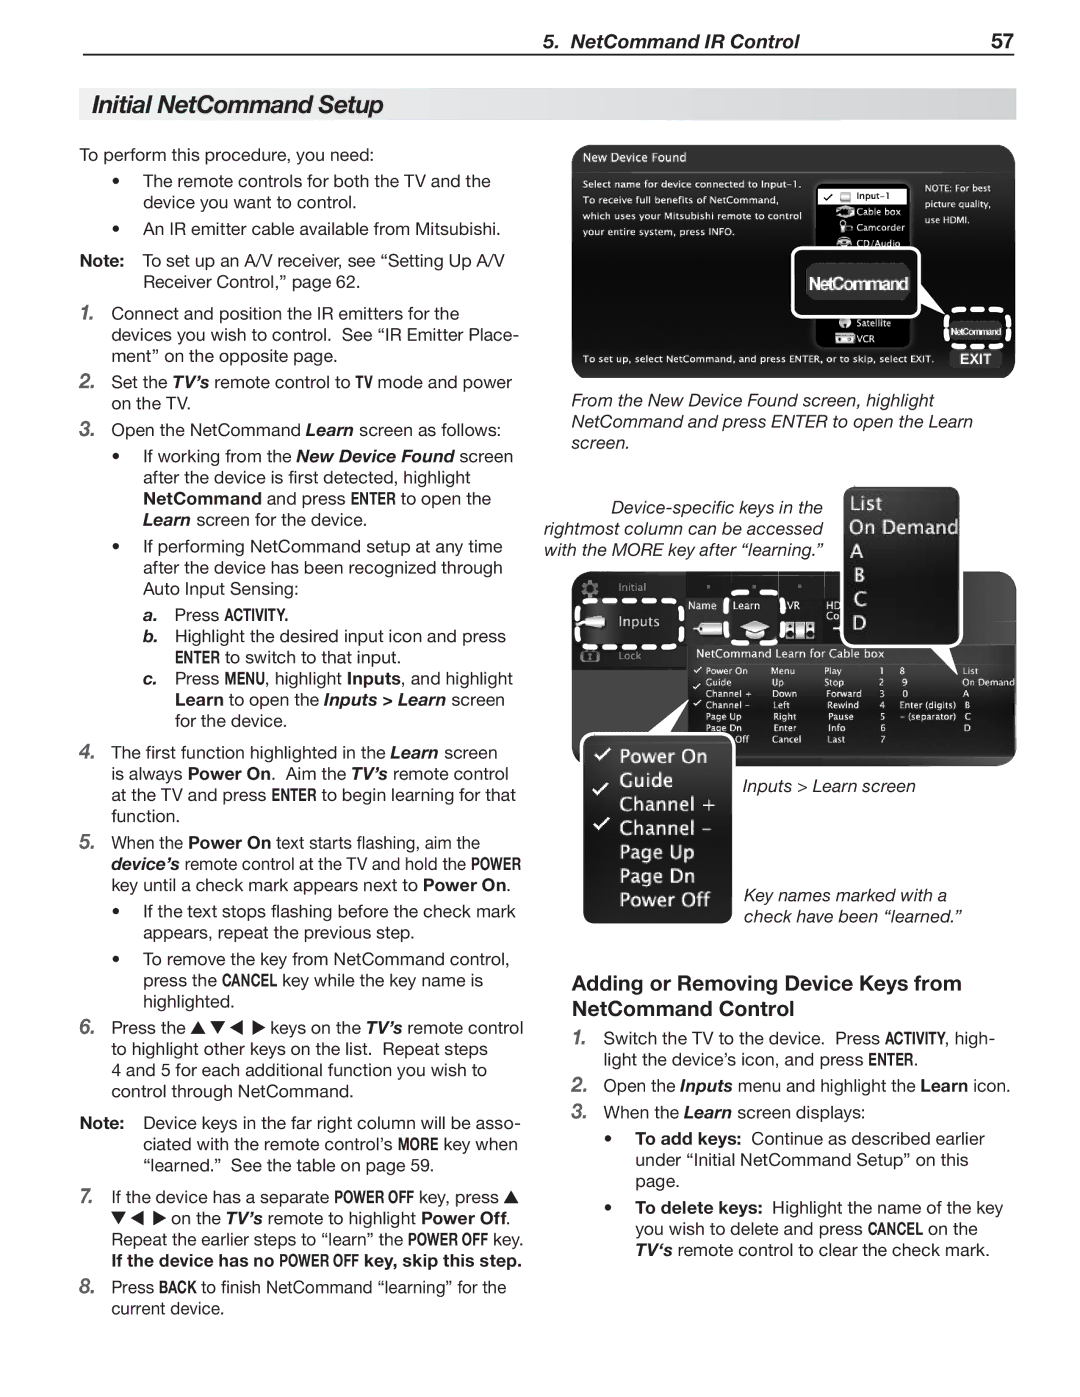
If working from the New Device Found screen after the device is first detected, highlight NetCommand and press ENTER to open the Learn screen for the device.

If performing NetCommand setup at any time after the device has been recognized through Auto Input Sensing:

a.Press ACTIVITY.

b.Highlight the desired input icon and press ENTER to switch to that input.

c.Press MENU, highlight Inputs, and highlight Learn to open the Inputs > Learn screen for the device.

4.The first function highlighted in the Learn screen is always Power On. Aim the TV’s remote control at the TV and press ENTER to begin learning for that function.

5.When the Power On text starts flashing, aim the device’s remote control at the TV and hold the POWER key until a check mark appears next to Power On.

If the text stops flashing before the check mark appears, repeat the previous step.

To remove the key from NetCommand control, press the CANCEL key while the key name is highlighted.

6.Press the keys on the TV’s remote control to highlight other keys on the list. Repeat steps

4 and 5 for each additional function you wish to control through NetCommand.

Note: Device keys in the far right column will be asso- ciated with the remote control’s MORE key when “learned.” See the table on page 59.

7.If the device has a separate POWER OFF key, press on the TV’s remote to highlight Power Off. Repeat the earlier steps to “learn” the POWER OFF key.

If the device has no POWER OFF key, skip this step.

8.Press BACK to finish NetCommand “learning” for the current device.

From the New Device Found screen, highlight NetCommand and press ENTER to open the Learn screen.

Device-specific keys in the rightmost column can be accessed with the MORE key after “learning.”

Inputs > Learn screen

Key names marked with a check have been “learned.”

Adding or Removing Device Keys from NetCommand Control

1.Switch the TV to the device. Press ACTIVITY, high- light the device’s icon, and press ENTER.

2.Open the Inputs menu and highlight the Learn icon.

3.When the Learn screen displays:

To add keys: Continue as described earlier under “Initial NetCommand Setup” on this page.

To delete keys: Highlight the name of the key you wish to delete and press CANCEL on the TV‘s remote control to clear the check mark.

Page 57
Image 57
Mitsubishi Electronics SeriesLT-40151 Initial NetCommand Setup, Adding or Removing Device Keys from NetCommand Control

SeriesLT-40151 specifications

The Mitsubishi Electronics Series LT-40151 is a cutting-edge display solution designed for various professional applications, offering a combination of advanced technology, superior features, and robust performance. This model is particularly known for its impressive visual quality, energy efficiency, and flexibility, making it suitable for both commercial and industrial environments.

One of the main features of the LT-40151 is its 40-inch LED display, which provides vibrant color reproduction and sharp image clarity. The high-definition resolution ensures that images and videos maintain their detail, whether used in presentations, advertising, or informational displays. The display also boasts a wide viewing angle, allowing for visual consistency from different positions in the room, making it ideal for large audiences.

A notable technological advancement of the LT-40151 is its integrated image processing capabilities. This enables the screen to optimize content in real-time, adjusting brightness, contrast, and color levels based on ambient lighting conditions. This automatic adaptation ensures that visuals remain clear and legible in various environments, whether in bright retail settings or dimly lit conference rooms.

Durability is another critical characteristic of the LT-40151. It is designed to withstand the rigors of continuous operation, making it an excellent choice for environments that require 24/7 usage. The robust build quality is complemented by energy-efficient features, significantly reducing operational costs over time while minimizing environmental impact.

Connectivity is a strong suit of the LT-40151, supporting a range of inputs including HDMI, DisplayPort, and USB connections. This versatility allows users to connect multiple devices seamlessly, enhancing its usability in diverse scenarios. Additionally, the display is compatible with various mounting options, providing flexibility for installation in various settings.

The user-friendly interface integrated into the LT-40151 facilitates easy navigation and set-up, ensuring that users can quickly adjust settings and configurations to suit their preferences.

In conclusion, the Mitsubishi Electronics Series LT-40151 is a sophisticated display solution that combines advanced visual technology, durability, and flexible connectivity, making it a top choice for professionals seeking reliable and high-quality performance in their display systems.