Preparating your projector (continued)

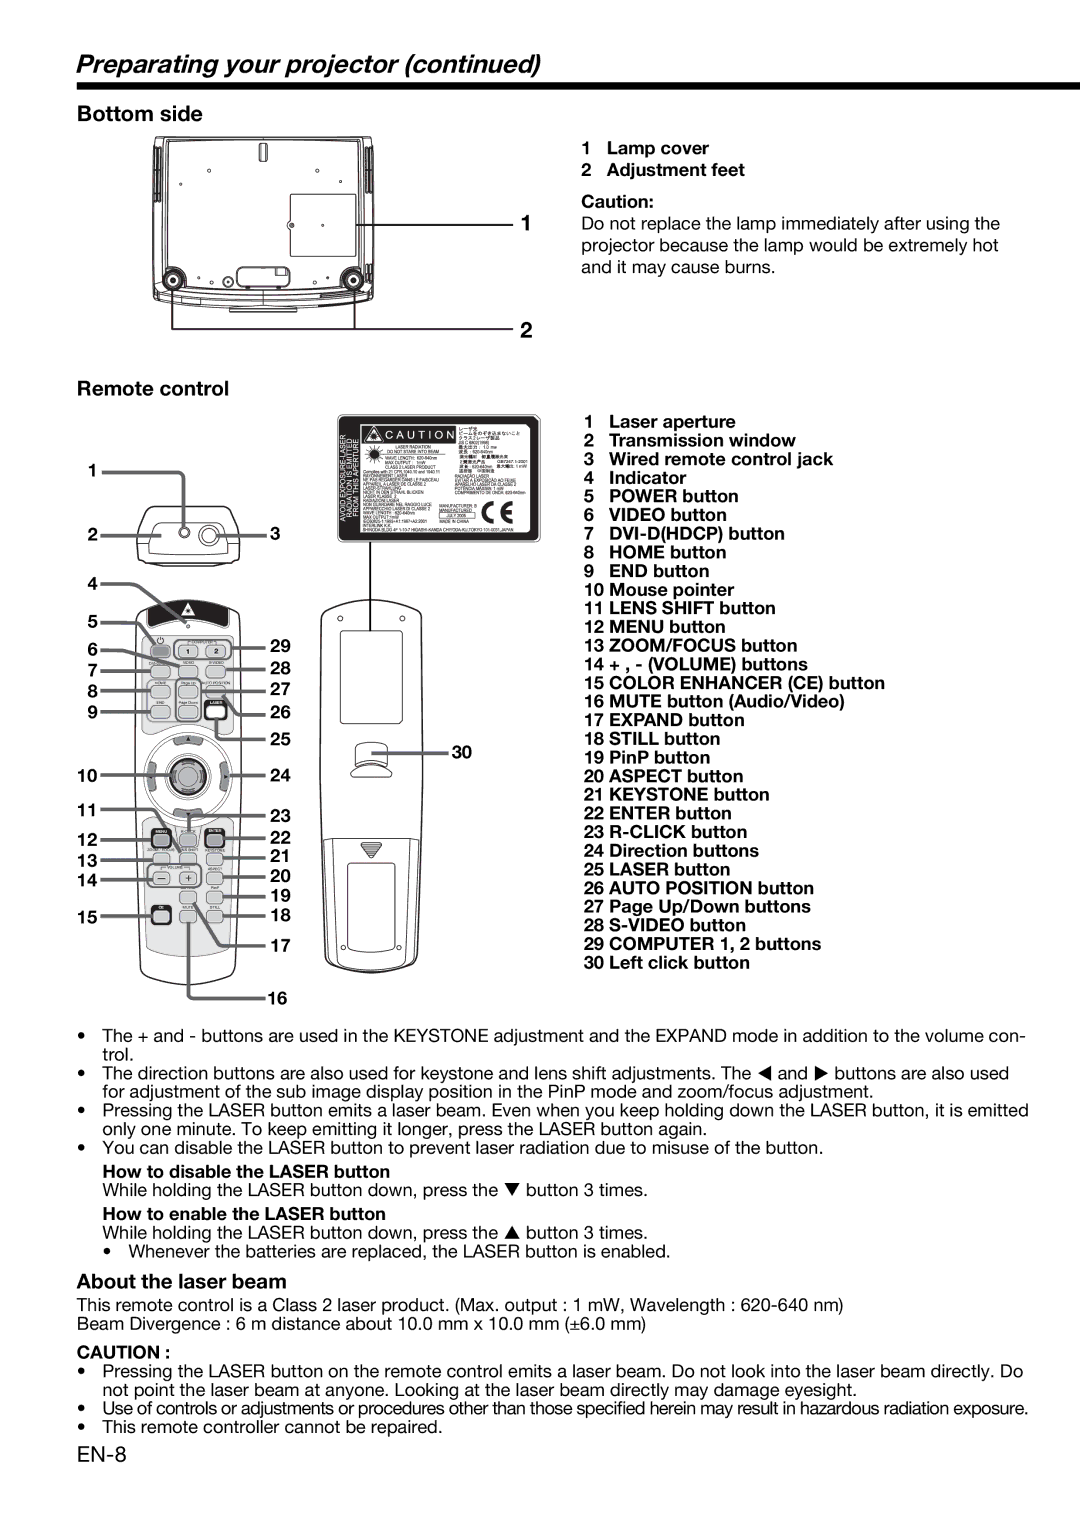
Bottom side

Remote control

1


2


3

4


5


29

6


1

2


COMPUTER


7

DVI-D(HDCP)

VIDEO

S-VIDEO

28


8

HOME

Page Up

AUTO POSITION

27


LASER

9

END

Page Down

26


25

10


24

11


23


12

MENU

R-CLICK

ENTER

22


13

ZOOM / FOCUS LENS SHIFT KEYSTONE

21

VOLUME

ASPECT

14


EXPAND

PinP

20


19

15

CE

MUTE

STILL

18


17


16

1

2

30

1Lamp cover

2Adjustment feet

Caution:

Do not replace the lamp immediately after using the projector because the lamp would be extremely hot and it may cause burns.

1Laser aperture

2Transmission window

3Wired remote control jack

4Indicator

5POWER button

6VIDEO button

7DVI-D(HDCP) button

8HOME button

9END button

10Mouse pointer

11LENS SHIFT button

12MENU button

13ZOOM/FOCUS button

14+ , - (VOLUME) buttons

15COLOR ENHANCER (CE) button

16MUTE button (Audio/Video)

17EXPAND button

18STILL button

19PinP button

20ASPECT button

21KEYSTONE button

22ENTER button

23R-CLICK button

24Direction buttons

25LASER button

26AUTO POSITION button

27Page Up/Down buttons

28S-VIDEO button

29COMPUTER 1, 2 buttons

30Left click button

The + and - buttons are used in the KEYSTONE adjustment and the EXPAND mode in addition to the volume con- trol.

The direction buttons are also used for keystone and lens shift adjustments. The ￿ and ￿ buttons are also used for adjustment of the sub image display position in the PinP mode and zoom/focus adjustment.

Pressing the LASER button emits a laser beam. Even when you keep holding down the LASER button, it is emitted only one minute. To keep emitting it longer, press the LASER button again.

You can disable the LASER button to prevent laser radiation due to misuse of the button.

How to disable the LASER button

While holding the LASER button down, press the ￿ button 3 times.

How to enable the LASER button

While holding the LASER button down, press the ￿ button 3 times.

• Whenever the batteries are replaced, the LASER button is enabled.

About the laser beam

This remote control is a Class 2 laser product. (Max. output : 1 mW, Wavelength : 620-640 nm)

Beam Divergence : 6 m distance about 10.0 mm x 10.0 mm (±6.0 mm)

CAUTION :

Pressing the LASER button on the remote control emits a laser beam. Do not look into the laser beam directly. Do not point the laser beam at anyone. Looking at the laser beam directly may damage eyesight.

Use of controls or adjustments or procedures other than those specified herein may result in hazardous radiation exposure.

This remote controller cannot be repaired.

EN-8

Page 8
Image 8
Mitsubishi Electronics XD2000U user manual Preparating your projector, Bottom side, Lamp cover Adjustment feet

XD2000U specifications

The Mitsubishi Electronics XD2000U is a high-performance, versatile projector designed to meet the demands of both professional and educational environments. With its compact design and advanced features, the XD2000U is suitable for various applications including conferences, classrooms, and training sessions.

One of the standout features of the XD2000U is its brightness, delivering an impressive 2000 ANSI lumens. This ensures clear and vibrant images even in well-lit environments, making it ideal for presentations where ambient light cannot be controlled. The projector also boasts a high contrast ratio of 2000:1, providing deep blacks and bright whites that enhance image clarity and detail.

The XD2000U utilizes DLP (Digital Light Processing) technology, which contributes to its reliable performance and image quality. DLP technology is known for its sharpness, consistent color reproduction, and reduced maintenance needs compared to traditional LCD projectors. This makes the XD2000U a great choice for users who prioritize longevity and minimal upkeep.

In terms of resolution, the XD2000U supports a native XGA resolution of 1024x768 pixels, making it suitable for detailed graphics and text presentation. Additionally, the projector can accommodate various input formats, including VGA, HDMI, and component video, ensuring compatibility with a range of devices such as laptops, DVDs, and gaming consoles.

The user-friendly features of the XD2000U enhance its adaptability in various settings. The integrated speaker eliminates the need for additional audio equipment, enabling seamless presentations. Its compact size and lightweight design make it easy to transport, making it a favored option among mobile professionals and educators.

Mitsubishi has equipped the XD2000U with extensive connectivity options, including RS-232 for control systems and USB for easy file access. These features streamline the setup process, allowing users to focus on delivering impactful presentations without technical distractions.

Moreover, the XD2000U incorporates energy-saving technologies, such as an eco mode that extends lamp life significantly while reducing power consumption. This not only lowers operational costs but also minimizes environmental impact.

Overall, the Mitsubishi Electronics XD2000U exemplifies a well-rounded projector that combines brightness, clarity, and connectivity in a portable package. Whether for professional or educational purposes, it promises to deliver high-quality performance and reliability for a variety of presentation needs.