DISASSEMBLY

DEMONTAGE

DESARMADO

!CAUTION: Always turn water OFF before

removing or disassembling the valve. Open valve handles to relieve water pressure to insure that complete water shut-off has been achieved.

!ATTENTION: Toujours couper l’alimenta- tion en eau avant d’enlever ou de démonter le robinet. Ouvrir la poignée du robinet pour libérer la pression d’eau et pour s’assurer que l’alimenta- tion en eau a bien été coupée.

!ADVERTENCIA: Siempre desconecte el agua antes de remover o desarmar la mezclador. Abra las manijas de la mezcladora para desahog- ar la presión del agua para asegurarse que se ha logrado un cierre completo.

1


2

11

1


4


3


4

STEM


TIGE


KEY


VASTAGO


CLÉ


CANDADO

FAUCET BODY

CARTRIDGE SHELL


BÂTI DU ROBINET


DOUILLE DE CARTOUCHE


CURPO DE LA MEZCLADORA

HOLE IN PISTON

CUBIERTA DEL CARTUCHO


ORIFICE DANS LE PISTON


AGUJERO EN PISTON

5

HOT SIDE STEM POSITION


COLD SIDE STEM POSITION


TIGE EN POSITION CHAUDE


TIGE EN POSITION FROIDE


POSICION DEL VASTAGO


POSICION DEL VASTAGO


LADO CALIENTE


LADO FRIO

ENGLISH

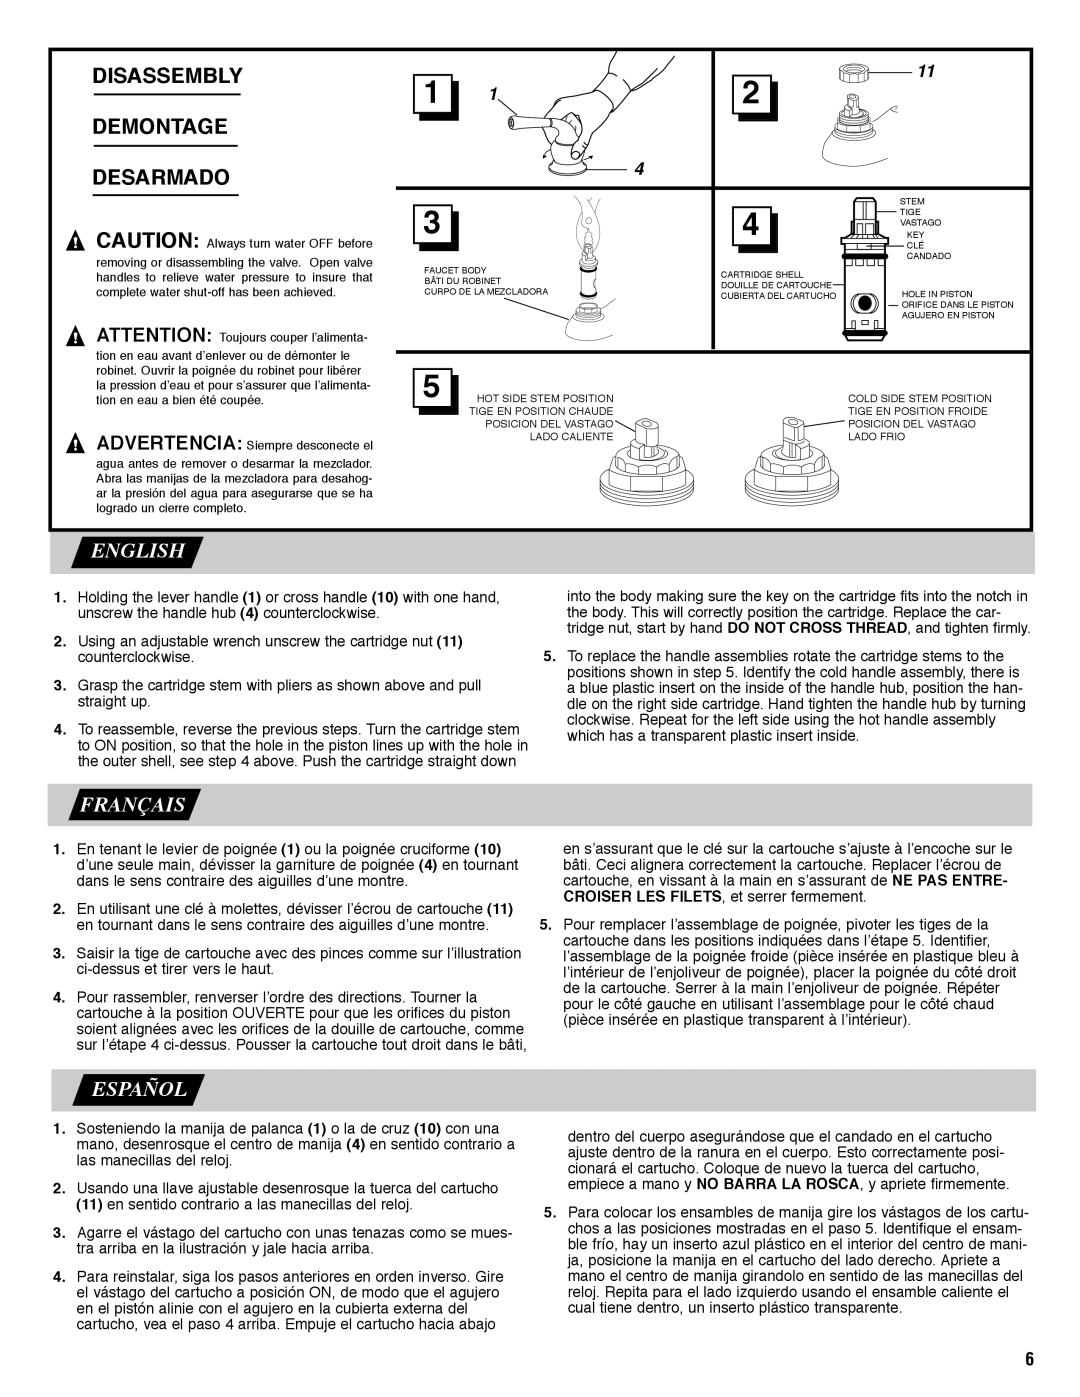
1.Holding the lever handle (1) or cross handle (10) with one hand, unscrew the handle hub (4) counterclockwise.

2.Using an adjustable wrench unscrew the cartridge nut (11) counterclockwise.

3.Grasp the cartridge stem with pliers as shown above and pull straight up.

4.To reassemble, reverse the previous steps. Turn the cartridge stem to ON position, so that the hole in the piston lines up with the hole in the outer shell, see step 4 above. Push the cartridge straight down

FRANÇAIS

into the body making sure the key on the cartridge fits into the notch in the body. This will correctly position the cartridge. Replace the car- tridge nut, start by hand DO NOT CROSS THREAD, and tighten firmly.

5.To replace the handle assemblies rotate the cartridge stems to the positions shown in step 5. Identify the cold handle assembly, there is a blue plastic insert on the inside of the handle hub, position the han- dle on the right side cartridge. Hand tighten the handle hub by turning clockwise. Repeat for the left side using the hot handle assembly which has a transparent plastic insert inside.

1.En tenant le levier de poignée (1) ou la poignée cruciforme (10) d’une seule main, dévisser la garniture de poignée (4) en tournant dans le sens contraire des aiguilles d’une montre.

2.En utilisant une clé à molettes, dévisser l’écrou de cartouche (11) en tournant dans le sens contraire des aiguilles d’une montre.

3.Saisir la tige de cartouche avec des pinces comme sur l’illustration ci-dessus et tirer vers le haut.

4.Pour rassembler, renverser l’ordre des directions. Tourner la cartouche à la position OUVERTE pour que les orifices du piston soient alignées avec les orifices de la douille de cartouche, comme sur l’étape 4 ci-dessus. Pousser la cartouche tout droit dans le bâti,

en s’assurant que le clé sur la cartouche s’ajuste à l’encoche sur le bâti. Ceci alignera correctement la cartouche. Replacer l’écrou de cartouche, en vissant à la main en s’assurant de NE PAS ENTRE- CROISER LES FILETS, et serrer fermement.

5.Pour remplacer l’assemblage de poignée, pivoter les tiges de la cartouche dans les positions indiquées dans l’étape 5. Identifier, l’assemblage de la poignée froide (pièce insérée en plastique bleu à l’intérieur de l’enjoliveur de poignée), placer la poignée du côté droit de la cartouche. Serrer à la main l’enjoliveur de poignée. Répéter pour le côté gauche en utilisant l’assemblage pour le côté chaud (pièce insérée en plastique transparent à l’intérieur).

ESPAÑOL

1.Sosteniendo la manija de palanca (1) o la de cruz (10) con una mano, desenrosque el centro de manija (4) en sentido contrario a las manecillas del reloj.

2.Usando una llave ajustable desenrosque la tuerca del cartucho (11) en sentido contrario a las manecillas del reloj.

3.Agarre el vástago del cartucho con unas tenazas como se mues- tra arriba en la ilustración y jale hacia arriba.

4.Para reinstalar, siga los pasos anteriores en orden inverso. Gire el vástago del cartucho a posición ON, de modo que el agujero en el pistón alinie con el agujero en la cubierta externa del cartucho, vea el paso 4 arriba. Empuje el cartucho hacia abajo

dentro del cuerpo asegurándose que el candado en el cartucho ajuste dentro de la ranura en el cuerpo. Esto correctamente posi- cionará el cartucho. Coloque de nuevo la tuerca del cartucho, empiece a mano y NO BARRA LA ROSCA, y apriete firmemente.

5.Para colocar los ensambles de manija gire los vástagos de los cartu- chos a las posiciones mostradas en el paso 5. Identifique el ensam- ble frío, hay un inserto azul plástico en el interior del centro de mani- ja, posicione la manija en el cartucho del lado derecho. Apriete a mano el centro de manija girandolo en sentido de las manecillas del reloj. Repita para el lado izquierdo usando el ensamble caliente el cual tiene dentro, un inserto plástico transparente.

6

Page 7
Image 7
Moen 4500, 84000 manual Disassembly Demontage Desarmado

4500, 84000 specifications

The Moen 84000,4500 is a sophisticated kitchen faucet that embodies innovation and modern design, bringing both functionality and style to the contemporary kitchen. This faucet is equipped with a range of impressive features that cater to the needs of today’s homeowners, making it a standout choice for those looking to upgrade their kitchen space.

One of the primary characteristics of the Moen 84000,4500 is its sleek, ergonomic design. Available in various finishes, including chrome and matte black, this faucet complements a wide array of kitchen aesthetics. Its clean lines and minimalist appearance ensure it can blend seamlessly with both traditional and modern décors.

At the heart of the Moen 84000,4500 is its advanced Spot Resist technology. This feature helps maintain the faucet’s stainless-steel finish by resisting fingerprints and water spots, making it easier to clean and maintain. This is especially beneficial in a busy kitchen environment where cleanliness is a priority.

The faucet also boasts a high-arc design that provides ample space for filling pots and pans, as well as washing larger items. The 360-degree swivel spout adds further convenience, allowing users to direct water exactly where it is needed, which enhances overall usability.

In terms of functionality, the Moen 84000,4500 incorporates the innovative Power Clean technology. This feature increases the spray power by up to 50% compared to the industry standard, making food prep and cleanup more efficient. The faucet offers a powerful and efficient spray that can handle tough cleaning tasks with ease.

Another notable aspect of this model is its one-handle design, which provides precise water control for both temperature and flow. The smooth operation ensures that users can easily transition between a steady stream and a powerful spray with a simple pull or push of the handle.

Installation of the Moen 84000,4500 is designed to be user-friendly, with the Moen Duralock quick connect system. This innovative installation system allows homeowners to securely connect the faucet without the need for additional tools, simplifying the setup process.

In summary, the Moen 84000,4500 is a feature-rich kitchen faucet that combines aesthetic appeal with practical technology. Its Spot Resist and Power Clean features, coupled with a high-arc design and easy installation, make it an ideal choice for consumers seeking to enhance their kitchen functionality and style. With Moen's commitment to quality, this faucet is sure to provide lasting performance and satisfaction.