INSTALLATION INSTRUCTIONS

CARTRIDGE NUT

ESCUTCHEON NUT


IMPORTANT:


DIVERTER VALVE

CENTER WASHER UNDER


VALVE BEFORE TIGHTENING NUT


THICK METAL WASHER


THICK METAL WASHER


SMALL RUBBER SEAL


FLAT RUBBER SEAL


(RIB SIDE DOWN)


BIDET DECK

BIDET DECK


LARGE RUBBER


SMALL RUBBER SEAL


CONE SEAL


(RIB SIDE UP)


THIN METAL WASHER


THIN METAL WASHER


NUT


NUT


FIGURE 1A


FIGURE 1B


LARGE HOLE


(Most Applications)

SMALL HOLE

INSTALLATION OF DIVERTER VALVE

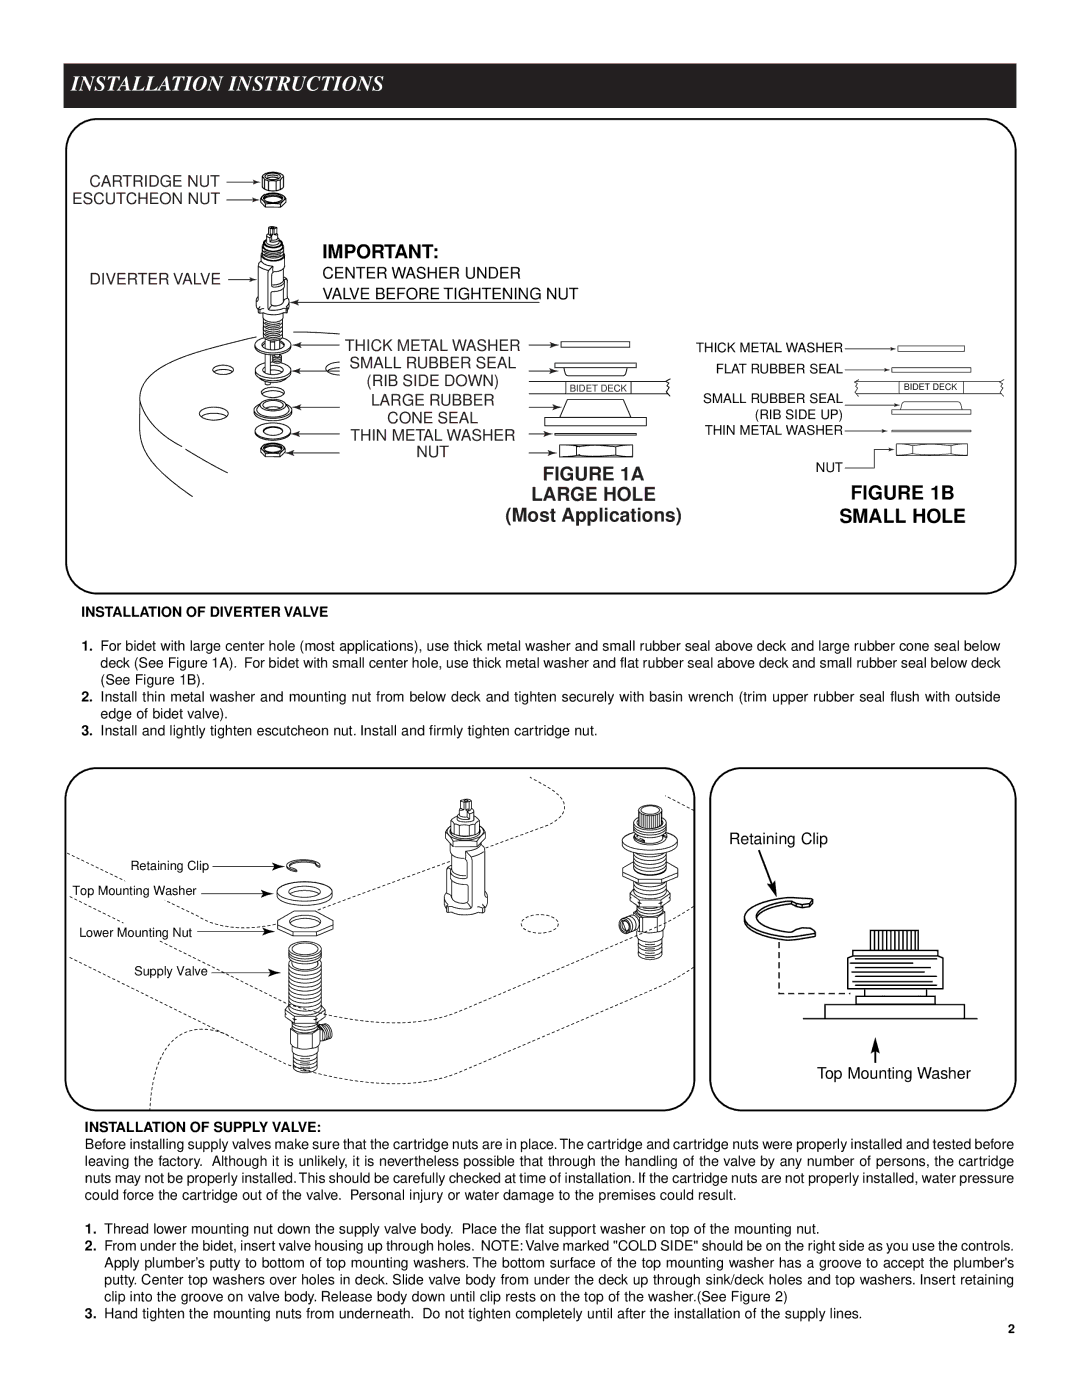
1.For bidet with large center hole (most applications), use thick metal washer and small rubber seal above deck and large rubber cone seal below deck (See Figure 1A). For bidet with small center hole, use thick metal washer and flat rubber seal above deck and small rubber seal below deck (See Figure 1B).

2.Install thin metal washer and mounting nut from below deck and tighten securely with basin wrench (trim upper rubber seal flush with outside edge of bidet valve).

3.Install and lightly tighten escutcheon nut. Install and firmly tighten cartridge nut.

Retaining Clip

Retaining Clip

Top Mounting Washer

Lower Mounting Nut

Supply Valve

Top Mounting Washer

INSTALLATION OF SUPPLY VALVE:

Before installing supply valves make sure that the cartridge nuts are in place. The cartridge and cartridge nuts were properly installed and tested before leaving the factory. Although it is unlikely, it is nevertheless possible that through the handling of the valve by any number of persons, the cartridge nuts may not be properly installed. This should be carefully checked at time of installation. If the cartridge nuts are not properly installed, water pressure could force the cartridge out of the valve. Personal injury or water damage to the premises could result.

1.Thread lower mounting nut down the supply valve body. Place the flat support washer on top of the mounting nut.

2.From under the bidet, insert valve housing up through holes. NOTE: Valve marked "COLD SIDE" should be on the right side as you use the controls. Apply plumber’s putty to bottom of top mounting washers. The bottom surface of the top mounting washer has a groove to accept the plumber's putty. Center top washers over holes in deck. Slide valve body from under the deck up through sink/deck holes and top washers. Insert retaining clip into the groove on valve body. Release body down until clip rests on the top of the washer.(See Figure 2)

3.Hand tighten the mounting nuts from underneath. Do not tighten completely until after the installation of the supply lines.

2

Page 2
Image 2
Moen 9200 manual Installation Instructions, Small Hole, Retaining Clip, Top Mounting Washer

9200 specifications

The Moen 9200 is a standout in the realm of kitchen faucets, offering advanced features and innovative technologies that cater to the needs of modern households. Designed for efficiency and style, this faucet is an excellent blend of function and aesthetics.

One of the key features of the Moen 9200 is its pull-down spray head. This design allows for maximum flexibility and ease of use. The spray head features a versatile two-function spray, which provides an option for a steady stream or a powerful rinse. This is particularly beneficial when handling large pots and pans or cleaning the sink area.

The Moen 9200 is equipped with Moen's advanced Reflex technology. This system ensures that the pull-down hose returns smoothly to the spout after use, providing a seamless and hassle-free experience. Reflex technology also offers extended reach and enhanced maneuverability, making it easier to cover every corner of the sink.

Another impressive aspect of the Moen 9200 is its Duralast cartridge, which is designed for longevity and reliability. This cartridge helps maintain a consistent water flow and reduces the likelihood of leaks over time, ensuring that users enjoy a worry-free experience for years to come.

The installation process of the Moen 9200 is designed to be simple and straightforward. This faucet comes with a quick-connect spray hose, which allows for easy assembly and installation without the need for extensive tools. This makes it an excellent choice for DIY enthusiasts and professionals alike.

In terms of aesthetic appeal, the Moen 9200 showcases a modern design that complements a variety of kitchen styles. Available in several finishes, including chrome and Spot Resist stainless, it resists fingerprints and water spots, ensuring easy maintenance and a consistently clean appearance.

The Moen 9200 is also eco-friendly, as it is compliant with the EPA's WaterSense criteria. This means it operates at a lower flow rate, helping homeowners reduce their water consumption without sacrificing performance.

Overall, the Moen 9200 is a high-quality kitchen faucet that combines innovative features with user-friendly technologies. Its sleek design, durable construction, and advanced functionality make it an ideal choice for anyone looking to upgrade their kitchen experience. Whether you are washing dishes, filling pots, or simply cleaning your sink, the Moen 9200 offers a superior solution tailored for your culinary needs.