3 Controls & Displays
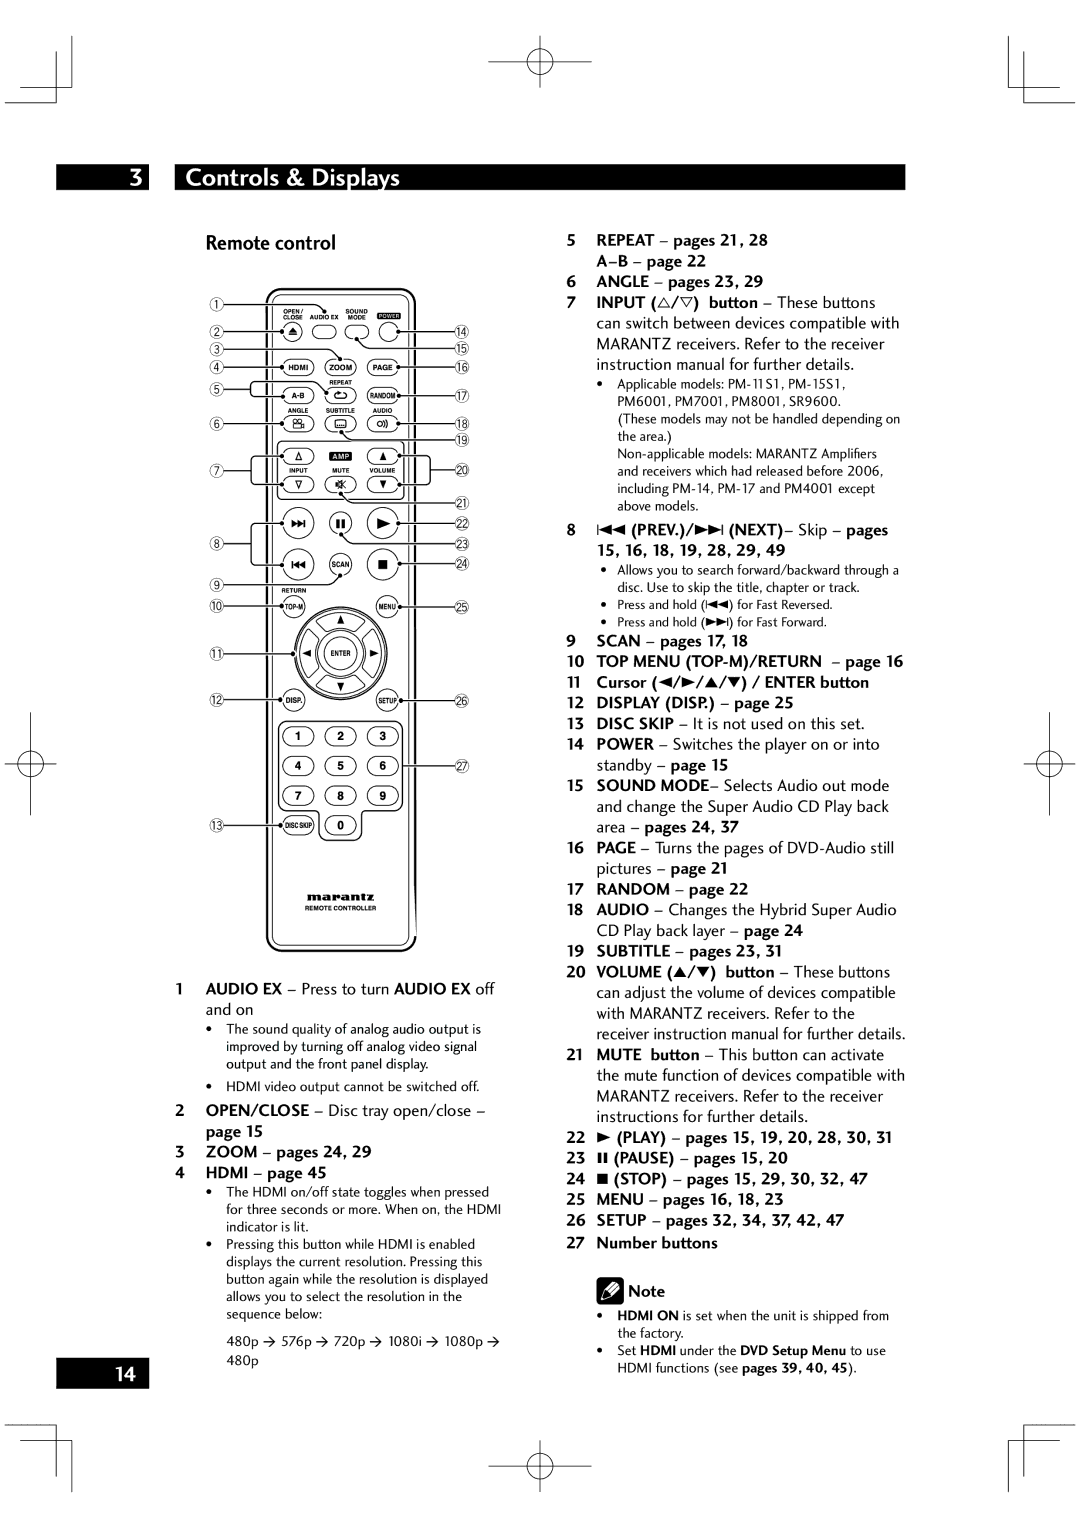
Remote control
1 |
|
2 | ! |
3 | @ |
4 | # |
5 | $ |
| |
6 | % |
| ^ |
7 | & |
| * |
| ( |
8 | ) |
| _ |
9 |
|
0 | + |
- |
|
= | ¡ |
| ™ |
~ |
|
1AUDIO EX – Press to turn AUDIO EX off and on
•The sound quality of analog audio output is improved by turning off analog video signal output and the front panel display.
•HDMI video output cannot be switched off.
2OPEN/CLOSE – Disc tray open/close – page 15
3ZOOM – pages 24, 29
4HDMI – page 45
•The HDMI on/off state toggles when pressed for three seconds or more. When on, the HDMI indicator is lit.
•Pressing this button while HDMI is enabled displays the current resolution. Pressing this button again while the resolution is displayed allows you to select the resolution in the sequence below:
480p Æ 576p Æ 720p Æ 1080i Æ 1080p Æ 480p
14
5REPEAT – pages 21, 28 A–B – page 22
6ANGLE – pages 23, 29
7INPUT (%/fi) button – These buttons can switch between devices compatible with MARANTZ receivers. Refer to the receiver instruction manual for further details.
•Applicable models:
(These models may not be handled depending on the area.)
84 (PREV.)/¢ (NEXT)– Skip – pages 15, 16, 18, 19, 28, 29, 49
•Allows you to search forward/backward through a disc. Use to skip the title, chapter or track.
•Press and hold (4) for Fast Reversed.
•Press and hold (¢) for Fast Forward.
9SCAN – pages 17, 18
10TOP MENU
11Cursor (2/3/5/∞) / ENTER button
12DISPLAY (DISP.) – page 25
13DISC SKIP – It is not used on this set.
14POWER – Switches the player on or into standby – page 15
15SOUND MODE– Selects Audio out mode and change the Super Audio CD Play back area – pages 24, 37
16PAGE – Turns the pages of
17RANDOM – page 22
18AUDIO – Changes the Hybrid Super Audio CD Play back layer – page 24
19SUBTITLE – pages 23, 31
20VOLUME (5/∞) button – These buttons can adjust the volume of devices compatible with MARANTZ receivers. Refer to the receiver instruction manual for further details.
21MUTE button – This button can activate the mute function of devices compatible with MARANTZ receivers. Refer to the receiver instructions for further details.
223 (PLAY) – pages 15, 19, 20, 28, 30, 31
238 (PAUSE) – pages 15, 20
247 (STOP) – pages 15, 29, 30, 32, 47
25MENU – pages 16, 18, 23
26SETUP – pages 32, 34, 37, 42, 47
27Number buttons  Note
Note
•HDMI ON is set when the unit is shipped from the factory.
•Set HDMI under the DVD Setup Menu to use HDMI functions (see pages 39, 40, 45).
