338
Page
Emergency services
Important Safety Information
Important Safety Information PL-1
General care
PL-2
Aircraft safety
Safety
Hospital safety
General safety
Vehicles equipped with an airbag
Service
Third party equipment
Efficient use
Important Safety Information PL-5
Declaration of conformity
Copyright Notice
Contents
Contents CL-2
CL-3
Using Messaging
Contents CL-4
CL-5
Using the Multimedia Centre
100
106
Contents CL-6
123
129
Overview
Introducing your
Softkey 1 SK1
Keys
SK1 indicator Options menu Indicator SK2 indicator
Home screen and Display symbols
Status Indicators
Mode Indicators
Setting up your
Setting up your
Usim Card
To Insert/Remove the Usim Card
Insert a Usim card
To Insert the Battery
Battery
To Charge the Battery Using the Charger
Charging
Low Battery Alarm
Connecting the battery charger to the phone
Setting the Clock
Switching your 338 on and off
Entering your PIN Code
Check your own number
To Enter your PIN Code
Understanding the Menus
Main Menu
Understanding the Menus
Menu options
To set an image as wallpaper
Do This
Quick menu
Quick Menu and Home Screen Shortcut
Quick menu
Home screen shortcut
What you can do from the Home Screen
Task Steps
Activating a Home screen shortcut
Taskbar
Taskbar
Useful Tips
Making and Receiving Calls
Making a Voice Call
To Make a Voice Call
Making and Receiving Calls
Common Tasks
Receiving a Voice Call
To Receive a Call
TaskSteps
When you miss a call
Turning off the ringtune
While ringing Rejecting a call
During a Voice Call
Voicemail
To Make a Second Call
To Receive a Second Call
To Switch to a Grouptalk
Other Operations During a Call
Press the Options menu key, Join calls
Record a Call memo
Activate Settings
Mute the microphone
Talk handsfree
To Make a Video Call to a Video Capable phone
Making and Receiving a Video Call
To Make a Video Call to a PC with Webcam
To Receive a Video Call
Operations During a Video Call
Task
Zoom in/out
Setting the lighting mode
Landscape mode or Night-time mode
Setting the call time duration information
Only your image
ItemDescription
Call Logs
Locking your
Setting the Key lock
Emergency calls under the Key lock
Unlock instruction
Setting up your Contacts
Contact Entries
Data Phone Contact List Usim Contact List
To Add a New Entry to the Contact List
Setting up your Contacts
To Add a New Contact Group
Select Add contact
Numbers are displayed
Entering Text
Entering Text
Text entry Text entry field
To change the input mode
To start messaging
To change the Editing options
Multitap Text ABC Input
T9 Text Input
Press the 3DEF 6MNO 4GHI keys
Numeric Input
Symbol input menu
Symbol Input
Symbol input menu
To input a symbol
To Change to Delete/Backspace Mode
Multi symbol input menu
To Enter a Space
To Insert a New Line
To Copy, Cut, Delete or Replace text
To Change to Insert/Overwrite Mode
To paste cut/copied text
Activate Copy/cut/other
Using Messaging
Message Types
Text messaging
Using Messaging
Supported Attachment Types
Message Menus Message menu
Description
Quote indicator
Signature setting
General
Scrolling
Receive options
Multimedia msgs
Send reports
Message. Select Send reports or No reports sent
Network defaults
Authentication
Reset settings
POP3 or IMAP4 Sets POP3 server or IMAP4 server
New Text Message
Writing and Sending a New Message
Multimedia msg. The New Message screen is displayed
New Multimedia Message
Select CC address or BCC address
Press the Options menu key and select Add attachment
New Email
For
Task Steps Available For
To Edit a Slide Show
Select Message priority and set Low, Standard or High
SK1 Use Deleting an attached file
To Receive a Multimedia Message
Receiving and Reading a Message
To Read a Message
To Receive a Multimedia Message Manually
Useful Tips For Reading a Message
View address list
SK2 Move
View file list
Press the SK1 Copy or SK2 Move
Text
Displaying a URL in the message
Menu key and select Open in browser
Adding the sender/receiver’s
To Control the Multimedia Message Player
Replying and Forwarding
To Reply to a Received Message in Inbox
Reply
To Forward a Received Message in Inbox
To Reply to a Received Message
Tips
Creating Folders
Organising Messages
Remote mailbox
Copying or Moving Messages
Menu key and select Manage folders , Delete folder
Deleting a folder
Renaming a folder
Folders , Rename folder
Changing the Settings on your
User settings menu
Screen image sample
Changing the Settings on your
Handset Profiles
Handset Profiles menu
Screen settings
Calls menu
Calls
All Calls
Options menu
Forwarding Setup
Landscape mode and Night-time mode Video call options
Fixed dialling Lets you dial the set number only
Auto redial Turns on/off automatic redial
Description
Receiving calls
Advanced settings
Set date and time
Date and time
Set Dual time
Format
Language
Security
Locks
Set codes
Network mode
Network setup
Network select
Pref.networks
Clear settings
Using the Browser to Access 3 Services
Browser Menus
Level Description
Using the Browser to Access 3 Services
US Ascii
Pages, History, Bookmarks, and Settings
Seconds and No timeout limit
Scroll three lines, Scroll five lines and Scroll one
Prompt each time
To End a Browser session
To Download and Save a File in your 338 File Manager
To Bookmark
Displaying the previous/next
Links and Anchors
Photo/Video Camera
Using your 338s Advanced Features
To Take and Send a Photo/Video in a Message
Multimedia centre and Take photo/Make video
Video/Audio Player
Image Viewer
Multiple selections
Multi-call/Multi-task
To Start/Switch Tasks During Multitasking
High-Speed Data Communications
Task
Messaging
Java Application
Synchronisation
Folder Description
Using the File Manager
Video files
Downloads
Using the File Manager
Task Description
Operations under File manager
Send as message
Delete
File properties
Sort files
Running Java Applications
Applications
To Run Downloaded Applications
Set permissions
Net access
Running Java Applications
Edit name
Show information
Settings
Backlight control
Vibration control
Using the Multimedia Centre
Using the Multimedia Centre
Short video 100KB
Long video 300KB
Capture
Image/Video Camera
Camera Capture
Camera Take photo
Taking a photo
Video recording
Camera Options menu
Camera Settings
To Take a Photo
Refer to Writing and Sending a New Message on page 43 for
Press the Options menu key and select Send as message
To Make a Video
Voice Recorder
Image viewer
Player
Playing/viewing multimedia files
To View an Image File
Image settings
Visual effects
Screen
Mute settings
Video settings
Video player
To Play a Video File
Press the Options menu key and select File properties
Audio player
To Play an Audio File
Music Settings
Target. Select Repeat on or Repeat off
Ringtune
Playlists
Connecting your 338 to a PC
Connecting your 338 to a PC
100
Do the following on the PC
Data exchange
101
To perform local USB synchronisation
To Transfer Data between the phone and a PC
To perform OTA remote synchronisation
102
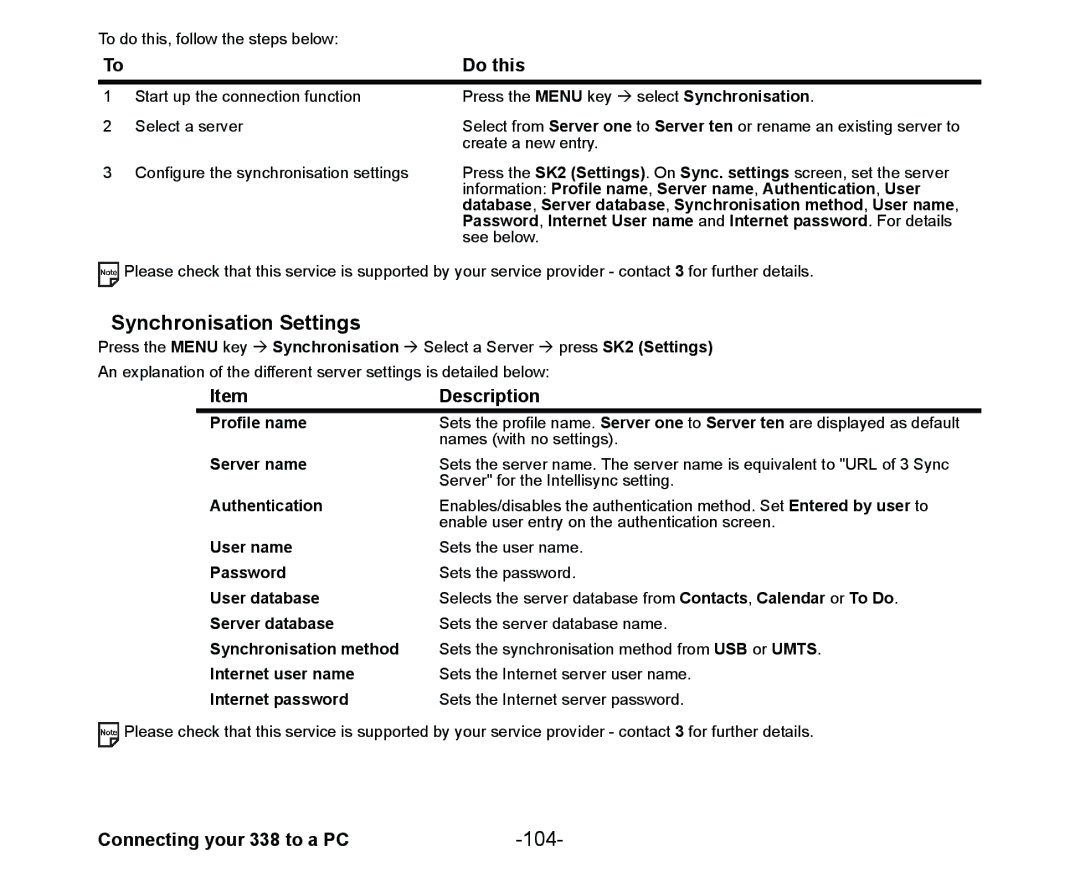
Synchronisation Options
To Register a Server
103
104
Synchronisation Settings
105
Server one to Server six
Using the Toolbox
Using the Toolbox
Toolbox menu
106
Calendar
Calendar
To display a day view
107
108
To add a new calendar entry
109
Set the Special occasion items
Set the Multiday event items
To synchronise calendar entries between 338 and a PC
To edit a calendar entry
110
Options menu key, select Edit and press the Enter key
111
To delete a calendar entry or entries
Adding a new task 1/2
To Do
To Add a New To Do Task
112
Adding a new task 2/2
To Edit To Do Tasks
113
114
To Delete To Do Tasks
Setting alarm
Alarm clock
To Set an Alarm
115
On/Off/Disable. Refer to To Change alarm clock status on
116
Repeat or Weekly
To Change alarm clock status
To Edit an Alarm
To Delete Alarms
117
To Create a New Notepad Entry
To Edit a Notepad Entry
118
119
To Delete a Notepad Entry
Calculator
Calculator
To Use the Calculator
120
To Convert one Currency to Another
Currency Calculation
121
Rate. Press SK1 OK
To Listen to a Call Memo
Call memo
To Delete a Call Memo
122
Shortcut Keys
Mode Key Function
Shortcut Keys
124
125
126
127
128
Index
Index
Index
130
131
132
V1.8 MDY-000021-EAA0 October 2004 1st edition