Manuals
/
NEC
/
TV and Video
/
Flat Panel Television
NEC
X461UN Installation, Mounting, Please note the following when mounting on wall or ceiling
Models:
X461UN
1
7
39
39
Download
39 pages
40.51 Kb
4
5
6
7
8
9
10
11
Troubleshooting
Specs
Install
Wiring Diagram
Power Indicator
Connecting a Personal Computer
Attaching Mounting Accessories
Setup
Adjust the sound
AMBIENT parameter setting
Page 7
Image 7
Page 6
Page 8
Page 7
Image 7
Page 6
Page 8
Contents
UserÕs Manual
MultiSync X461UN
Index
English
Declaration of conformity
For USA
For Canada
Declaration
Important Information
Declaration of the Manufacturer
¥ The lamps in this product contain mercury. Please
Safety Precautions, Maintenance & Recommended Use
dispose according to state, local or federal law
Setup Manual
Contents
Mounting
Installation
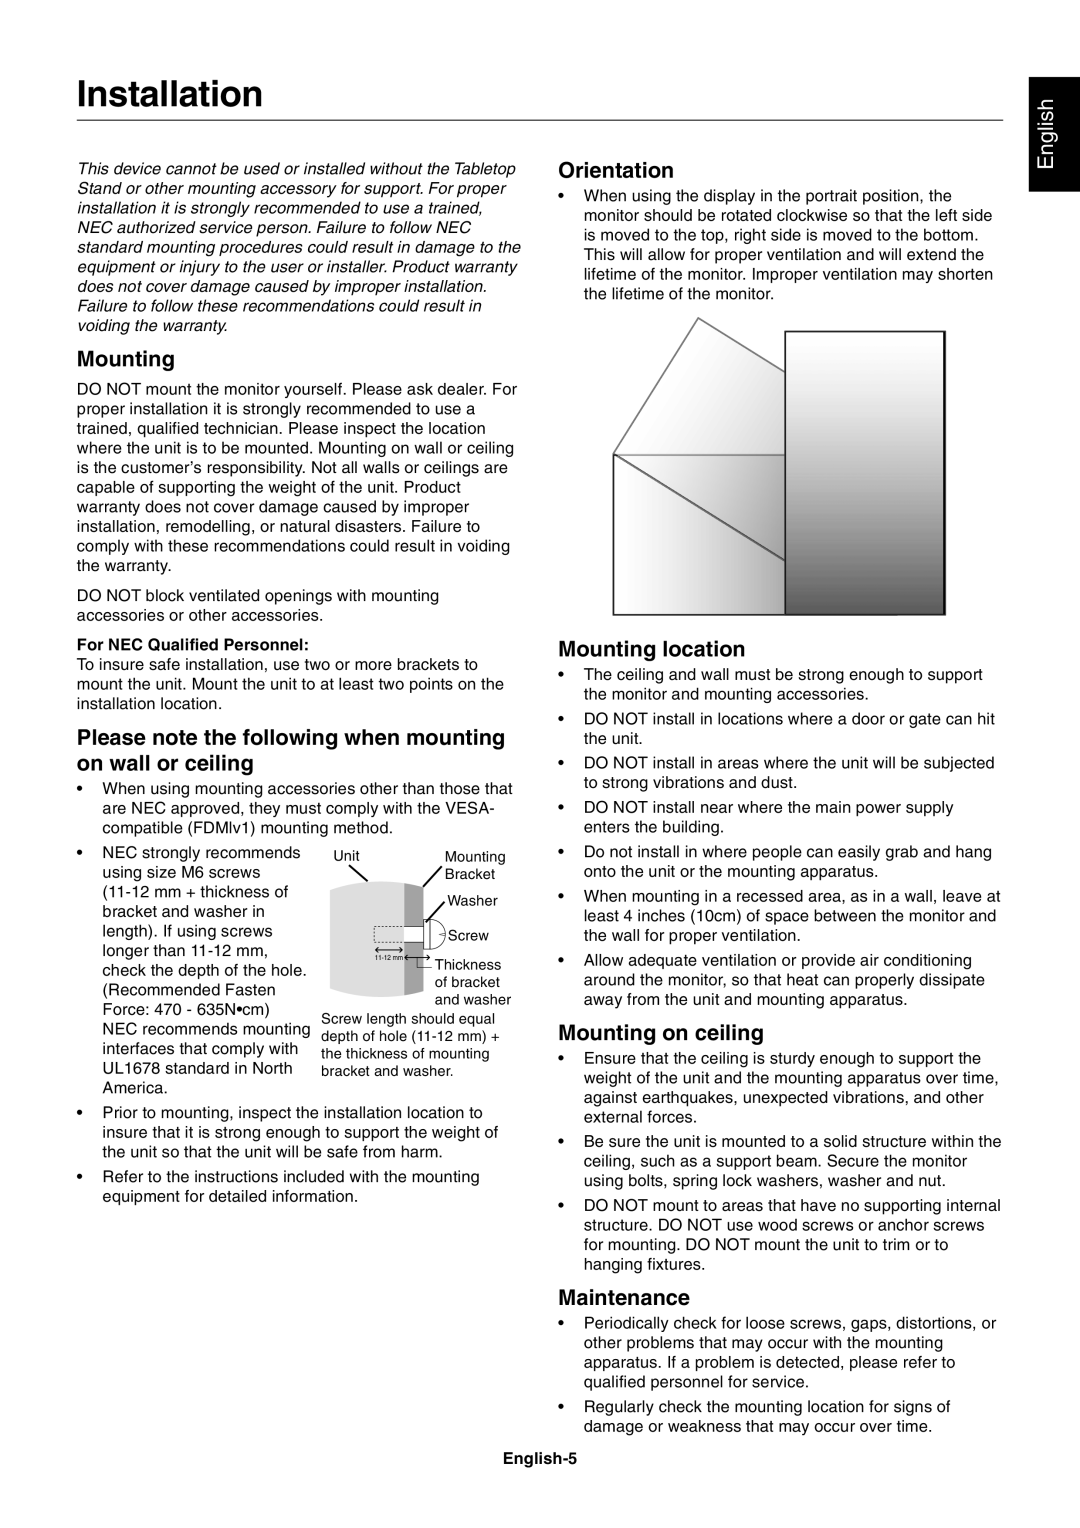
Please note the following when mounting on wall or ceiling
Maintenance
3. Ventilation Requirements
Attaching Mounting Accessories
1. Attach Mounting Accessories
2. Installing and removing optional table top stand
Control Panel
Parts Name and Functions
Terminal Panel
Option board slot
Remote control sensor
Kensington Lock
AMBIENT LIGHT SENSOR
Wireless Remote Control Optional
Handling the remote control
Remote Control
Operating Range for the Option
4. Connect the supplied power cord
Setup
1. Determine the installation location
2. Install the remote control Optional batteries
10. Adjust the image See page
6. Switch on the power of all the attached external equipment
8. Adjust the sound
9. Adjust the screen See pages 20 and
Connections
Wiring Diagram
Before making connections
Connecting a DVD Player with HDMI out
Connecting a Personal Computer
English-15
Basic Operation
Power ON and OFF Modes
Picture Aspect
Power Indicator
Using Power Management
Selecting a video source
Picture Mode
AMBIENT parameter setting
AMBIENT Mode
CARBON FOOTPRINT
OSD On-Screen-Display Controls
Select Goto Adjustment Return Close
PICTURE MODE
PICTURE
ADJUST
English-20
SCHEDULE
AUDIO
English-21
English-22
English-23
MULTI DISPLAY
ADVANCED OPTION
DISPLAY PROTECTION
English-24
VIDEO1, VIDEO2, S-VIDEO inputs only
English-25
RGB/HV inputs only
All inputs except VGA, RGB/HV
Image Sticking of LCD Panel
For long life use as Public Display
NOTE 1 CREATING A SCHEDULE
NOTE 2 IMAGE PERSISTENCE
REMOTE CONTROL ID FUNCTION
Remote Control Function
English-28
WIRED REMOTE CONTROL FUNCTION
Connection
Controlling the LCD monitor via RS-232C Remote Control
English-29
Overview
Connecting to a Network
Network Setting by Using an HTTP Browser
Controlling the LCD monitor via LAN Control
English-31
Network Settings
Preparation Before Use
Handling of the Address for Operation via a Browser
English-32
Alert Mail Setting
English-33
Features
Troubleshooting
Product Specifications
Specifications
English-35
English-36
Pin Assignment
WEEE Mark European Directive 2002/96/EC
Manufacturer’s Recycling and Energy Information
Disposing of your old NEC product
Energy Saving
Top
Page
Image
Contents