NETGEAR ReadyNAS User Guide
NETGEAR, Inc
Statement of Conditions
Technical Support
Trademarks
Certificate of the Manufacturer/Importer
Product and Publication Details
v1.0, October
v1.0, October
NETGEAR ReadyNAS User Guide
Contents
Configuring Your ReadyNAS
About This Manual
Chapter
Accessing Shares from Your Operating System
Maintenance and Administration
Chapter
Appendix B
Appendix A
RAID Levels Simplified
Input Field Format
v1.0, October
Contents
viii
About This Manual
Chapter 3, “Maintenance and Administration”
Conventions, Formats, and Scope
About This Manual
How to Use This Manual
How to Print This Manual
NETGEAR ReadyNAS User Guide
Revision History
Click the print icon in the upper left corner of your browser window
About This Manual
Chapter Configuring Your ReadyNAS
NETGEAR ReadyNAS NV+ X-RAID
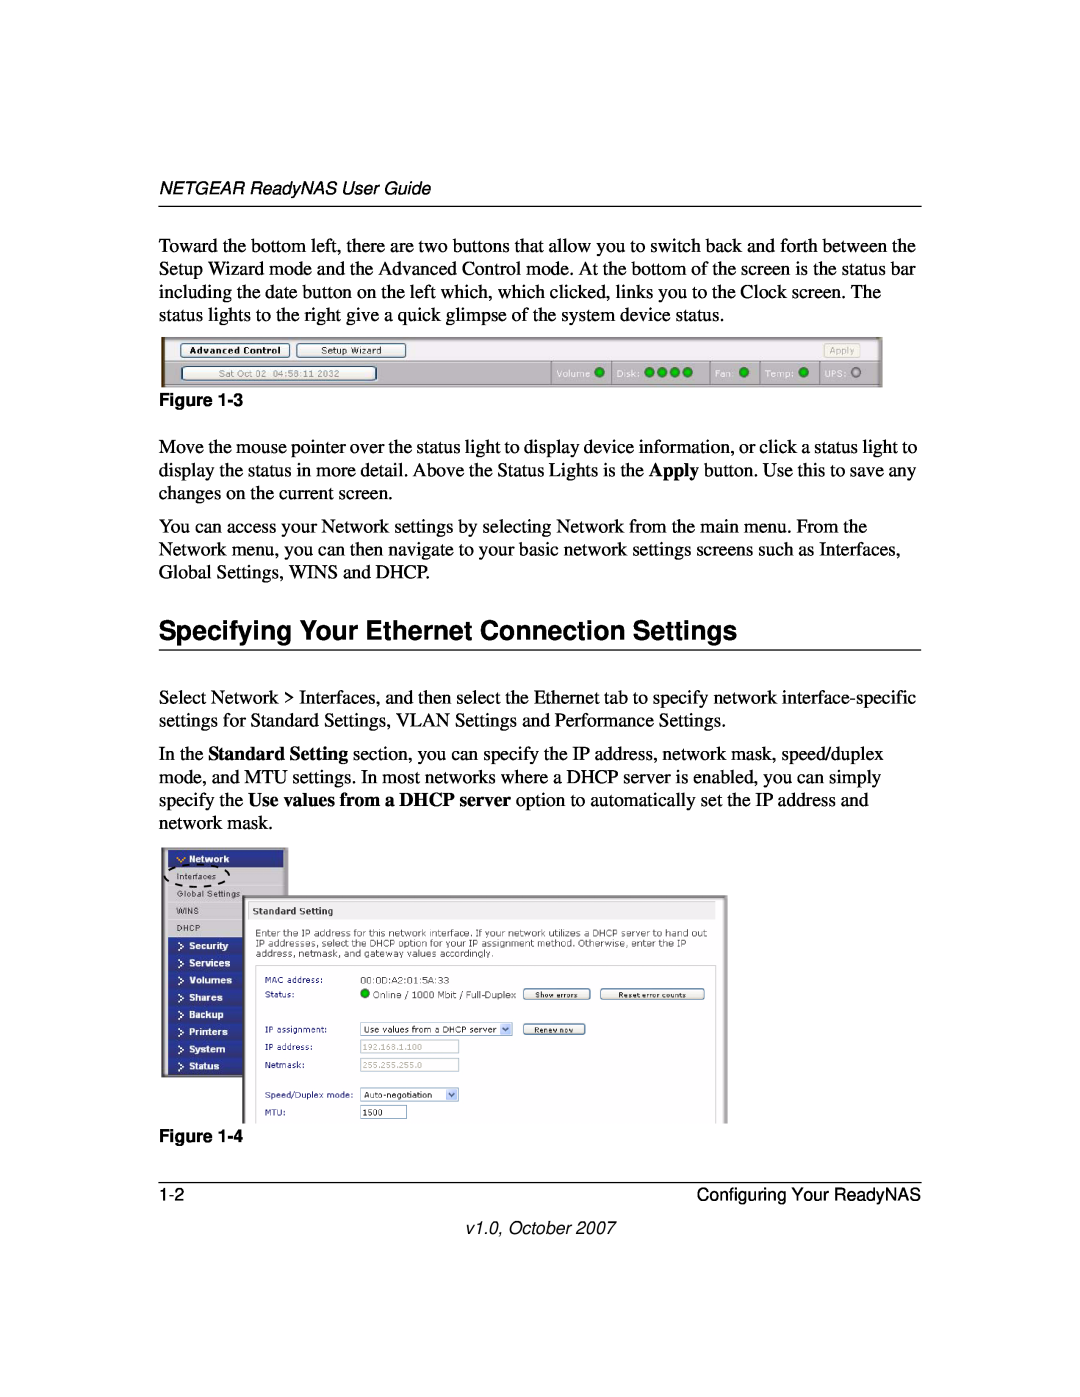
Specifying Your Ethernet Connection Settings
Configuring Your ReadyNAS
Page
If you wish to use the ReadyNAS in a VLAN environment, select the Enable VLAN support check box, and enter a numeric VLAN tag. You need to reboot the ReadyNAS for the VLAN function to take effect
Hostname
Global Network Settings
Default Gateway
DNS Settings
WINS
DHCP
Setting Up Security
Admin Password
Security Mode
a domain environment with more than 1000 users
Share Security Mode
User Security Mode
Domain Security Mode
Setting Up User and Group Accounts
Managing Groups
name1,gid1,quota1,member11member12member13
name2,gid2,quota2,member21member22member23
flintstones
Managing Users
name3,gid3,quota3,member31member32member33
rubble,1007,5000,barneybetty
name3,password3,group3,email3,uid3,quota3
name1,password1,group1,email1,uid1,quota1
name2,password2,group2,email2,uid2,quota2
Selecting Services for Share Access
Setting Accounts Preferences
Standard File Protocols
Streaming Services
SlimServer provides music streaming to the popular Squeezebox music players from Slim Devices. You can click the http setup link for more detailed configuration options
Understanding Volume Management
Discovery Services
X-RAID
Volume Management for Flex-RAID
Flex-RAID
Deleting a Volume
Adding a Volume
To add a volume
RAID Settings
Volume Management for X-RAID
Adding a Second Disk for Redundancy
Adding a Third and Fourth Disk for More Capacity
Replacing All Your Disks for More Capacity
Taking and Scheduling Snapshots
Changing between X-RAID and Flex-RAID Modes
Snapshots
If you specify a start and end time of 0000, ReadyNAS will take one snapshot at midnight. A start time of 0000 and an end time of 2300 will set snapshots to be taken between midnight and 11 pm the next day at the interval you specify. Once you save the snapshot schedule, the time of the next snapshot is displayed. When the next snapshot is taken, the previous one is replaced
You can also specify how long a snapshot should last. If you will be using snapshots for backups, you can schedule the snapshot to last slightly longer than the expected duration of the backup. Having an active snapshot can affect the write performance to the ReadyNAS, so deactivating it when it is not needed might be advantageous in write-intensive environments
USB Storage
Resizing Snapshot Space
FAT32 NTFS Ext2 Ext3
Managing Your Shares
USB Flash Device Option
Adding Shares
Managing Shares
Setting Share Access in Share Mode
Setting Share Access in User and Domain Modes
192.168.2., 192.168.2.0/255.255.255.0, 192.168.2.0/24
Hosts allowed access 192.168.2.101
Hosts allowed access 192.168.2.101
Recycle Bin. The ReadyNAS can have a Recycle Bin for each share for Windows users. The Enable Recycle Bin option is shown at the bottom of the CIFS screen
Advanced Options
USB Shares
Configuring Backup Jobs
Adding a New Backup Job
Step 1 - Select Backup Source
myfolder media/Videos My Folder
myserver/myshare myserver/myshare/myfolder
192.168.0.101/myshare/myfolder
My Documents/My Pictures
Step 2 - Select Backup Destination
Step 3 - Choose Backup Schedule
Step 4 - Choose Backup Options
All Logs link
Viewing the Backup Schedule
Programming the Backup Button
Viewing the Backup Log
Print Shares over CIFS/SMB
Setting Up Printers
Editing a Backup Job
IPP Printing
Managing Print Queues
System Time
Managing Your ReadyNAS System
Clock
Alerts Contacts
Alerts
NTP Option
Alerts Settings
SNMP
To set up SNMP service
Performance
SMTP
Select Disable journaling if you understand the consequences of this action, and you do not mind a long file system check only after unexpected power failures. File system journaling allows disk checks of only a few seconds verses possibly an hour or longer without journaling. Disabling journaling improves disk write performance slightly
Adding a UPS for Performance
Language
Remote Update
Updating ReadyNAS
Local Update
Factory Default
Power Management
Settings
Power Timer
Disk Spin-Down Option
UPS Configuration
Shutdown
1-65
Configuring Your ReadyNAS
NETGEAR ReadyNAS User Guide
v1.0, October
1-66
Configuring Your ReadyNAS
NETGEAR ReadyNAS User Guide
v1.0, October
Chapter 2 Accessing Shares from Your Operating System
Windows
MAC OS
Accessing Shares from Your Operating System
AFP over Bonjour
AFP over AppleTalk
You should see the same file listing as you would in Windows Explorer
To access the same share under Mac OS 9, select Connect to Server from the Finder menu, choose the NAS device entry from the AppleTalk section, and click Connect
MAC OS
Linux/Unix
mount ipaddr/backup /backup
Web Browser
NETGEAR ReadyNAS User Guide
If the Share access is read-only, only the file manager displays
Accessing Shares from Your Operating System
v1.0, October
delete any files created through the web
FTP/FTPS
Rsync
# rsync ipaddrbackup
# rsync -a ipaddrbackup /tmp
Networked DVD Players and UPnP AV Media Adapters
2-14
Accessing Shares from Your Operating System
NETGEAR ReadyNAS User Guide
v1.0, October
Health
Chapter Maintenance and Administration
Viewing System Status
Logs
Replacing a Failed Disk on the ReadyNAS NV+
Ordering a Replacement Disk
Replacing a Failed Disk
Replacing the Failed Disk on the ReadyNAS
Replacing the Failed Disk on the ReadyNAS 600/X6
Resynchronizing the Volume
Resetting Your System System Switch
Diskless system with X-RAID expandable volume
Configuring RAID on the ReadyNAS 1100 and NV+
Your ReadyNAS comes in one of three configurations
System with pre-installed disks in X-RAID expandable volume
To reconfigure your RAID setup 1. Power off the device
Backing Up the ReadyNAS to a USB Drive
USB Drive
ReadyNAS1100 Backup
ReadyNAS NV+ Backup
Changing User Passwords
Removing the System Module from the ReadyNAS
NETGEAR ReadyNAS User Guide
In Share and Domain security mode, the Password tab does not appear
Maintenance and Administration
3-12
RAID Level
Appendix A RAID Levels Simplified
RAID Level
RAID Level
RAID Level X X-RAID
RAID level 5 provides the best balance of capacity and performance while providing data redundancy. RAID 5 provides redundancy by striping data across three or more disks and keeping the parity information on one of the disks in each stripe. In case of disk failure, the surviving disks and the parity disk are used to reconstruct the lost data, providing data transparently to the user application. When the failed disk has been replaced with a good disk, the reconstructed data is written out to the new disk when the reconstruction or sometimes referred as RESYNC process is complete, the volume returns to a redundant state. The capacity of a RAID 5 volume is the smallest disk in the RAID set multiplied by one less than the number of disks in the RAID set. For example, a four-disk RAID 5 set provides the capacity of three disks, assuming all four disks are identical in size
Host
Appendix B Input Field Format
Domain or Workgroup Name
Host Name
SNMP Community
Share Password
Share Name
User or Group Name
NETGEAR ReadyNAS User Guide
User Password
The password can be any character except for single quote
Input Field Format
v1.0, October
NETGEAR ReadyNAS User Guide
Input Field Format
v1.0, October
Appendix C Glossary
Glossary
v1.0, October
NETGEAR ReadyNAS User Guide
Glossary
Index-1
Index
Numerics
v1.0, August
v1.0, August
NETGEAR ReadyNAS RAIDiator 3.01 Administration Manual
Index-2
v1.0, August
NETGEAR ReadyNAS RAIDiator 3.01 Administration Manual
Index-3
v1.0, August
NETGEAR ReadyNAS RAIDiator 3.01 Administration Manual
Index-4
v1.0, August
NETGEAR ReadyNAS RAIDiator 3.01 Administration Manual
Index-5
v1.0, August
NETGEAR ReadyNAS RAIDiator 3.01 Administration Manual
Index-6
v1.0, August
NETGEAR ReadyNAS RAIDiator 3.01 Administration Manual
Index-7
v1.0, August
NETGEAR ReadyNAS RAIDiator 3.01 Administration Manual
Index-8