NTI RACKMUX KVM Drawer with NODEMUX Switch

INSTALLATION

Rack Mounting Instructions

The RACKMUX was designed to be mounted to a rack and includes mounting flanges to make attachment easy.

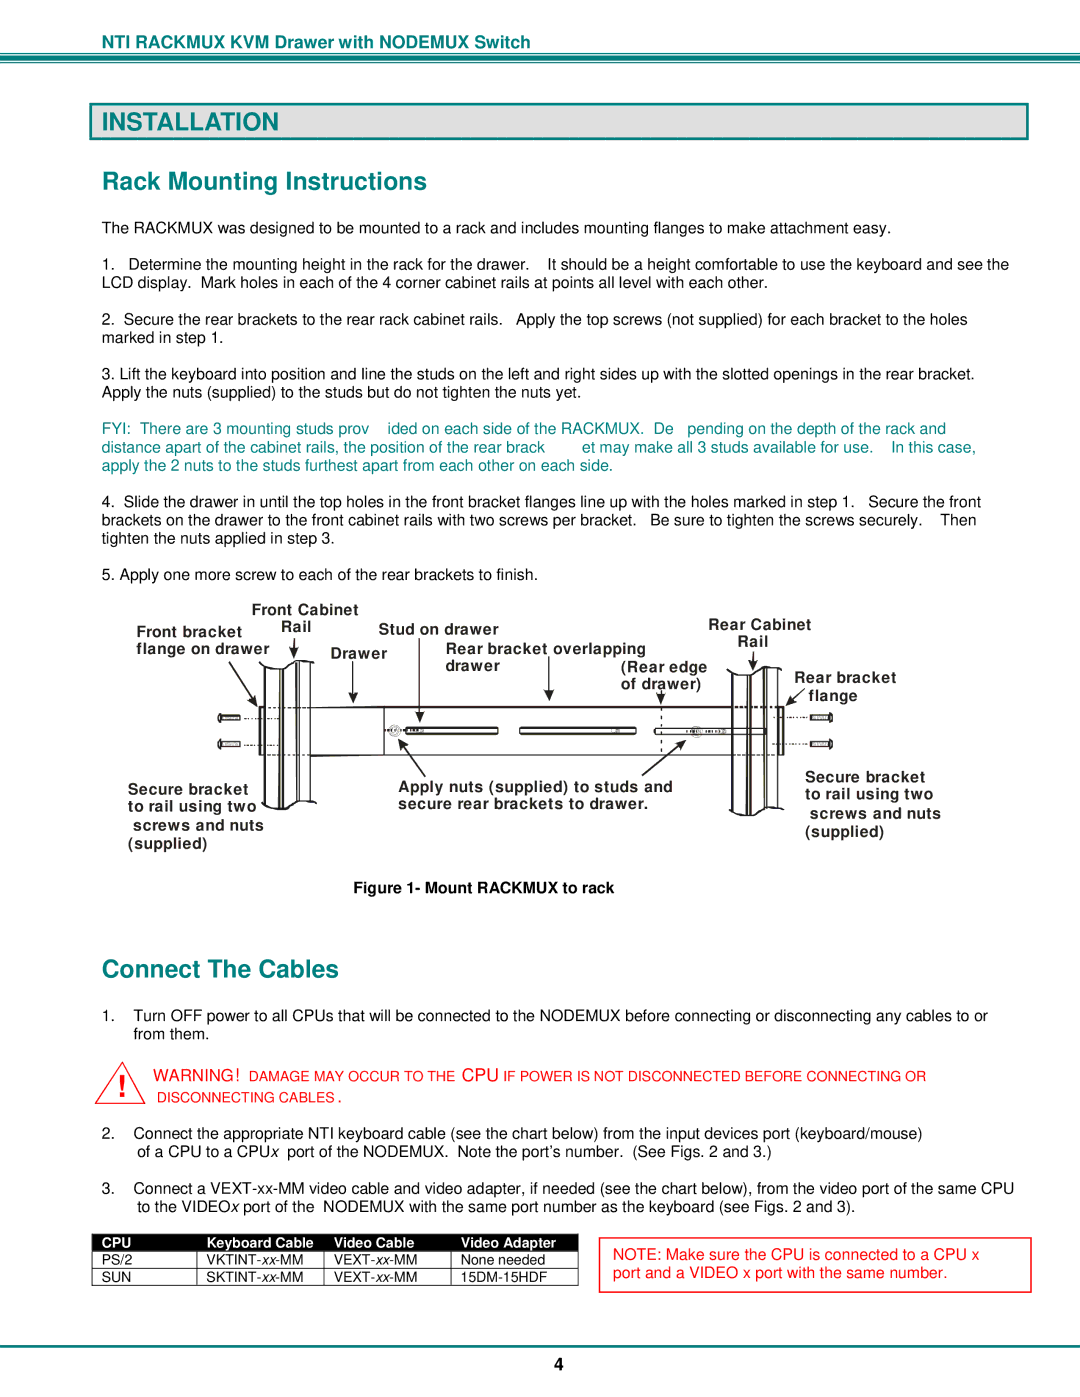
1.Determine the mounting height in the rack for the drawer. It should be a height comfortable to use the keyboard and see the LCD display. Mark holes in each of the 4 corner cabinet rails at points all level with each other.

2.Secure the rear brackets to the rear rack cabinet rails. Apply the top screws (not supplied) for each bracket to the holes marked in step 1.

3.Lift the keyboard into position and line the studs on the left and right sides up with the slotted openings in the rear bracket. Apply the nuts (supplied) to the studs but do not tighten the nuts yet.

FYI: There are 3 mounting studs provided on each side of the RACKMUX. Depending on the depth of the rack and distance apart of the cabinet rails, the position of the rear bracket may make all 3 studs available for use. In this case, apply the 2 nuts to the studs furthest apart from each other on each side.

4.Slide the drawer in until the top holes in the front bracket flanges line up with the holes marked in step 1. Secure the front brackets on the drawer to the front cabinet rails with two screws per bracket. Be sure to tighten the screws securely. Then tighten the nuts applied in step 3.

5.Apply one more screw to each of the rear brackets to finish.


Front Cabinet


Front bracket

Rail


Stud on drawer


flange on drawer

Drawer

Rear bracket

overlapping


drawer

(Rear edge


of drawer)


Secure bracket

Apply nuts (supplied) to studs and

to rail using two

secure rear brackets to drawer.

screws and nuts (supplied)

Rear Cabinet

Rail

Rear bracket flange

Secure bracket to rail using two screws and nuts (supplied)

Figure 1- Mount RACKMUX to rack

Connect The Cables

1.Turn OFF power to all CPUs that will be connected to the NODEMUX before connecting or disconnecting any cables to or from them.

!WARNING! DAMAGE MAY OCCUR TO THE CPU IF POWER IS NOT DISCONNECTED BEFORE CONNECTING OR DISCONNECTING CABLES.

2.Connect the appropriate NTI keyboard cable (see the chart below) from the input devices port (keyboard/mouse)

of a CPU to a CPUx port of the NODEMUX. Note the port’s number. (See Figs. 2 and 3.)

3.Connect a VEXT-xx-MM video cable and video adapter, if needed (see the chart below), from the video port of the same CPU to the VIDEOx port of the NODEMUX with the same port number as the keyboard (see Figs. 2 and 3).

CPU

Keyboard Cable

Video Cable

Video Adapter

PS/2

VKTINT-xx-MM

VEXT-xx-MM

None needed

SUN

SKTINT-xx-MM

VEXT-xx-MM

15DM-15HDF

NOTE: Make sure the CPU is connected to a CPU x port and a VIDEO x port with the same number.

4

Page 8
Image 8
Network Technologies RACKMUX-V15-8UNV, RACKMUX-V15-4UNV Installation, Rack Mounting Instructions, Connect The Cables

RACKMUX-V17-4UNV, RACKMUX-V17-8UNV, RACKMUX-V15-8UNV, RACKMUX-V15-4UNV specifications

Network technologies have seen significant advancements to meet the increasing demand for efficient data management and distribution. Among the prominent solutions in this arena are the RACKMUX-V15-4UNV, RACKMUX-V15-8UNV, RACKMUX-V17-8UNV, and RACKMUX-V17-4UNV. These devices play a critical role in modern networking by providing robust matrix switching capabilities that can accommodate various needs across different environments.

The RACKMUX-V15-4UNV is designed for compact networking setups. This unit features four universal inputs, allowing for seamless integration with multiple devices. Its compact 1U design makes it particularly suitable for environments where space is at a premium, such as data centers and server rooms. The technology supports high-bandwidth data throughput, ensuring fast and efficient data transfers. Moreover, it offers easy monitoring and control through an intuitive user interface, simplifying management for network operators.

Moving to the RACKMUX-V15-8UNV, this model expands upon its predecessor by supporting up to eight universal inputs. It's ideal for larger networking scenarios, providing greater flexibility and scalability. The device comes equipped with advanced signal processing capabilities, enabling it to handle diverse formats without compromising on performance. It also features hot-swappable architecture, ensuring that operators can replace or upgrade components without affecting system uptime.

The RACKMUX-V17-4UNV introduces enhanced functionality with its four universal inputs, incorporating cutting-edge technology for an even more efficient switching process. The key distinguishing feature of the V17 line is its improved power management system, allowing for reduced energy consumption without sacrificing performance. This model is aimed at eco-conscious organizations seeking to lower their carbon footprint while still maintaining high-quality network performance.

Lastly, the RACKMUX-V17-8UNV raises the bar further by providing eight universal inputs alongside advanced features that optimize operational capabilities. This model utilizes the latest in networking protocols, ensuring compatibility with various emerging technologies. Its robust build quality also ensures reliability, reducing maintenance needs and increasing longevity.

Each of these devices reflects the growing need for adaptable and efficient network technologies. Their main features, including universal input support, enhanced signal processing, compact designs, and energy management, make the RACKMUX ranges an excellent choice for organizations looking to optimize their network infrastructure. With ongoing advancements, these models will continue to adapt to the evolving landscape of network technology, offering robust, reliable solutions for years to come.