User’s Manual
Trademark Information
Page
Handle the camera strap with care
For Your Safety
Turn off in the event of malfunction
Do not disassemble
Do not immerse in or expose to water
For Your Safety
Observe caution when handling batteries
Iii
CD-ROMs
Observe caution when using the flash
Use appropriate cables
Handle moving parts with care
Interface Cables
Federal Communications
Interference Statement
Modifications
Symbol for Separate Collection in European Countries
Table of Contents
Viii
Table of Contents
Table of Contents
100
About This Manual
Before Taking Important Pictures
Information and Precautions
Use Only Nikon Brand Electronic Accessories
Life-Long Learning
Disposing of Data Storage Devices
Information and Precautions
Lens cover closed
Parts of the Camera
Camera Body
Coolpix L22 Front View
Tripod socket
Battery-chamber
Parts of the Camera
Coolpix L21 Front View
Coolpix L21 Rear View
After a few seconds a
Actual display varies with current camera settings
Monitor
Shooting
111
Playback
Current frame number
106
Shooting-mode Selection Menu
Ashooting mode button
Basic Operations
Cplayback button
For the Menu Screen
Multi Selector
For Shooting
For Playback
Button
Switching Between Tabs
Attaching the Camera Strap
Help Displays
About the Shutter-release Button
Turning On and Off the Camera
Inserting the Batteries
Applicable Batteries
Auto Power Off in Shooting Mode Standby Mode
Additional Precautions Regarding Batteries
Battery Type
Alternative Power Sources
Daylight Saving Time
Setting Display Language, Date and Time
Press the power switch to turn on the camera
Choose Yes and press k
Year are displayed and press k or K
When Easy auto mode is displayed, press k
Change the date and time
Choose the order in which the day, month
Inserting Memory Cards
Inserting Memory Cards
Insert the memory card
Formatting Memory Cards
Write Protect Switch
Removing Memory Cards
Inserting Memory Cards
Number of Exposures Remaining
Check the battery level and number of exposures remaining
Battery level indicator
Press k
Motion Detection
Indicators Displayed in GEasy auto Mode
Turn the Camera On and Select GEasy Auto Mode
Available functions in easy auto mode
Frame the picture
Frame a Picture
Ready the camera
Digital Zoom and Interpolation
Using the Zoom
Digital Zoom
Frame a Picture
Press the shutter-release button halfway
When a face is detected
When no faces are detected
Focus and Shoot
Did someone blink? Screen
Focus and Shoot
During Recording
Autofocus performance
Deleting Pictures
Viewing Pictures Playback Mode
Press a to switch to shooting mode
Viewing and Deleting Pictures
Viewing Pictures
Playback Mode
Power on by Pressing c
Deleting the Last Picture Taken While in Shooting Mode
Automatic Scene Selection
Easy auto mode
Frame the subject and shoot
Shooting in the Auto Mode
Press Ato display the shooting-mode selection menu
Press the multi selector Hor Ito choose a and press k
Press the multi selector Hor Ito select a mode and press k
Using the Flash
Setting the Flash Mode
Press mflash mode on the multi selector
Flash Lamp
Using the Flash
Shooting When Lighting Is Poor and the Flash Is Disabled W
Flash Mode Setting
Press the shutter-release button Rest of the way down
Taking Pictures with the Self-timer
Press nself-timer on the multi selector
Press the multi selector Hor Ito select on and press k
Rotate the zoom control to move to the wide zoom position
Macro Mode
Press p macro mode on the multi selector
Macro Mode Setting
Press the shutter-release button to shoot
Using Exposure Compensation
Exposure Compensation
Press o exposure compensation on the multi selector
Image Mode
Using the Scene Mode
Setting the Scene Mode
Off
Features
Using the Scene Mode
Landscape Use this mode for vivid landscapes and cityscapes
Off*2
Sports
While the shutter-release button is held down, the L22
ENight portrait
Beach/snow
For those scene modes with O, use of a tripod is recommended
Other settings can be selected Shooting Suited for the Scene
Museum
MFireworks show
Using the Scene Mode
Adjusting Hues When Using Food Mode
Taking Pictures for Food Mode
Press the multi selector Hor Ito adjust Color if necessary
Use this mode when taking pictures of food
Taking Pictures for a Panorama
More Information
Press kwhen shooting is completed
Panorama Assist
Panorama Maker
Shutter is automatically released
Using Smart Portrait Mode
Press Ato exit smart portrait mode
Functions Available in Smart Portrait Mode
Using Smart Portrait Mode
Face Detection and Smiling Face Detection features
Auto Off Standby Mode When Using Smart Portrait Mode
Viewing Multiple Pictures Thumbnail Playback
Thumbnail Playback Mode Display
Use Description Choose date
Calendar Display
Viewing Multiple Pictures Thumbnail Playback
Calendar display
Use Description Zoom Rotate the zoom control to g
Pictures taken using face detection
Monitor Switch to shooting Press a Mode
Taking a Closer Look Playback Zoom
Original Pictures and Edited Copies
Editing Pictures
Restrictions on Picture Editing
Choose OK and press k
Enhancing Brightness and Contrast D-Lighting
Use the multi selector to choose
ID-Lighting and press k
Copy is displayed with a gray frame
Resizing Pictures Small Picture
Use the multi selector to choose gSmall picture and press k
Choose the desired copy size and press k
About the size of the original image
Creating a Cropped Copy Crop
Refine copy composition
Press d Use the multi selector to select Yes and press k
While the Camera is Saving Movies
Options Available When Shooting Movies
Recording Movies
Recording Movies
Movie Options and Maximum Movie Length
Movie Menu
DSelecting Movie Options
Displaying the Movie Menu
Deleting Movie Files
Full-frame playback mode a 26, movies are
Movie, display it in full-frame playback mode Press k
Movie Playback
Hold down cto turn on the camera
Connecting to a TV
Turn off the camera
Tune the television to the video channel
Compatible Operating Systems
Connecting to a Computer
Before Connecting the Camera
Install the Software
Turn on the camera
Connecting to a Computer
Connecting the USB Cable
Transferring Pictures from a Camera to a Computer
Button
Start Nikon Transfer installed on the computer
Windows
Source device Start Transfer
Starting Nikon Transfer or ViewNX Manually
Disconnecting the camera
Using a Card Reader
Viewing Nikon Transfer and ViewNX Help Information
Panorama Creation with Panorama Maker
Image File Names and Folder Names
Turn camera off and disconnect USB cable
Connecting to a Printer
Printing Pictures
TimeA Print multiple pictures A67
Turn on the printer. Check printer settings
Connecting the Camera and Printer
Connecting to a Printer
Connecting the Audio Video/USB Cable
Printing Pictures One at a Time
Printing starts
When the print selection screen is displayed, press d
Printing Multiple Pictures
Choose Start print and press k
Print menu
Choose Print selection, Print all images or
Dpof printing and press k
Print selection
Again
Paper Size
Images and press k. To print pictures, press
Choose Select images and press k
Press din playback mode
Creating a Dpof Print Order Print Set
Use the multi selector to choose Print set
Date Imprint
Creating a Dpof Print Order Print Set
Deleting All Print Orders
Shooting Options The Shooting Menu
Camera settings that cannot be applied at the same time
Shooting Options The Shooting Menu
Displaying the Shooting Menu
AImage mode
Number of Exposures Remaining
White Balance
Set AAuto mode a 29 M dshooting menu MB White Balance
BWhite Balance
Choose Measure
Preset Manual
BPreset manual , then press k
Multi selector to set White balance to
Multi-shot
Change settings to Continuous or BSS best shot selector
Set AAuto mode a 29 M dshooting menu MCContinuous
Continuous
Make colors more vivid or record pictures in monochrome
Set AAuto mode a 29 M dshooting menu MFColor Options
FColor Options
Or Cyanotype, the White balance
Camera Settings that Cannot Be Set at the Same Time
When using Multi-shot 16, Image
Motion detection is not enabled
Slide show Delete
Following functions are available in playback mode
Playback Options The Playback Menu
Displaying the Playback Menu
To fix the selection of pictures, press k
Selecting Multiple Pictures
Press the multi selector Jor Kto choose the desired picture
Press H or Ito select on or OFF or the number of copies
Choose End or Restart
BSlide Show
Use the multi selector to choose Start
Slide show begins
Delete selected pictures or all pictures
Press cplayback mode Md playback menu McDelete
Delete
Setup menu contains the following settings
Basic Camera Setup The Setup Menu
Press H or Ito select the ztab
Displaying the Setup Menu
Press dto display the menu screen
Press the multi selector Jto enter the menu
Select the method for displaying menus
Press dM zsetup menu a 86 MaMenus
Menus
Press K or k
CWelcome Screen
Press dM zsetup menu a 86 McWelcome screen
Choose xTravel destination and press k
Setting Travel Destination Time Zone
Date
Use the multi selector to choose Time zone and press k
Imprinting the date on pictures
Clock Battery
WHome Time Zone
UTC
Time Zones
Press dM zsetup menu a 86 MeMonitor settings
EMonitor Settings
Following settings are available
Info
Photo Info
Date Imprint and Print Set
Press dM zsetup menu a 86 MfDate imprint
FDate Imprint
WElectronic VR
Press the d button M zSetup menu a 85 M wElectronic VR
UMotion detection
Press dM zsetup menu a 86 MUMotion detection
Off Motion detection is not enabled
HAF Assist
Change settings for AF-assist illumination
Press dM zsetup menu a 86 MhAF assist
When using Continuous, BSS, or Multi-shot
ISound Settings
Adjust the following sound settings
KAuto Off
Canceling standby mode
Press dM zsetup menu a 86 MkAuto off
Sleep Mode
Formatting a Memory Card
Press dM zsetup menu a 86 MlFormat memory/mFormat card
Format Memory/mFormat Card
Formatting internal memory
Select the language used for camera monitor display
OVideo Mode
Language
101
Portrait a 36 and Night portrait a 37 scene modes
DBlink Warning
Operating the Did someone blink? Screen
102
103
PReset All
Others
Setup Menu
Option Default value Paper size A66
104
105
SBattery Type
Press dM zsetup menu a 86 MsBattery type
106
Press dM zsetup menu a 86 MdProtect
Protect
107
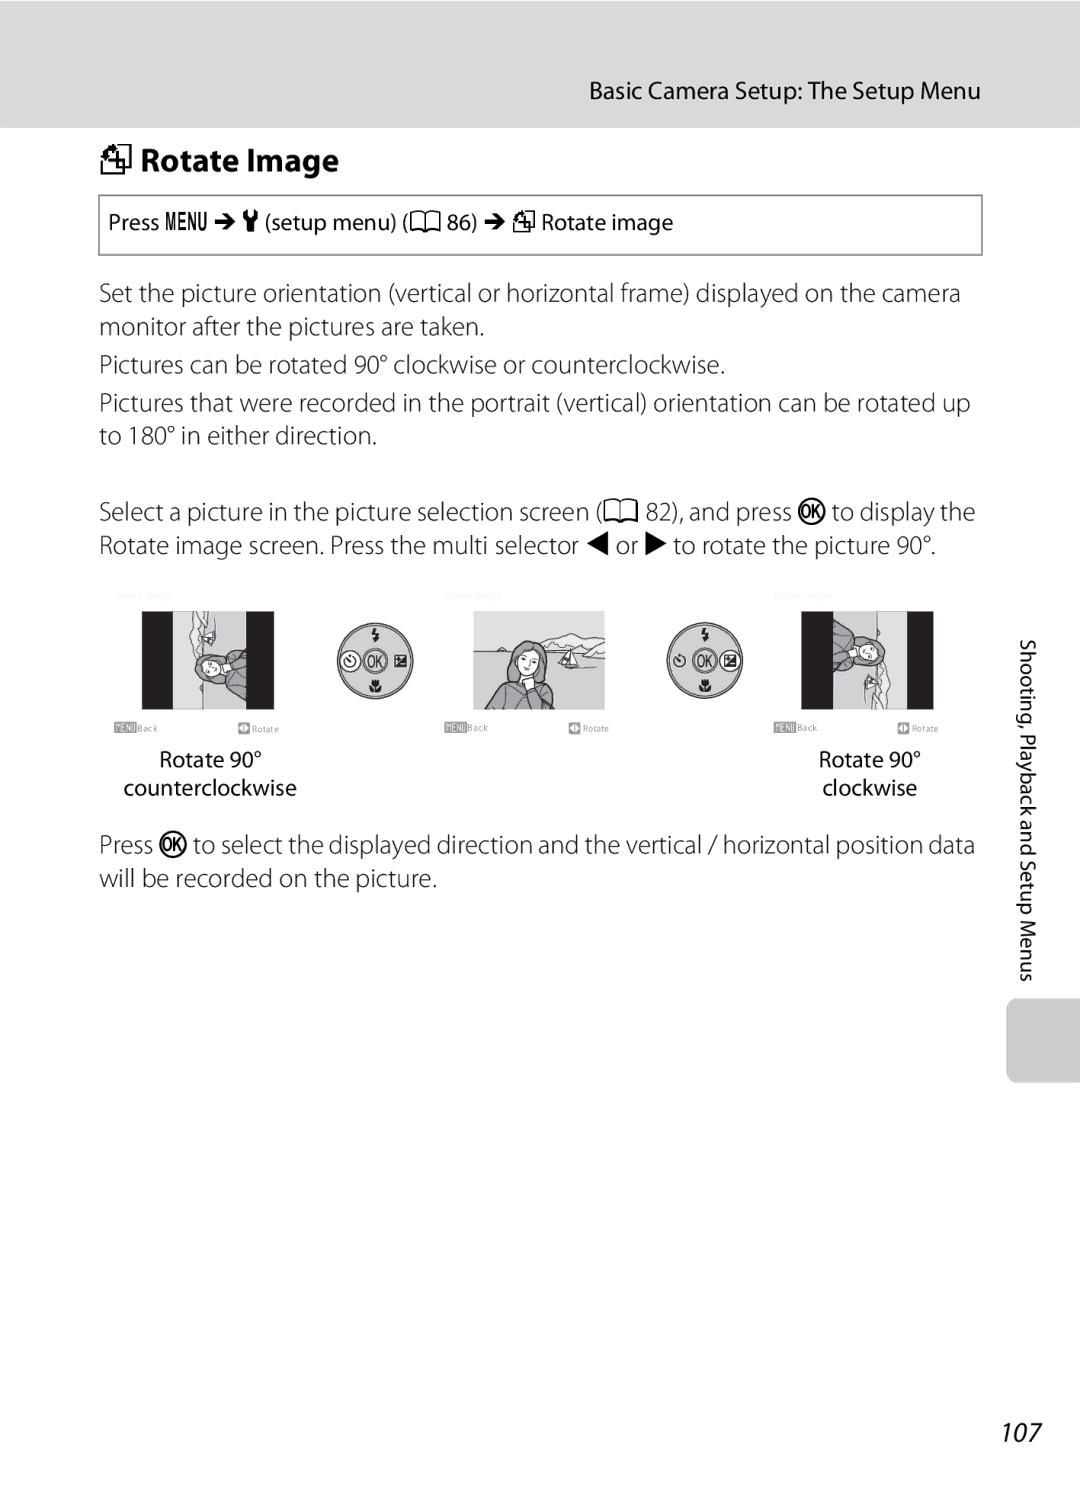
Press dM zsetup menu a 86 MfRotate image
FRotate Image
Choose the copy option and press k
Select an option from the copy screen using
Copy
Multi selector and press k
View the current camera firmware version
Press dM zsetup menu a 86 MrFirmware version
RFirmware Version
109
Contact the manufacturer for details on the above cards
Optional Accessories
Approved Memory Cards
110
DSCN0001 . JPG
Image File and Folder Names
111
Pictures and movies are assigned file names as follows
112
Caring for the Camera
Caring for the Camera
Battery
113
Do not use alcohol, thinner, or other volatile chemicals
Cleaning
114
115
Storage
116
Error Messages
P3968×2232 for L22 P3200×1800 for
Error Messages
117
118
119
Troubleshooting
Display, Settings and Power Supply
Continuous or Multi-shot 16 or BSS is
Troubleshooting
120
Electronically Controlled Cameras
Shot 16 is selected for Continuous
121
P3968×2232 for L22 and P3200×1800
122
123
Nikon Coolpix L22/COOLPIX L21 Digital Camera
Specifications
124
125
Specifications
126
127
Specifications
128
Supported Standards
129
Symbols
Index
130
Vivid color
Volume Welcome screen White balance Zoom button 4, 6
131
132
133
134
Page
CT9L0211