Power SW with LED (1)
Turns the apparatus on and off. Press this SW, the power LED inside the SW will turn on.
 Dial Control knob (5)
Used to change editable values.
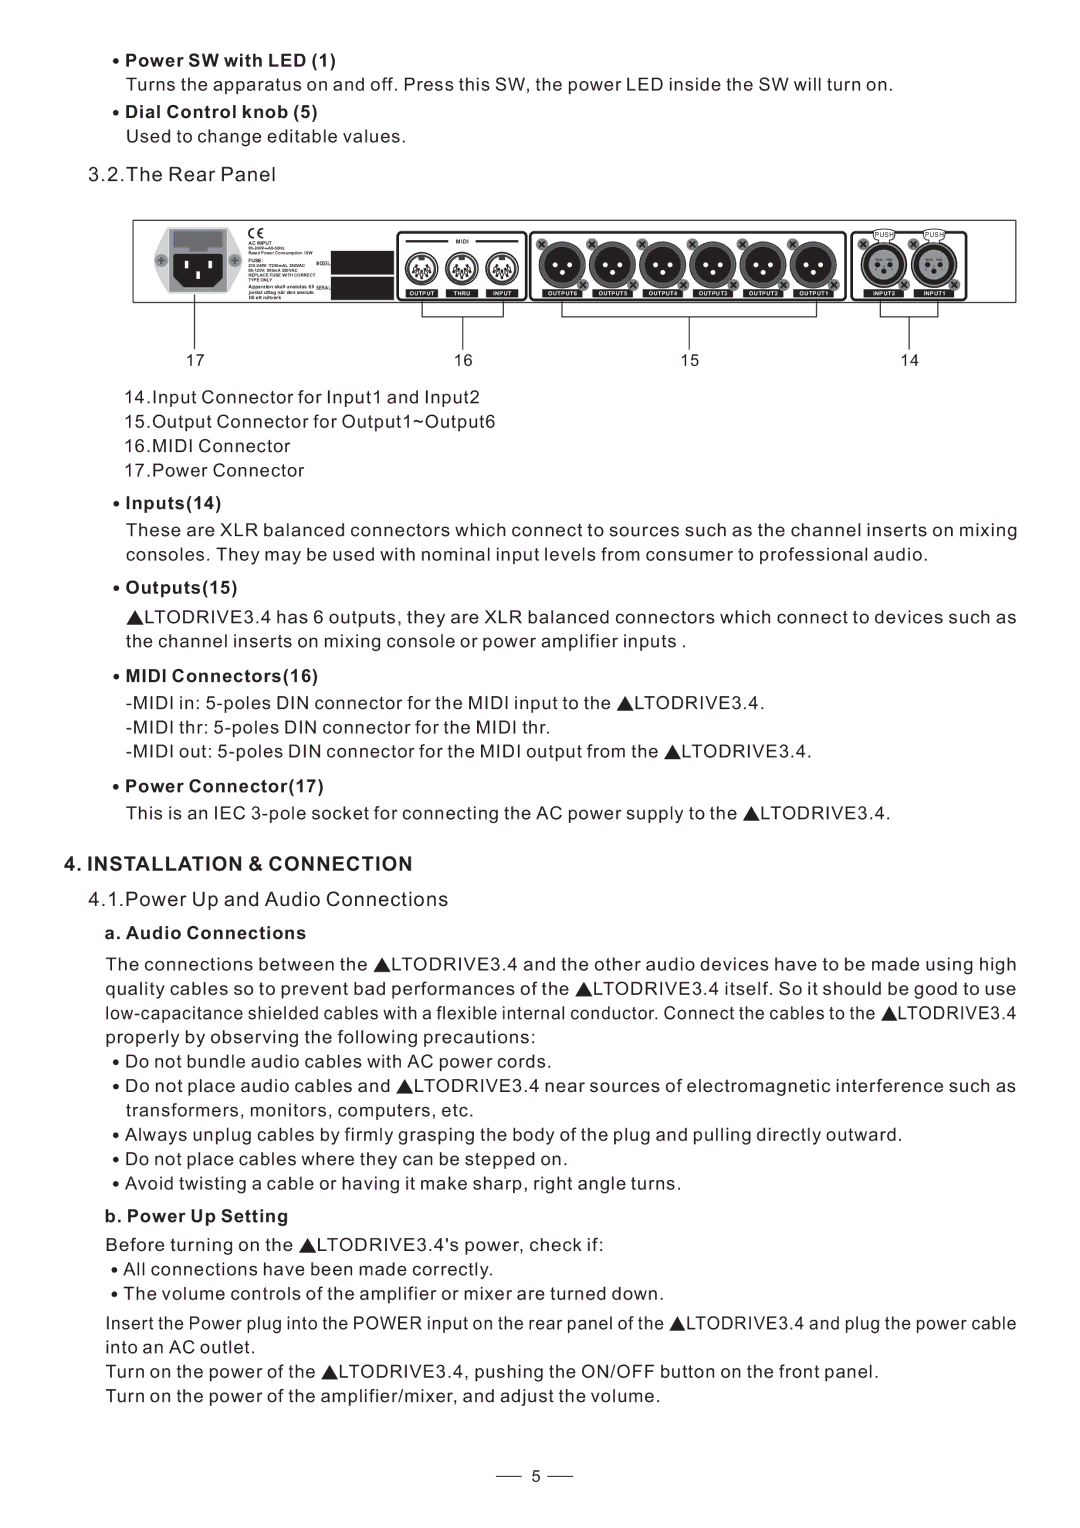
3.2.The Rear Panel
AC INPUT
![]() 60-50Hz
60-50Hz
Rated Power Consumption 15W
FUSE:
REPLACE FUSE WITH CORRECT TYPE ONLY
Apparaten skall anslutas till jordat uttag nar den ansluts till ett natverk
MODEL
SERIAL
|
|
|
|
|
|
|
|
| PUSH | PUSH | ||
| MIDI |
|
|
|
|
|
|
|
|
|
|
|
|
|
|
|
|
|
|
|
| NEW | TIDE | NEW | TIDE |
|
|
|
|
|
|
|
|
|
| 3 |
| 3 |
|
|
|
|
|
|
|
|
| 2 | 1 | 2 | 1 |
OUTPUT | THRU | INPUT | OUTPUT6 | OUTPUT5 | OUTPUT4 | OUTPUT3 | OUTPUT2 | OUTPUT1 | INPUT2 | INPUT1 | ||
17 | 16 | 15 | 14 |
14.Input Connector for Input1 and Input2 15.Output Connector for Output1~Output6 16.MIDI Connector
17.Power Connector
 Inputs(14)
These are XLR balanced connectors which connect to sources such as the channel inserts on mixing consoles. They may be used with nominal input levels from consumer to professional audio.
 Outputs(15)
![]() LTODRIVE3.4 has 6 outputs, they are XLR balanced connectors which connect to devices such as the channel inserts on mixing console or power amplifier inputs .
LTODRIVE3.4 has 6 outputs, they are XLR balanced connectors which connect to devices such as the channel inserts on mixing console or power amplifier inputs .
 MIDI Connectors(16)
![]() LTODRIVE3.4.
LTODRIVE3.4.
![]() LTODRIVE3.4.
LTODRIVE3.4.
 Power Connector(17)
This is an IEC ![]() LTODRIVE3.4.
LTODRIVE3.4.
4.INSTALLATION & CONNECTION 4.1.Power Up and Audio Connections
a. Audio Connections
The connections between the ![]() LTODRIVE3.4 and the other audio devices have to be made using high quality cables so to prevent bad performances of the
LTODRIVE3.4 and the other audio devices have to be made using high quality cables so to prevent bad performances of the ![]() LTODRIVE3.4 itself. So it should be good to use
LTODRIVE3.4 itself. So it should be good to use ![]() LTODRIVE3.4 properly by observing the following precautions:
LTODRIVE3.4 properly by observing the following precautions:
![]() Do not bundle audio cables with AC power cords.
Do not bundle audio cables with AC power cords.
![]() Do not place audio cables and
Do not place audio cables and ![]() LTODRIVE3.4 near sources of electromagnetic interference such as transformers, monitors, computers, etc.
LTODRIVE3.4 near sources of electromagnetic interference such as transformers, monitors, computers, etc.
![]() Always unplug cables by firmly grasping the body of the plug and pulling directly outward.
Always unplug cables by firmly grasping the body of the plug and pulling directly outward.
![]() Do not place cables where they can be stepped on.
Do not place cables where they can be stepped on.
![]() Avoid twisting a cable or having it make sharp, right angle turns.
Avoid twisting a cable or having it make sharp, right angle turns.
b. Power Up Setting
Before turning on the ![]() LTODRIVE3.4's power, check if:
LTODRIVE3.4's power, check if:
![]() All connections have been made correctly.
All connections have been made correctly.
![]() The volume controls of the amplifier or mixer are turned down.
The volume controls of the amplifier or mixer are turned down.
Insert the Power plug into the POWER input on the rear panel of the ![]() LTODRIVE3.4 and plug the power cable into an AC outlet.
LTODRIVE3.4 and plug the power cable into an AC outlet.
Turn on the power of the ![]() LTODRIVE3.4, pushing the ON/OFF button on the front panel. Turn on the power of the amplifier/mixer, and adjust the volume.
LTODRIVE3.4, pushing the ON/OFF button on the front panel. Turn on the power of the amplifier/mixer, and adjust the volume.
5