HOW TO LOWER THE TREADMILL FOR USE
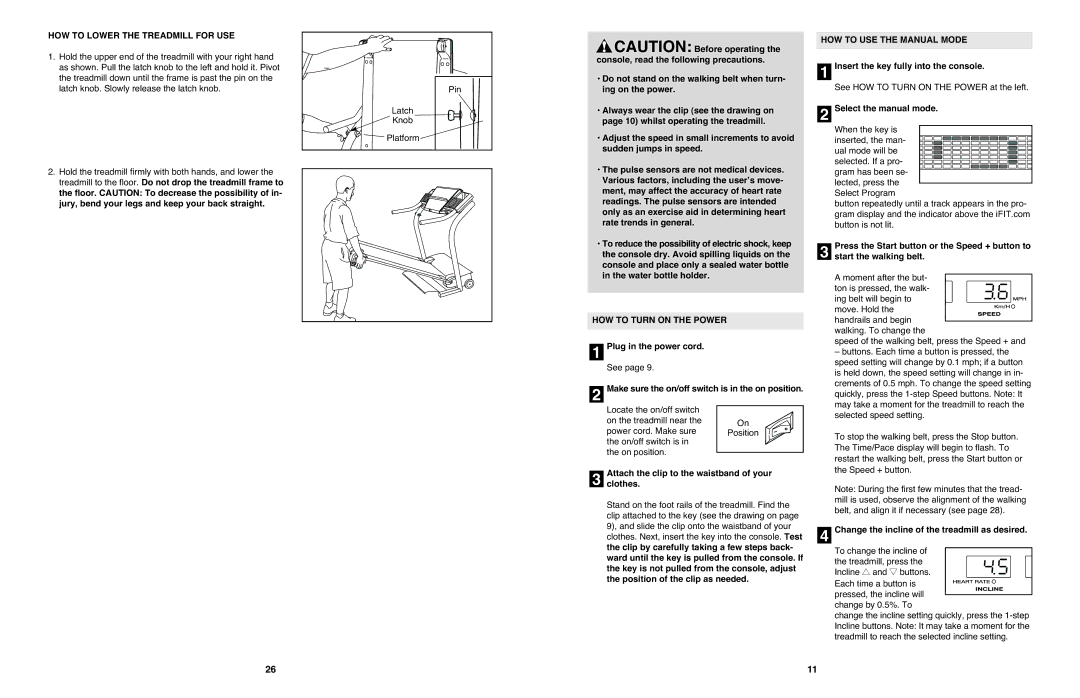
1.Hold the upper end of the treadmill with your right hand as shown. Pull the latch knob to the left and hold it. Pivot the treadmill down until the frame is past the pin on the latch knob. Slowly release the latch knob.
2.Hold the treadmill firmly with both hands, and lower the treadmill to the floor. Do not drop the treadmill frame to the floor. CAUTION: To decrease the possibility of in- jury, bend your legs and keep your back straight.
Pin |
Latch |
Knob |
Platform |
![]() CAUTION: Before operating the console, read the following precautions.
CAUTION: Before operating the console, read the following precautions.
•Do not stand on the walking belt when turn- ing on the power.
•Always wear the clip (see the drawing on page 10) whilst operating the treadmill.
•Adjust the speed in small increments to avoid sudden jumps in speed.
•The pulse sensors are not medical devices. Various factors, including the user’s move- ment, may affect the accuracy of heart rate readings. The pulse sensors are intended only as an exercise aid in determining heart rate trends in general.
•To reduce the possibility of electric shock, keep the console dry. Avoid spilling liquids on the console and place only a sealed water bottle in the water bottle holder.
HOW TO TURN ON THE POWER
1Plug in the power cord. See page 9.
2Make sure the on/off switch is in the on position.
Locate the on/off switch |
|
|
|
on the treadmill near the |
|
|
|
| On |
| |
power cord. Make sure |
|
| |
| Position |
| |
the on/off switch is in |
|
|
|
|
|
| |
the on position. |
|
|
|
|
|
|
Attach the clip to the waistband of your
3clothes.
Stand on the foot rails of the treadmill. Find the clip attached to the key (see the drawing on page 9), and slide the clip onto the waistband of your clothes. Next, insert the key into the console. Test the clip by carefully taking a few steps back- ward until the key is pulled from the console. If the key is not pulled from the console, adjust the position of the clip as needed.
HOW TO USE THE MANUAL MODE
1Insert the key fully into the console.
See HOW TO TURN ON THE POWER at the left.
2Select the manual mode.
When the key is
inserted, the man- ual mode will be selected. If a pro- gram has been se-
lected, press the Select Program
button repeatedly until a track appears in the pro- gram display and the indicator above the iFIT.com button is not lit.
Press the Start button or the Speed + button to
3start the walking belt.
A moment after the but-
ton is pressed, the walk-
ing belt will begin to move. Hold the handrails and begin walking. To change the
speed of the walking belt, press the Speed + and
–buttons. Each time a button is pressed, the speed setting will change by 0.1 mph; if a button is held down, the speed setting will change in in- crements of 0.5 mph. To change the speed setting quickly, press the
To stop the walking belt, press the Stop button. The Time/Pace display will begin to flash. To restart the walking belt, press the Start button or the Speed + button.
Note: During the first few minutes that the tread- mill is used, observe the alignment of the walking belt, and align it if necessary (see page 28).
4Change the incline of the treadmill as desired.
To change the incline of
the treadmill, press the Incline ▲▲ and ▼▼ buttons. Each time a button is pressed, the incline will change by 0.5%. To
change the incline setting quickly, press the
26 | 11 |