interval settings are available: 30 minutes, 60 minutes, and 90 minutes. Time setting selection is dependent on the climate where the unit is being installed.
Example 1. Dry climate of Southern Arizona. A 90 minute setting is recommended.
Example 2. Moist climate of Seattle, Washington. A 30 minute setting is recommended.
To set the cycle timer, place the timing pin on the defrost control board to the desired time interval post.
Note: All units are shipped from the factory with the default time setting of 30 minutes.
START UP AND SYSTEM CHECK
Pre-Start Check List
•Verify that the unit is level to allow proper condensate drainage.
•Verify that there is free airflow to and from the outdoor coil and that all clearance requirements are met.
•Verify that the duct work is sealed to prevent air leakage.
•Verify that the line voltage power leads are securely connected and the unit is properly grounded.
•Verify that the low voltage wires are securely connected to the correct leads on the low voltage terminal strip.
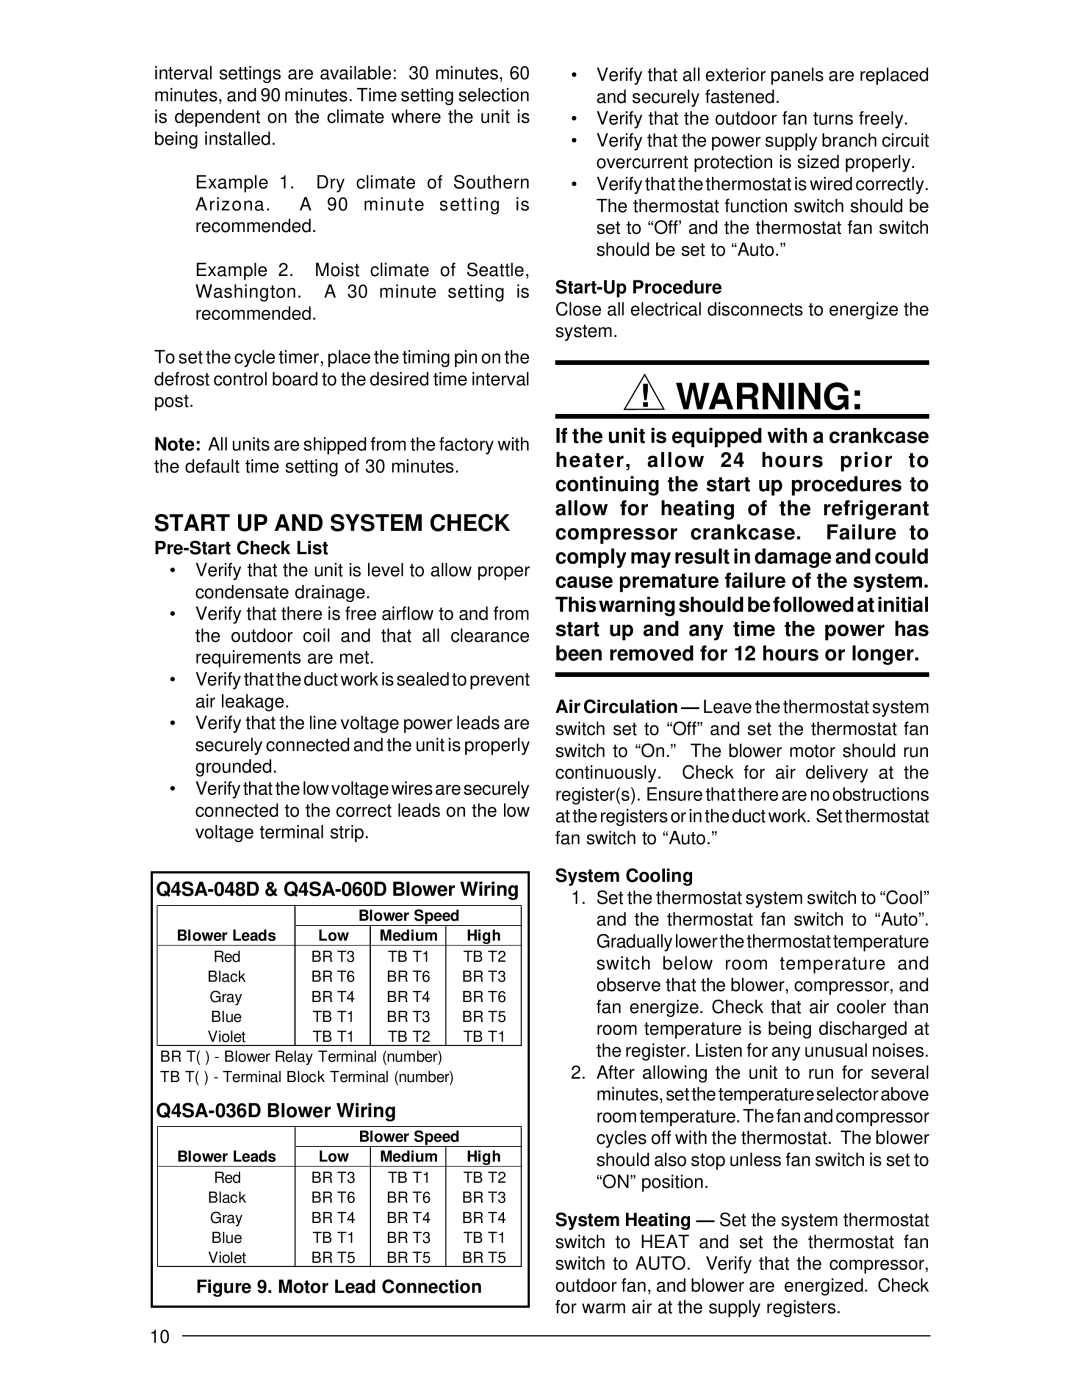
Q4SA-048D & Q4SA-060D Blower Wiring
|
| Blower Speed |
| ||
Blower Leads | Low |
| Medium |
| High |
Red | BR T3 |
| TB T1 |
| TB T2 |
Black | BR T6 |
| BR T6 |
| BR T3 |
Gray | BR T4 |
| BR T4 |
| BR T6 |
Blue | TB T1 |
| BR T3 |
| BR T5 |
Violet | TB T1 |
| TB T2 |
| TB T1 |
BR T( ) - Blower Relay Terminal (number) TB T( ) - Terminal Block Terminal (number)
Q4SA-036D Blower Wiring
|
| Blower Speed |
| ||
Blower Leads | Low |
| Medium |
| High |
Red | BR T3 |
| TB T1 |
| TB T2 |
Black | BR T6 |
| BR T6 |
| BR T3 |
Gray | BR T4 |
| BR T4 |
| BR T4 |
Blue | TB T1 |
| BR T3 |
| TB T1 |
Violet | BR T5 |
| BR T5 |
| BR T5 |
Figure 9. Motor Lead Connection
•Verify that all exterior panels are replaced and securely fastened.
•Verify that the outdoor fan turns freely.
•Verify that the power supply branch circuit overcurrent protection is sized properly.
•Verify that the thermostat is wired correctly. The thermostat function switch should be set to “Off’ and the thermostat fan switch should be set to “Auto.”
Start-Up Procedure
Close all electrical disconnects to energize the system.
!WARNING:
If the unit is equipped with a crankcase heater, allow 24 hours prior to continuing the start up procedures to allow for heating of the refrigerant compressor crankcase. Failure to comply may result in damage and could cause premature failure of the system. This warning should be followed at initial start up and any time the power has been removed for 12 hours or longer.
Air Circulation — Leave the thermostat system switch set to “Off” and set the thermostat fan switch to “On.” The blower motor should run continuously. Check for air delivery at the register(s). Ensure that there are no obstructions at the registers or in the duct work. Set thermostat fan switch to “Auto.”
System Cooling
1.Set the thermostat system switch to “Cool” and the thermostat fan switch to “Auto”. Gradually lower the thermostat temperature switch below room temperature and observe that the blower, compressor, and fan energize. Check that air cooler than room temperature is being discharged at the register. Listen for any unusual noises.
2.After allowing the unit to run for several minutes, set the temperature selector above room temperature. The fan and compressor cycles off with the thermostat. The blower should also stop unless fan switch is set to “ON” position.
System Heating — Set the system thermostat switch to HEAT and set the thermostat fan switch to AUTO. Verify that the compressor, outdoor fan, and blower are energized. Check for warm air at the supply registers.
10